Temporarily unavailable.
I was wondering how to do this. Thank you!
3 Likes
thank you @Jules I am learning alot from you… 
3 Likes
That is a great tutorial. The effects in the video work well with the video. I am learning a ton from you, although my favorite tutorial ( so far ) , is Laser Design Basics. Thank you so much for all that you do. 
4 Likes
If you wanted to take the spots on the wings and engrave those total areas, not just the lines or the cuts, would you have to fill those spaces with a color and designate that color as ‘engrave’, then? Is there any other way to select their outlines and have the spaces enclosed by those outlines engraved rather than just etching the lines?
1 Like
You fill the shape with color, and remove the stroke color. That will specify it as an engrave to the Glowforge interface.
2 Likes
Or make the shapes a different stroke color and tell the GFUI to engrave it.
2 Likes
There you go again. This may be pushing the threshold on my artistic talents (or lack thereof). I guess I will learn a lot when I get started.
Now I’m hoping I won’t need to get extra laser safety equipment for the cats.
2 Likes
Filling the shapes and turning off the strokes removes all confusion for the interface. Trying to convert a stroke to an engrave in the interface itself can be an iffy proposition. If the paths aren’t completely closed, you can get strange results.
(It’s just the most certain way to ensure you are getting the engrave you want.)
5 Likes
Yeah, but then I have to retool a design for a different machine.
Yeah I know, First World Problem ![]()
5 Likes
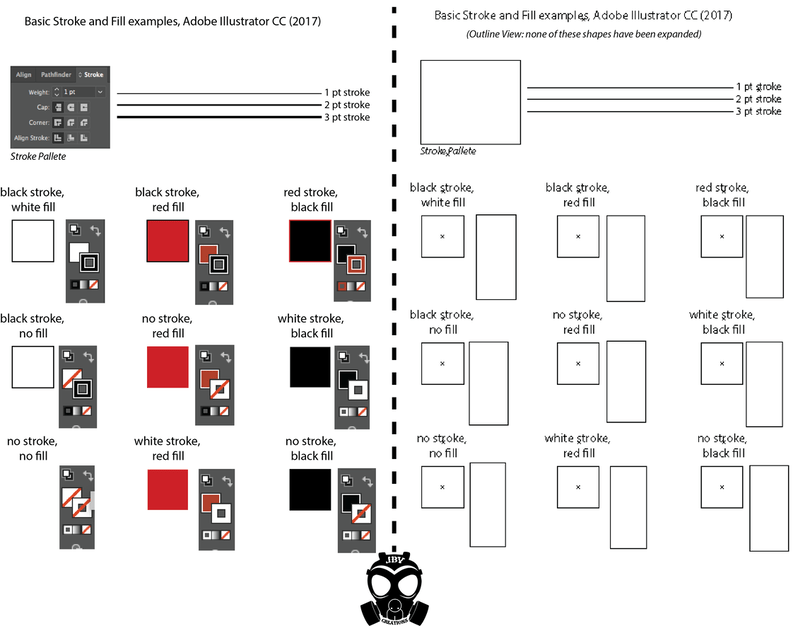
quick question. I’m trying to understand what is meant by Fill and Stroke.
Am I correct when I make the following “translation” in my head?
Fill = color fill, as in the little bucket in most editing software that fills an enclosed shape with a specific color.
Stroke = the outline of a given shape or design. The thin line that defines a boundary.
So when you say “Filling the shapes and turning off the strokes” you are saying that we should fill the shape with color, and then once that has been completed, get rid of the outline of that shape? I’m not quite sure how to do that since every editing software I know will delete the interior color as well if the outline is deleted.
3 Likes
Sorry, that was poorly worded…what I mean by getting rid of the stroke is just removing the stroke color.
You are correct, you can’t actually get rid of the stroke, it’s what defines the shape. But if you assign no color to the stroke, it effectively becomes invisible to the Glowforge interface, and all the interface will see is the Fill color that you want to engrave.
Everything in the GF interface keys off of color.
Fill colors are Engraved.
Stroke colors are either Cut (default) or can be Scored if you convert it to that in the interface.
(Scoring is the “Engraving” for single paths, whereas Engraving fills in large areas of color with a back and forth motion.)
And while you can technically convert operations in the interface, sometimes the results aren’t going to be what you expect - because you forgot you had a colored stroke line in there somewhere.
8 Likes
that certainly helps, thanks!
3 Likes
You are one with the Matrix!
4 Likes
Thanks @Jules! It’s really great to get these sneak peeks of the GF GUI and see how it all works. Keep being awesome, we appreciate it!
3 Likes
And thank you for the heads up on that little edit. 
3 Likes
Ah, excellent! So glad to see that setting up ordered cuts is so easy in the GF UI. I do a lot of work that has cuts that definitely benefit from being made in a specific order, so this is perfect!
1 Like