Pass through works like crap

Trying for a week. Sitting on a mountain of wasted material and running out of time. This DOESNT work.

welcome to the forum Anthony…

can… you… be… a … bit… more… descriptive… what… your … issue… is?

J.o.n.a.t.h.a.n

Passthrough is still a beta feature and isn’t fully supported per my understanding. If you can provide some additional detail on what went wrong, photos of the issue, and any additional information, it will help Support to determine if there may be a problem.

There are also some advanced users here on the forum who may be able to assist. It does work, thought it can be hard to manage with some projects and can take a trick or two to get it working per your expectations.

I’m sorry that you’ve had trouble with your Pro Passthrough print. I am happy to help investigate! First, could you provide a little more information about the specific trouble you are having with Pro Passthrough?

Next, if you haven’t done so already, will you read the section titled “Extra Pointers” on our Pro Passthrough support page, and then run a test print?

Here are the steps for the test:

  1. Load a sheet of material into the Pro Passthrough slot and ensure that the portion sticking out of the printer is supported so the material lies flat on the crumb tray inside the printer.

  2. Double-check that the material is completely flat against the crumb tray. A quick way to do this is to press gently on the material where it rests on the tray and feel if it moves. If not, you’re good.

  3. It can help to use pins to hold the material flat against the tray. For example, a lot of customers use small pieces of scrap to print these pins available in the free laser design section.

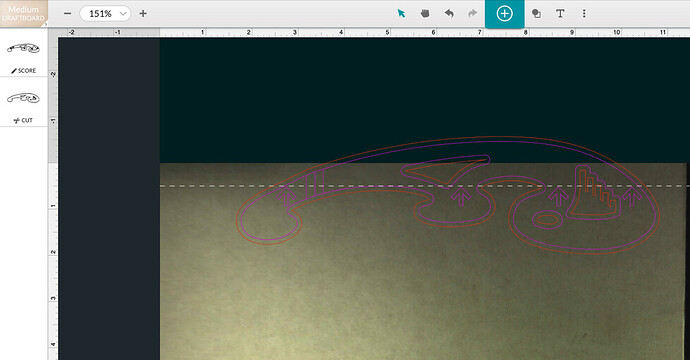
  4. Open the Smooth Curves Stencil from your design library.

  5. Turn on the Pro Passthrough feature in the menu bar.

  6. Select the entire design, and arrange it so that the dotted line at the top of the work area is at the tips of the arrows in the design


  7. Click Print and run the first section of the design.

  8. After the first section completes, move your material through the Pro Passthrough slot so the printed area is more than 3 inches away from the front of the Glowforge.

  9. Follow the prompts and run the 2nd portion of the test print.

After the test print completes, please send us the following:
  • Photos of the front and back of the finished print.

  • The date and time you ran the test along with your time zone.

  • A photo of the bottom of your print head showing the lens and both windows.
Thank you for sending us this information. We’ll retrieve the data from this test print, review everything and follow up with next steps.

AAARRRRGGGGGHHHHHHHH!

How’s that?

Tony Bottini

that was very helpful, Tony.

I want you to be printing successfully with Pro Passthrough! I took a look at the logs and it looks like you haven’t had a chance to run the test print from above yet. Once you are able to complete the print, let us know so that we can help further!

Some bitch, more moan. Turns out that the problem was that during the inspection phase when the user is asked to look at the merge before continuing, the merge was always horrendously off-center and apparently out of scale. I took great pain to center the workplace, clean the lenses, etc. However, painstaking manual matching of the next portion of the plan consistently produced unbelievably terrible results. If became quite clear that there was no possible way to manually match the work in process. So, I began ignoring the review screen and simply hit ‘Continue’ irregardless of how awful looking the merge appeared. To my surprise, most of the time the automated process was right on target. Based upon my experience, I would completely lose the intermediary step asking the user to verify the match. Manual matching doesn’t work.

agb

Thanks for the advice. Fix your software.

Tony Bottini

I’m a glowforge owner like you, I am not tech support.

I’m sorry for the ongoing trouble when trying to run Pro Passthrough prints. I’m one of our Technical Support Engineers here at Glowforge, and I’ve reviewed the logs from some of your recent prints to get a better sense of what might be going on. Based on what I can see in the logs, it looks like the system is running into trouble when taking photos between sections of Pro Passthrough prints.

I’d like to take a look at the bottom of your unit’s print head to check for anything unusual. Will you please share a photo similar to this example? I’ll be taking a look at the two windows on the bottom of the head which are highlighted by the blue arrows in the example photo:


If you notice any residue or buildup on the windows when taking this photo, please try cleaning them with a Zeiss wipe or similar lens wipe. If cleaning the windows doesn’t remove the residue, please let me know as that could indicate that the buildup is on the inside of the window.

It’s been a little while since we’ve seen any replies on this thread so I’m going to close it. If you still need help with this please either start a new thread or email support@glowforge.com.