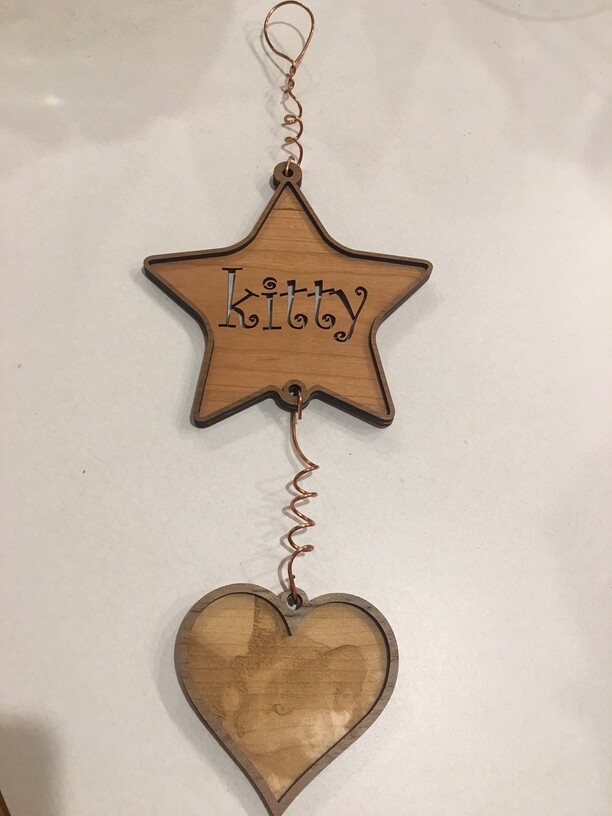
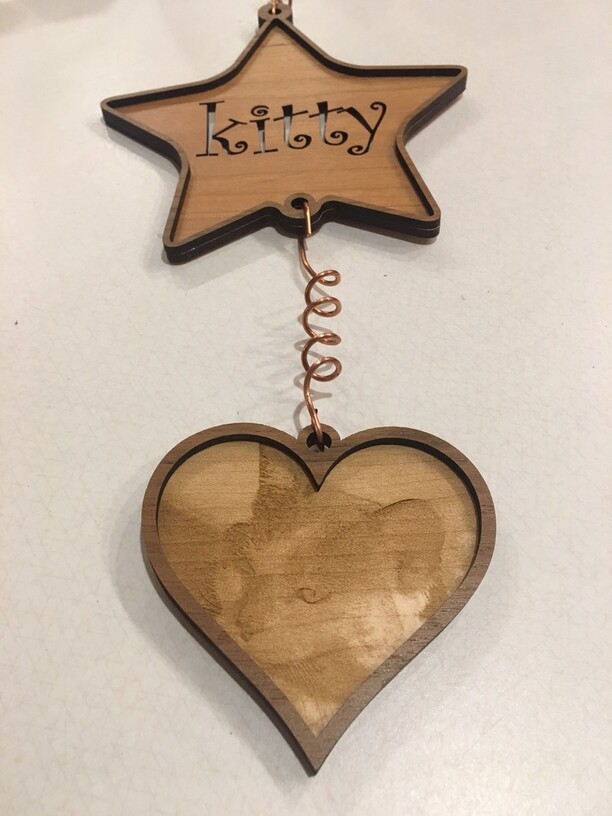
My buddy at work was looking down the other day and when I asked him what was going on he told me how his favorite cat had passed away unexpectedly. When we had to put our beloved dog Daisy the vet gave us a metal hanging sculpture with her name cut into it, so I thought maybe I could make something similar for my friend. I know his family so I contacted his son and got some pictures of the cat and made this. I’m really happy with how it came out and how easy it was, except for the photo engrave. I just couldn’t get that to work like I expected. These are all proofgrade hardwood materials. The Kitty star is cherry with a walnut border glued on. The heart with the engrave is maple, also with a walnut border glued on.
For the engrave, I, of course, started with photoshop, greyscale, kicked up the contrast, and sharpened and adjusted the curves. In gfui I first did draft photo and got the expected pixellated dot picture. When I switched to hd photo, it came out like a 3d engrave. I went to manual and adjusted the settings here and there with varying results, but it always had the 3d texture. Even this sort of washed out engrave has 3d features. Not sure what I’m doing wrong, but any advise on the engrave is appreciated. The banding is the grain of the original maple.
He loved the piece by the way. Hard to watch a grown man cry and it brought back all those feelings for me too.
Love the borders! I haven’t done a lot of photo engraving yet, but am wondering if you removed the masking before engraving. That would eliminate a lot of the detail. That’s about as far as my expertise goes, as yet, sorry!
Yes, I did remove the masking (after the 3rd or 4th attempt). I peeled it back for the engrave, then restuck it to protect the piece while it cut out. It was definitely better without the masking, but still looked more like a 3D engrave than a picture.
I bet if you post the image here, I’m sure there’s someone who could suggest how to edit it to make it show up better. In the end, though, it is a 3D engrave, so that’s pretty much what it’s going to look like.
Have you played with the Rasterbator? It can give you some cool photo effects.
I’ll post the pic in a few. I thought that’s what the convert to dots/patterns was all about in the photo engrave settings. Not doing power modulation but converting the image to dots for a ‘flat’ picture engrave. That’s certainly what the draft photo engrave did. I think the main difference in the settings between draft and HD is the LPI (and probably power/speed adjustments), but they both are supposed to do the dot/pattern conversion, at least according to the settings.