My bad - don’t know my US flora yet 
1 Like
Is that catching a bug or seed in mid flight?
Lol
a seed from the feeder.
the orchid shows the sharpening a good bit better, though i think most of the visual pop is coming from the other adjustments, of course.
1 Like
Only did levels. Otherwise same pic. But the details, especially on the buds, is much greater.
1 Like
“only” isn’t fair, there’s a big jump, and that increased brightness, temp change, etc is part of why the hairs seem so much pronounced (also part because your zoom scales are different). regardless this might be a good idea for taking candid pics of your creations (or flowers as you aptly demonstrate) - not harping, i think it might be valid if you can’t control your sharpness - but i don’t think it’ll make one whit of difference to a laser etching. other aspects being equal, naturally.
The only reason I posted this was because of other tutorials that prepared rasters for engraving using unsharp mask. If you want to use that filter thats your choice. This is another way, nothing more.
1 Like
You know what’s really nice about tutorials? No matter what you post up, someone is going to find it useful, because we all have different comfort levels, and different experience levels.
6 Likes
Highpass is an amazing pro tip, I use it on pretty much every image and find it to be far more impactful than any of the sharpening filters. +cool points to teditz
It’s also hilarious how this is turning into a how to use photoshop section, lets get a frequency separation tute up next! hahah.
3 Likes
Write one. 
(We’ll post it.)
1 Like
I’m glad someone else has used it!
Nothing wrong with Photoshop tutes!!!
I just learned about this recently. It’s changed how I do touch ups significantly.

8 Likes
Thanks for sharing this!! Opened an account! Can never learn too much about Photoshop
Here’s my favorite high-pass trick.
Original:

Filter… Other… High Pass… Radius: 50 px
Image…Adjustment…Levels and adjust so it looks like this:
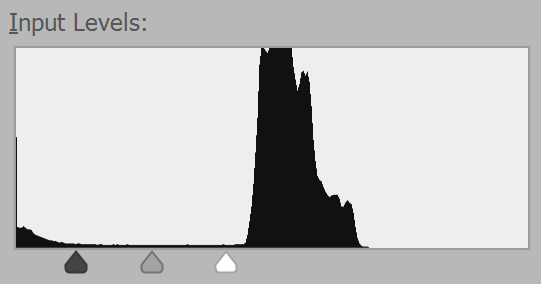
tah dah!

Basically high pass filters get rid of gradual changes across the image, like shadows, and maintain sharp transitions, like edges. Lots of uses!
16 Likes
Just learned something. Posting that as a tutorial…welcome to the team. 
4 Likes
Thanks Jules!
2 Likes
YEAH, even I can tell the difference between these two. Thanks!
1 Like
Yep, very high level trick to know. Changing color without destroying texture in a really straight forward and quick way. Fancy stuff.
1 Like