Planar butt jointing techniques

holy crap.
Or, as i’m known to say - “Dayum! Just Dayum!”

thank you so much for the pictures. I aspire to try this one day.

1 Like

oh my goodness; I’m in love!

5 Likes

Ohhhhh, beautiful! I really can’t decide which is my favorite—they are all amazing!

2 Likes

Wow! Do you have to take any char off before gluing? Regular consistency titebond?

2 Likes

Titebond classic, and no, I didn’t remove any of the char/residue from the joints – I would imagine it’s not quite as strong as it could be as a result. I haven’t had the heart to try to snap a joint, but the box feels pretty sturdy. It is actually this very concern that made me adamant about getting good glue coverage across the whole joint.

I did drop one of the pieces onto concrete yesterday and it was fine, so it’s not especially fragile by any means. Maybe I’ll flex that greek key design until failure and see how it breaks.

5 Likes

Well that went about as expected.

It did break along the glue joint, but it took a good bit of force.

The glue seemed to tear the residue from the wood fibers so I think my theory that good glue coverage is a must definitely holds up.

This is especially true because I see now that my glue didn’t spread evenly in the joint.

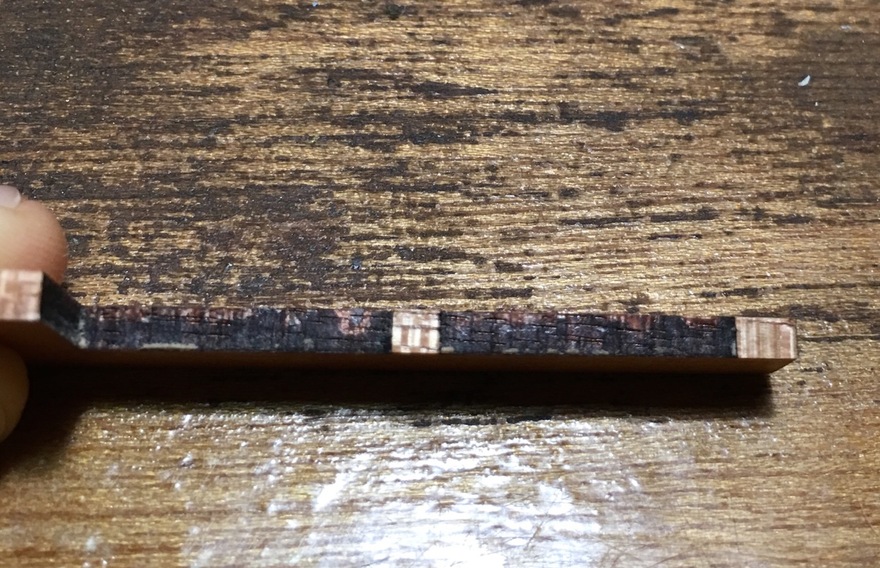
You can see the glue coverage was best along the top edge and when the joint tore apart it took the residue with it.

Take from this what you will; I assume this will be the weakest joint type because of the long straight joints. Curved shapes will probably hold up much better and I just can’t rip the precious up. Let us know if you do any experiments on this :slight_smile:

10 Likes

Thanks! Mostly I was wondering whether I might be able to get away with a cyanoacrylate glue and just let it wick into the joint rather than all the hard work of doing it right :wink:

Even if you have mediocre glue coverage the joints should be pretty strong. (My back of the envelope is to downrate from the roughly 1000psi of a proper joint, then figure how many square inches I’ve got. One of those fancy interlocks is probably close to 1 square inch of surface per linear inch of box…)

4 Likes

I’m into this plan, because wood glue was a serious hassle on something like this – you want to use as little as possible because of cleanup issues, but use too little and it’ll start to harden before you finish applying it to the long complicated edge.

I’d be slightly concerned about the CA wicking into the wood fibers themselves and making the joint unattractive or otherwise looking off due to interplay with whatever your final finish is, but I say give it a whirl and let us all know :wink:

5 Likes

In this case if you cut into the grain at a 45º angle it might help prevent it breaking so easily. Even running it at a 90º angle from what you had previously will strengthen it quite a bit, since the major connections will be running parallel to the grain.

Another option is to have a grain rotated backing piece (90º) to help strengthen that connection

7 Likes

These are incredibly inspirational. Love the ‘rules’ you’ve set and then the exploration that results.

1 Like

That is some impressive work…how do you go about creating these images that you are cutting? Would love so see a tutorial video of it from designing to cutting.

1 Like

I used inkscape for everything. I find that granular process explanation of mechanics is a bit less useful because everyone has a particular workflow or set of tools. If I describe it in detail some people will know what I mean and think it makes perfect sense and lots more will either be like “what?” Or “oh that’s a dumb way to do it”.

Ultimately it’s all just pretty simple path and node manipulation. it goes like this:

  • Draw a rectangle the size of your test cut.

  • Convert to a path. Add nodes to the vertical sides.

  • Draw a curve that looks pleasing to you along the middle joining your two nodes. This will be your butt joint line.

-Now break your rectangle at those middle nodes and turn it into two “U” shapes, one up and one down.

  • Copy and paste the entire thing so you have two working copies.

  • Delete the top half of the rectangle from one copy, delete the bottom half from the other.

  • Join the butt curve to the remaining halves and now you have your two shapes. Kerf adjust and go.

So there you go, my relatively simple process. Hopefully you find it useful.

6 Likes

I am not very familiar with Inkscape yet, but I do get the jist of what you are saying and it does seem fairly straight forward…now if I can just learn the programs. Thanks for the info!

1 Like

Anyone feeling particularly ambitious? This would make a really difficult butt joint design:

5 Likes

A fractal rabbit hole is a nice concept !
Bu t I don’t think I’ll go down that one.
John :upside_down_face:

2 Likes

Ok… I’m still enamored with this… and something popped up in a random pinterest session that reminded me of this.

Legit RABBITHOLE WARNING!

Searching “quilting pantographs” will bring a ton of brain itching patterns that I THINK will work with this joining technique. Not all of them, but many of them. Holy moly! I can’t turn this thing* off! (*brain)

YOUR FAULT this time @evansd2! :face_with_raised_eyebrow:

6 Likes

That is indeed a deep, deep hole you just uncovered…

3 Likes

Well, well, well that is cool.

For the lazy:

https://www.google.com/search?q=quilting+pantographs

5 Likes

Ohhhh, this is gonna be fun! :slight_smile:

2 Likes

Oh snap. This one:

https://www.urbanelementz.com/quilting-designs/pantographs-e2e/a-little-bit-this.html

3 Likes