All of these are just amazing. Thank you for sharing!
Thank you all for your encouragement and kind words. ![]() I’m having so much fun with this. I “do” however need to get my arse in gear and start to be more systematic about this. It’s not a lot of waste, as I use such small pieces of acrylic that I can use even the smallest scrap - and ergo I keep nearly all my “snafu” pieces. I do need to do a science on the different cuts I get based on colors of acrylic. I think that some colors just burn more, and it may also be the speed of the laser going around a tight bend vs cutting in a straight line or curve. But not all colors cut the same. I have noted this if I decide to change out the color of an inlay piece. I sometimes have to change the kerf if it’s a different color acrylic.
I’m having so much fun with this. I “do” however need to get my arse in gear and start to be more systematic about this. It’s not a lot of waste, as I use such small pieces of acrylic that I can use even the smallest scrap - and ergo I keep nearly all my “snafu” pieces. I do need to do a science on the different cuts I get based on colors of acrylic. I think that some colors just burn more, and it may also be the speed of the laser going around a tight bend vs cutting in a straight line or curve. But not all colors cut the same. I have noted this if I decide to change out the color of an inlay piece. I sometimes have to change the kerf if it’s a different color acrylic.
And while I’m at it, shameless shout out for the places I buy my acrylic (yes I’m an acryloholic) which are Houston Acrylic (Houston ;)), Cerulean Tides (Florida), and Custom Made Better (North Carolina) who have such a great variety of acrylic colors and patterns. I’ve noted a huge increase in the colors available in the past few years.
These are really amazing! Such attention to the tiny details! I think having to attain that level of precision would drive me crazy.
Thanks for the shout out to your suppliers - one of them is very close to me (yay for potentially avoiding shipping costs!)
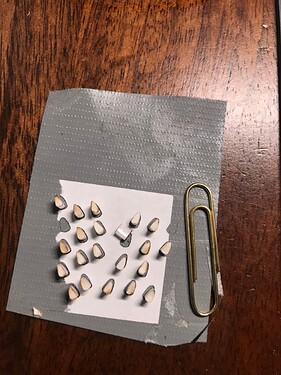
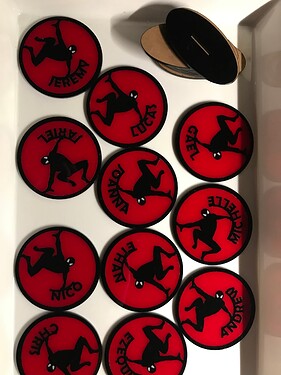
Hahaha about the detail. ![]() Here’s an example of insanity. I made these for a little boy’s birthday party. Yes. Obsessed with Spiderman. They are little tokens for each kid to take home. Note the size of the eyes. I probably should be locked in a padded room. So glad to hear you are near one of the acrylic businesses. They are all small businesses. They are also on instagram, etc. and share the new colors that they order online. There are some others I have not yet tried. I like to try to support small and women owned businesses. OK back to the insanity of size.
Here’s an example of insanity. I made these for a little boy’s birthday party. Yes. Obsessed with Spiderman. They are little tokens for each kid to take home. Note the size of the eyes. I probably should be locked in a padded room. So glad to hear you are near one of the acrylic businesses. They are all small businesses. They are also on instagram, etc. and share the new colors that they order online. There are some others I have not yet tried. I like to try to support small and women owned businesses. OK back to the insanity of size. ![]()
Tiny yes, but look how much they pop. Totally worth it ![]()
can you explain more about the kerf in illustrator? you put new anchor points inside the image to create kerf?
Check out #1a here, it has a link to a huge array of acrylic providers:
Ha! Just what I need. MOAR ACRYLICS. ![]()
![]()
![]() Thanks. There were a couple of new to me suppliers there. At some point (I’m trying to be good for now) I will have to test some of their colors also! Appreciate the link.
Thanks. There were a couple of new to me suppliers there. At some point (I’m trying to be good for now) I will have to test some of their colors also! Appreciate the link.
Glad I could enable you ![]()
I’m the same way with hardwoods, I get it.
(and dice)
I am sure there are people who can better explain this, but basically (if I have understood your question) kerf is the amount of material that is “lost” when you do a cut. So for inlay you have to add that miniscule extra so that the pieces slot in precisely and there’s no gap. At least for me that’s important as I don’t put my acrylic on top of anything. It all slots in.
I did some science to figure out that my machine (each machine is different I gather, and it can change over time on your machine) the kerf is usually .0055" and I add that to the inner pieces I am going to cut.
BUT it’s not that simple. I have found that some lines are wildly off, and that by going into the shape and by adding in anchor points along the line path (In Illustrator they are called anchor points) I can get the glowforge cuts to more accurately follow the exact shape line.
BUT and there are still issues I’m trying to solve for, curves and straight lines - even with extra anchor points - don’t always cut exactly the shape of the drawing either. Some of it I “think” is related to the speed and heat of the cut. I think that different color acrylics cut slightly differently - and some of course are slightly thicker by an nnnnth (as I am mixing and matching suppliers) and also I think when the laser is cutting around a curve or on a straight line the speed increases or slows, and that might also have an impact on the precise line. Again we are talking nnnnnth measurements. I’m still working it all out.
As an example, my current project (mash up of Spiderman and Link from Zelda) has been a struggle. I ended up using an added .0045" (instead of .0055") on one section of their knees/pants to make it fit inside, but when I hold it up to the light I can see areas of light between the inner and outer shapes. So I am still doing a science on all of this. To try to figure out how to get the glowforge to cut exactly on the line of the drawing, and not be off by an nnnnnth. I particular find this for things like long lines. The sword in my design is always just a little too long. I find this on ALL long lines that I cut.
Oh and another thing is I have to learn to cool my jets and wait for a piece to cool down before trying to slot it in. Sometimes that makes a difference.
And also to slot in from the back up instead of the front down - because the laser cuts wider at the top and thinner at the bottom. A “v” shape it’s not a perfect up/down angle when it cuts. For this reason I also reflect the piece i am making so that the back cut ends up being the front cut - as that’s much more precise because it’s the end of the “v” area that is being presented as the top of the piece, and ergo slots in even closer.
Hopefully this isn’t too jumbled an explanation. ![]() I’m sure others can explain it better.
I’m sure others can explain it better.
I’m actually being a drama queen here. ![]() These eyes amazingly turned out to be surprisingly easy to pop in. My trick (because my fingers get in the way of seeing where I’m trying to slot small pieces in - even with my magnifying glasses on) is to make sure I have it the right way around, then hold it with a piece of tape on the top and guide it in by holding the tape instead of the acrylic piece. once I’ve got it in place, then I can shove it down with my fingers.
These eyes amazingly turned out to be surprisingly easy to pop in. My trick (because my fingers get in the way of seeing where I’m trying to slot small pieces in - even with my magnifying glasses on) is to make sure I have it the right way around, then hold it with a piece of tape on the top and guide it in by holding the tape instead of the acrylic piece. once I’ve got it in place, then I can shove it down with my fingers. ![]()
These are great designs! Very nice work. I like that you give tips for those of us dexterity-challenged (the tape)>
You need one of these:
Uchida of America 91GR Double Ended Jewel Picker Amazon.com
THANK YOU!!! I have just ordered a couple. One for me. One for my husband! I had no idea these were a thing. ![]()
thank you! you did a great job explaining ![]()
Yup. All this. While acrylic is going to be one of the, if not the most, uniform materials, there may be impurities inside a sheet that cut differently when hit by a laser. And the acrylic manufacturer is probably not too terribly worried about a perfectly thick sheet of acrylic, much less uniformity across lots. This does not matter to a saw blade, but to a laser burning away material variations in thickness equals variations in kerf.
As for pinpoints of light between pieces even with a perfect svg the laser is interpreting an arc into a series of commands/waveforms to a machine that drives motors in either the x or y direction. I don’t work much in acrylic, but have you tried hitting your pieces, gently hitting, with a heat gun? Maybe it’ll slump the pieces together and get rid of your micro-gaps.
Oh that’s an EXCELLENT idea. I will try slumping the pin prick areas together!!! I have slumped shapes of acrylic (including acrylic with inlay fairly successfully!) and just didn’t think of doing it on a flat design to fix the nnnnth of kerf. THANK you for the idea. Also duh to me. ![]()
And thanks also for confirming what I thought about the materials and laser path. I’m looking for a machinist’s precision, with tools that aren’t made for that level of precision. ![]()
Off on a tangent, have you seen Adam Savage’s fabulous video about measurements. https://youtu.be/qE7dYhpI_bI?si=lKCG8guloyC1gsnU
I have not seen Adam Savage’s video, but I am familiar with precision measurement and tolerances from manufacturing and engineering work I’ve been involved with over the years. Although, as it is Adam Savage perhaps it’s from a more humorous point of view.
This is one of the reasons why I think inlay is more simple with Wood: Wood can compress much more than acrylic does, and it can take up the slack of a kerf adjustment to make extremely well-fitted inlay.
and @TeamSM , thank you both! Ordering mine now.

