Powder-Coat-Filled Engraves

I saw a video on using powder coat for filled laser engraves and, wanted to try it.

The chase:

Control your air assist to keep the fine powder from just blowing away.

Start with a shallow engrave on wood or acrylic. I reduced SD engrave power by 50% and, got .4mm deep engraves.

Without moving the piece in the machine, sprinkle some of the powder coat over the engrave, tap it into the engrave with a square-end paint brush and, scrape the excess off level with the material using something like an aluminum business card.

Re-run the engrave, de-focused (.2” for 1/8” stock) with these settings:

1000 / 15 / 340 LPI

I used masked material but, the excess powder mostly wipes off or, can be removed with a gentle sanding.

The powder coat goes from melting to completely vaporizing pretty quickly as power increases.

There is some texture to the fill, which might be a neat effect for some applications.

Without the de-focus:

There wasn’t significant improvement going to higher resolutions than 340 LPI. If you try, note that you need to reduce the power, too.

I wore a mask and gloves when working with the powder coat. I don’t think it is particularly toxic but, I’m sure I don’t need it in my lungs. You probably don’t, either.

Let me know if you try this, especially if you get any better results!

One minute video demonstration:

One possible source for powder coat: The Powder Coat Store | eBay Stores

Evermore Studio blog Powder-Coat-Filled Laser Engraves write-up (Pretty much what is in this post, a few more photos.)

26 Likes

That looks like a really cool technique.

How are you controlling the fan? Diverting or something else?

8 Likes

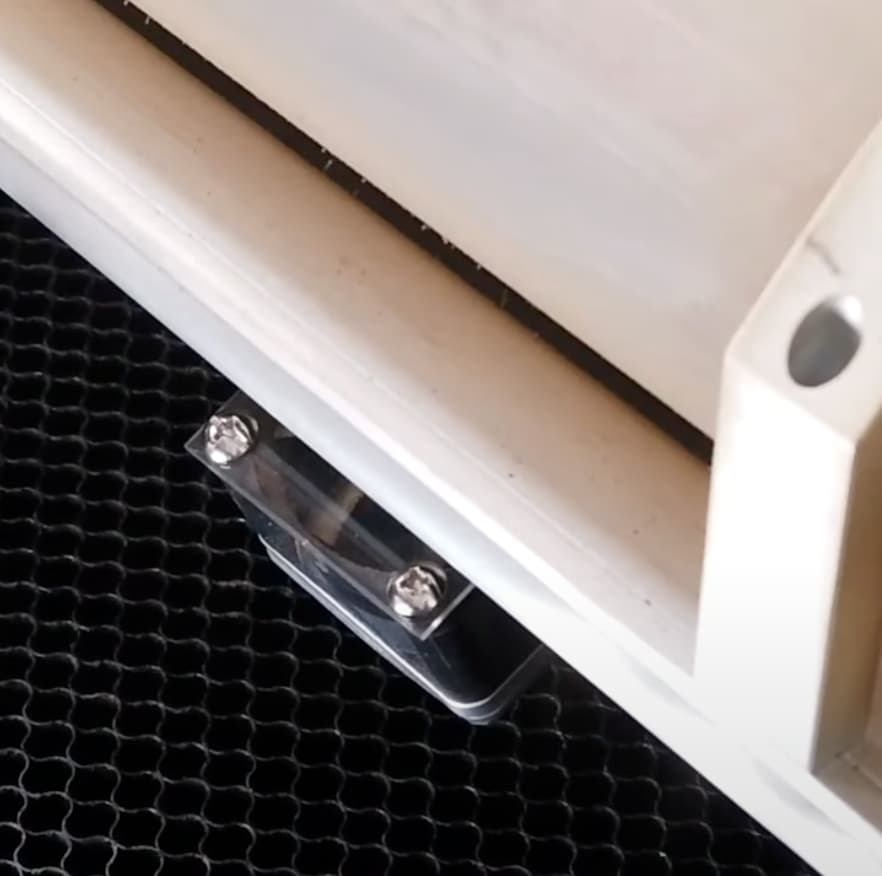
Yeah. I am using the approach @evansd2 describes in the post I linked above ( How to manually control the air assist fan power ). I made a square of 1/16" thick clear acrylic with holes where the screws go and, used short screws to hold it over the top of the air assist fan.

As with a lot of stuff in BtM, it is obvious no one should do that …

12 Likes

Oh man this is great.

Did you stress test it, like tried to scratch it out, etc?

I wonder what would happen if you tried this with a thin layer of powder on metal or glass?

Interesting about the amount you scraped off, I wonder how sensitive this is to depth of the powder?

Also, I just love that you used that air assist controller idea. I wasn’t sure anyone else had tried it. I’ve used it periodically over the years with no bad side effects, but I am always on alert for fire risk when I do use it.

13 Likes

Yep! I scratched at several of the samples with a plastic razor blade and a metal pick with no detectable damage. It’s surprisingly durable. I can scrape it out with the metal pick if I really work at it.

I haven’t tried it but, other people who did this with different lasers say it doesn’t work well on metal because the metal needs to heat up enough to bond to the powder coat. It wouldn’t be too difficult to try it, though.

Most of my early tests were with deeper, normal SD engraves. Those ended up with a more irregular surface. That’s what led me to try shallower engraves. I tried an even shallower engrave (which I didn’t measure but, about 1/4 of normal SD engrave power) and, ended up with the powder coat just tinting the char in the engrave. There is definitely more room to experiment with that. I will report in if I play with it more.

I made one of the air assist controllers awhile ago with this in mind but, also played with it a little with some very thin paper. I always watch carefully for any problems but, it has been fine so far. I do have a pretty potent external fan that very visibly clears the smoke and any powder that becomes airborne.

I briefly considered titling this “Stuck-On Sintering” in honor of one of the most popular support topics here but, wanted people to be able to find this in some sensible way.

15 Likes

Hmm which one? Not ringing any bells…

6 Likes

Well this is just plain awesome! Would love to see some of your Celtic knot designs done up this way.

9 Likes

Neat technique!
Regarding the texture I’m guessing the temperature doesn’t stay elevated long enough for the material to flow out to a glossy finish like it does in an oven.

7 Likes

Thank you! I have some ideas along those lines.

3 Likes

Sounds right.

I suppose you could put the piece in an oven to fuse the fill. That would get all the stray stuff, too, which might lead to more adventures.

7 Likes

Would there be a way to temporarily bond the powder coat with water? (or ?% sodium salicylate?) That the damp powder coat would hold on long enough to fuse, but still wash off afterwards?

This would be particularly interesting on ceramic tile :slightly_smiling_face:

5 Likes

This is really neat! Thanks for the detailed overview.

5 Likes

Apparently, a Thing one can do after the process described, if the substrate can take it (e.g., wood), is to put the piece in an oven at 400F for ~10 minutes to fully cure the powder coat, which should render it tougher and, possibly, smoother.

7 Likes

Ooh, very cool!

6 Likes