Practical cuts

Times like this I wish I could like more than once.

5 Likes

That’s fabulous! and now I kinda wanna start a starter :stuck_out_tongue:

Not a show I’ve ever watched regularly, but always interesting when I do.

It was time for another practical cut. I finally decided to hook up the Bose Acoustimass Subwoofer and Dual-Cube speakers in my small exercise room next to the office. Because it is small, I wanted to avoid using the stands for the Cube speakers and mount them on the wall.

Problem was, I wanted them in the corners close to the ceiling, and Bose, with their very sturdy mounts, provides only a small 2x2 inch paper template for drilling the four holes required for each speaker.

While I could certainly measure, mark, drill, and then realize I dropped the paper by half an inch or so, and be miserable with even the most slightly unbalanced speaker locations, I realized there was no need for that!

I have a Glowforge! So, I determined the exact dimensions, designed a template that would let me easily “punch” the starter holes so the mounting plate was exactly two inches from each wall and six inches from the ceiling, and get ready to go! It also had a hole to match MOST of the mounting template provided, and the screw hole locations at the corners of that hole, in the exact locations for the starter drill holes.

Found some scrap Draftboard and realized I was going to need to cut it in the middle to fit given the voids from previous cuts, and like a dope, pulled out a hand saw to make a few cuts…… Halfway through the first, I thought STOP! Just drop a cut line from the new Beta feature, so I put the saw down, went to the PC, and dropped the line right where it needed to be, and Presto! I had the size of scrap I needed to be able to cut the template (had to go RIGHT to the edge, which is why it needed to be in the center of the bed.

Ran the cuts, and of course, realized as it was finishing that I forgot to ignore the center placement square I made, so the key part I needed was no longer attached to the template.

Took the other half of the scrap Draftboard, marked that pesky extra square to IGNORE, and hit the magic button. Less than two minutes, later, I had my draftboard template with the perfect offset distance from wall and ceiling.

I then lined up the paper template JUST to be sure, and it was spot on!

Held up the tool in each corner, punched the starter holes, and got to drilling and assembling. Placement was perfect. Mounted the plates, ran the speaker wire, put up the speakers, tested them, then installed the Legrand Cordmate for the wire, moved everything (except the elliptical) back in place, and decided to stop and post the result.

While I realize most folks probably aren’t undertaking the exact same job, I hope the IDEA inspires you to think about how to use your ‘Forge in making templates for other “around the house” work where precision is important (at least for those with a bit of OCD!)

14 Likes

This is freaking awesome. Good work :upside_down_face:

3 Likes

So smart.

1 Like

And… another one: The daughter of two good friends of ours just graduated college, and a group of us are doing a “Graduation Parade” in cars, with appropriate social distancing later today. My wife wanted to make some hand signs using cardstock with memes / pictures she found on the internet, and asked me yesterday if we had Paint Stirrers / Stick that we could use to hold them up.

I said yes… and then realized that the only ones I had were the smaller “tongue depressor” style, which wouldn’t be big enough. Then, of course, it hit me! I have a Glowforge. (Seems to be a theme, right?)

Looking at some of the paint stick stirrer designs on Amazon, one of them actually had a ruler next to it, which made it VERY easy to determine where to design and cut the shape for the handle.

Note: because I was doing this “quick and dirty” I did not bother to clean up the design - just let the extra cutting around the hanlde section cut - adds maybe 10-15 seconds per stick of cutting time - and would have taken me much longer to edit the nodes, split the path, remove the extra sections, and re-join them. (I’ll post the design in Free Designs in a bit.)

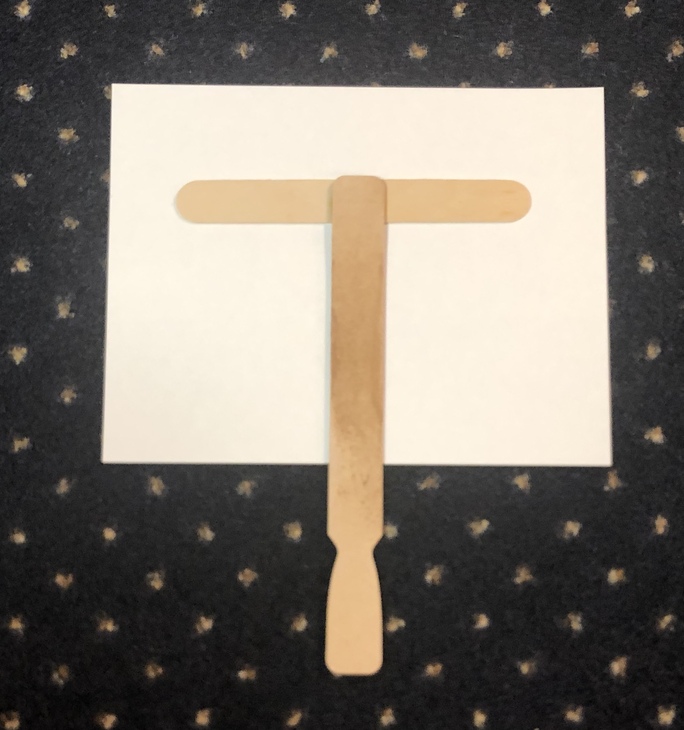
Made 14 of those (from a single sheet of draftboard @ $4.00), cleaned off the edges - using a generic magic eraser - with all of them taped together (it’s much more efficient that way), and paired them with the Tounge Depressor style smaller sticks to create a T-Shaped holder.

(I chose to design just the regular paint stick and cut it, gluing it to the “tongue depressor” style ones I already had because to create a T -style in the draftboard would have taken many more sheets, and I already had a bunch of the other part.)

Used TiteBond II Wood Glue and mini clamps to secure them. Once dried, attached the signs - printed on cardstock - using Elmer’s Multi-Purpose spray-on adhesive.

They are incredible stable, and the design seems to work really well.

Here are pics of the holder from the back,

the 4 different signs we’re going to be sharing with other parade participants:

The “Friends” themed one is my personal favorite.

16 Likes

Spelled senior wrong.
.

.
.

.

.

.

.
.
.

.

.

.

.

Sorry, Dad jokes and pranks just sort of oooze out.

Great job. They will also have a memento to help bring the day back.

2 Likes

“Quaranteened” is a missed opportunity.

6 Likes

Yeah… I didn’t design the signs - my wife found all of them on the interwebs… :wink:

2 Likes

here are a few practical items.

Leather tool holding rack.

Rack for food coloring set

16 Likes

So I’ve had this router guide sitting waiting on a use case when it finally comes up today so I grab it and get ready to mount the router to it and guess what? That’s right, I don’t know what routers this came pre-drilled for but it sure was not Bosch! Nothing even close. So what do we do? Grab calipers of course. Four countersunk screw holes all done on the glowforge. I had some scrap acrylic so I experimented on it for working out the depths of the countersinks. Went together perfectly.

15 Likes

A trivial practical cut.

26 Likes

Much better than being caught with your pants down.

9 Likes

I’ve been making buttons from my earsavers acrylic scraps. My grandma’s button box was one of my favorite things, and I don’t even HAVE one! That’s changing now. :wink:

7 Likes

Working on ways to use these

8 Likes

It might be my eyes… but I don’t see any holes?

1 Like

Note: I said working on ways. From using tiny magnets to bamboo with holes to actually making holes, or cut and engrave this and glue to the back…
holes

1 Like

Refrigerator magnets?

2 Likes

They are great for that! The central dome is thick enough I can drill most of the way through and use 1/8 inch neomagnets or I have thar rubber magnet stuff that came in one-inch diameter just glued in place,

1 Like

I just posted a square string spool to the Free Designs area.

Now I just need to design a gear driven winder for it. :wink:

9 Likes