Hi. I do not know if this is the right location. I have designed a file in illustrator and part of the design extends past the art board. When I save the file to a pdf and import it into the glowforge app it is still showing the areas off the art board and I don’t want them. Does anybody know how to fix this? Thank you in advance. Mike
The way I understand it, the Artboard is just there to help you see and manipulate things. The design is the design, even if it is bigger/smaller than the artboard. I guess to get rid of things you don’t want, you will have to remove them from the design. Maybe put it in photoshop and crop it?
1 Like
Some designs allow you to move individual pieces around so you can handle them in a separate operation. I bought a box file on Etsy that I had to do this with. It was advertised as being for the GF. Yeah, but…
In Illustrator I have set my design space up so I can see how things will fit on the board. However, i’m getting ready to do somethign that requires dimensions larger than 10.5" tall, (a 12" wheel I’d rather not cut up into sections). [and if anyone has an opinion on how to do that, I’m all ears!]
That part that extends beyond the cutting area, just move it completely out, take care of everything else; then find a spot for the first one, move it back and cut it.
Another thing, I have learned the hard way not to nest things in Illustrator (I have a verrrrrry old version). Even on different layers and different colors, the GFUI is treating them as linked objects; they move together and I can’t always separate them. In that case, I make two files.
2 Likes
Do yourself a favor, build an artboard template in Illustrator. Specify one with a width of 20" and height of 12", then center a rectangle measuring 19.5" wide by 10.95" tall. Use it whenever you draw something for Glowforge. A sample file can be downloaded below.
Artboard.pdf (334.4 KB)
Whenever you import your designs they will be the correct size and within the printable area of your Glowforge, and if you center your designs on the artboard and within the rectangle, the designs will be centered in the cutting area, which makes it easier to center images onto irregularly shaped materials.
When you import designs created on the artboard template, just ignore the rectangle when it comes to setting the processes, but use it as a reference tool for accurate placement and centering in the cutting area. At the lower left of my template, outside the bounds of the sizing rectangle, I keep three rectangles which I use for defining lines and engraves. I use cyan for scoring, red for cutting, and magenta for engraving, these elements get deleted before saving and uploading, but can be used along with the eyedropper tool to ensure that your line structure is the same throughout all of your drawings.
2 Likes
Thank you all for the replies!
That rectangle idea is an awesome tip that I will use going forward, thank you!
My issues though is different. I will try to explain it better. I have a design I made and some of images I added to the design, I want show only part of the image on the design and so part of those images hang off (for lack of a better explanation) of the art board. When I import into glowforge app, it ignores the art board and just brings in all the images in which is fine, but it brings in the whole images, even what I intended to get cut off at the edge of the design. Is there anyway to not have that happen? I tried importing into gimp and cropping but when I do and save it mentions in glowforge about a clipping path and winds up placing a grey box over the image. I am all new to this. I have used both photoshop and illustrator in the past but very little and it was around 15 years ago. Thx
you are going to have to trim out/remove all the stuff that extends beyond the artboard.
If it is vector data, you can use the pathfinder tools to cut out the extraneous points. If it is raster data, you can use the Image Crop tool to cut it down to the size of the artboard.
You can always post the file here, and someone may be able to walk you through the specifics of your individual file.
2 Likes
No, the AI art board does not function as a clipping path (which would be ignored by the GFUI anyway). If there are parts of your art you don’t want GF to see you need to actually delete those parts. Depending on the art a combination of Pathfinder and Shapebuilder tools will do the trick.
1 Like
If any line elements touch the artboard, they are considered active elements and will be imported as such. If you don’t want certain elements to be uploaded you can disable them in the document properties panel by hiding them, but if you only want the portion that hangs off the artboard to be ignored, you will have to edit the element, cutting away the parts you don’t want.
2 Likes
Thank you again for the replies. I am not sure how to do it. This is a screenshot showing what the artboard and the elements I want to cut off. They are vector.
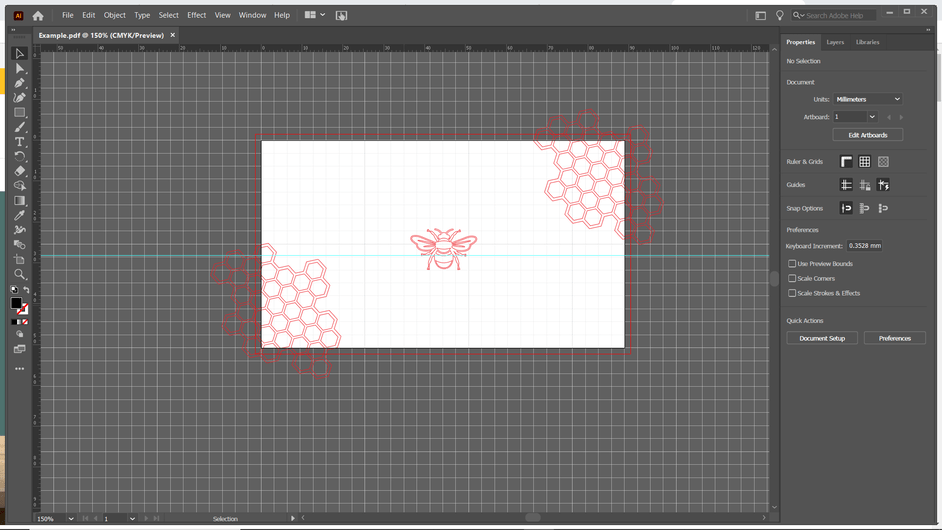
Use your direct select tool (the white pointer) to select the line elements outside the printable area then delete them. For the line elements that are part on and part off of the artboard, leave them hanging off and then edit the end nodes of the line segments to be within the printable area by clicking on the node and dragging it along the line segment back into the printable area.
3 Likes
Thank you very much! That did it. I was using the black selector and wasn’t working correctly. Thank you so much to you and everybody else for being so helpful and patient!
1 Like
In addition to the direct select method, here’s the Adobe documentation on Shapebuilder and Pathfinder. For either, you’d draw a rectangle over the parts you don’t want (the parts off the art board) and use that rectangle to trim away the artwork below.
3 Likes
Thank you! I will try those next. I appreciate the help.
1 Like
This topic was automatically closed 32 days after the last reply. New replies are no longer allowed.