Pro Passthrough Release

interesting, inspiring, and worth exploring.

My garage is not overly bright, with just a bit of natural light coming in from north facing windows at the top of the garage door. ( which is relatively close to the forge) It is so dim that I have added a slew of cheap led strips in several locations over the years. Mostly to support soldering and other activities where my eyesight fails. Most of the time these are off. Most of the time, my lid has a goodly layer of smoke haze ( I clean that far less often than I clean the optics, because I hate it when it has streaks and thus do a number on it when I clean it). So I suspect, I am getting relatively low external light within the machine fairly consistently. That said, I really want this to work and this seems an easy solution should it prove out.

A few weeks back, when battling a string of retry requests on the pass through, It occurred to me to turn the ones directly above the forge on. On that cut, that seemed to solve it. but is not a fair test. (given that multiple retries with no changes at all in between tries, can work on the 3rd or 4th try or not).

The fair test would be to use a host of lighting conditions , keeping all else constant , and attempting repeated auto aligns to see if there is a strong correlation. This would include rejecting a successful align (which is possible in the current UI). I will try that today and report back. Finding iffy auto aligns is not a challenge for me. :unamused:

2 Likes

Yeah I saw the wording mentioned try changing the lighting (or moving the material a little etc), so I said “huh I’ll try that”. It worked… I was pretty surprised at first, but in hindsight it makes a lot of sense.

I assume you’re keeping the camera optics clean on the head? Seems like something you wouldn’t miss, but that precision camera is essential so it’s worth asking.

3 Likes

The camera(s) optics have been getting lots of love.

So, the experiment. started at about 11 am west coast time.

ran a passthrough project. cleaned my optics, secured material with t pins.
blocked all light from entering the forge.
ran first pass (of 3) with no issue. waited for prompt,
moved the material (which included untangling it from the seals and hoovering out the crumbs), blocked light again and boom, auto align worked like a charm.
chose to retry auto align anyway ( per the goal of the experiment) and it failed, failed, failed, failed, failed, failed, failed. ( total of 7 fails with no changes between the success and any of the fails)
Removed darkness inducing materials and turned on the bright lights. and it failed, failed, failed, failed, failed, failed, failed, failed. ( 8 more fails, again no changes except the light blocker was removed)
turned off the bright lights but allowed natural light to enter.
and it failed, failed ( 2 more fails)
returned the darkness inducing cover and it… failed. score total: 1 pass 18 fails.

resorted to manual align. clicked that option.

was treated to an ad for the new premium features which I had no choice but to click through

and then manually aligned as best I could ( used manual focus and zoom) and pressed print. Before starting the print on the machine, I noticed that the UI had forgotten that this was a passthrough print so the elements being printed were only a sliver of what remained. So, before hitting the white button, turned pass through back on . Chaos ensues. UI contents vanish. What was shown on the us was nothing. i.e. he ui was still there, i could zoom and move about but there were no contents within the forge, jut blackness (sorry no Screen shot) . decided to hit the print button on the forge anyway. it started to print and I now see that I had missed on the manual align. :slightly_frowning_face: :frowning_face: :confounded:

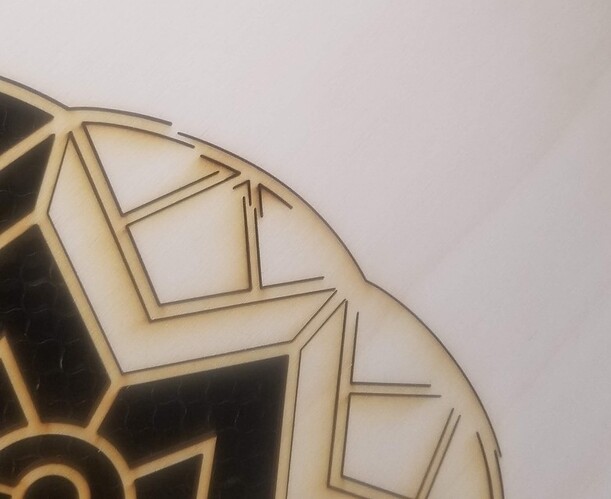
so stopped it. took this photo.

Thus ends the experiment. Epic fail. Sad because the comments about lighting had my hopes up. Plenty of fodder for the software team to chew upon. including:

goodly data on a success followed by a slew of failures with zero changes in between (nothing was moved, the lighting was the same…)

A note that pushing an ad in the middle if a passthrogh cut is unwelcome, particularly when i have been beta testing that stuff for a while.

A note that somehow between that ad and when I selected manual align, the UI forgot that I was using passthrough and thus what it offered to print was a poor choice. (it has a tough time remembering this in general)

and a note that for me and toadkiller ( my forge) lighting does not seem to be a factor in success.

4 Likes

Thank you so much for all the testing and thorough report!

Looking through your auto-alignment tests, it appears that the alignment errors you encountered were all related to the removal of cut-outs between print slices. We recommend keeping cut-outs in-place until that portion of the material has been pulled through the Glowforge (if possible for your design). This helps maximize the similarity between images collected in each slice.

You may have been more interested in testing lighting conditions (you did mention passing up on the successful alignment for science!) but in case you want to go back to complete this project that may help. The feedback is appreciated!

1 Like

Please enlighten me on how to move the material backwards through the seals without removing the tidbits. they catch on everything and or get caught under the material as it move causing it to no longer lay flat. I am flabbergasted by this recommendation.

2 Likes

I’ve had good luck using a strip of cheap Scotch tape on top of the bits near the joins, before shifting it. (It’s only needed along the joins so that the pictures match, the rest can be removed before shifting.)

6 Likes

Really good to know :smiley:

1 Like

Ok, so I tried again, and followed the advise to keep all the tidbits near the seam intact. Used big piece of blue painters tape. This worked fine ( thanks Jules for the tip) . I only had to replace a few of the bits post tape removal. The result is a strip at least 2 inches wide with all parts intact at the seam. With great anticipation I moved ahead and…

STILL FAILED!!!

Trying again. This time with a lucky rabbits foot in my left pocket (or is it suposed to be my right?).

failed again. trying again #3 with no external light.

@kevinmcvey, I am interested in why this one failed. ~ 5 pm, 5:10 pm,

2 Likes

When the head moves out and shoots the little red dots for alignment…watch it to see where it hits. If you have blue tape there, remove the blue tape at that spot so that the image looks more like the pre-alignment image. It has to be able to see and identify the image where those dots hit.

(Clear tape might work better. It’s trying to match up the pictures.)

2 Likes

Thanks, No blue tape, I removed it all after the move.

I note that the wood sheet is higher than the honeycomb on the crumb tray, as it is resting on the leading and training edge which is higher than the middle (always has been). this results in all the bits, sitting lower than the top of the sheet. This may or may not match their relative height when the pre-move images were captured. The sheet had the near edge resting on the honeycomb, not the higher lip at that point so it was lower. I have no idea how to solve for this if this is the issue as at some point the leading or trailing edge will be on the honeycomb unless one wants to waste a lot of wood.

2 Likes

the 3rd try, with no external light, worked. I am not up for chancing another roll of the alignment dice so science can wait.

2 Likes

Thank You so much

I can’t wait to get my hands on this baby!!!

1 Like

I filled out the application and got notice last night that it had been added. I was excited to try it out this morning. I cleaned my machine before I started, just to give it the best chance to succeed. But sadly it didn’t work. I followed all the steps and had things ready for my first print. I hit the print button and it never made it to the machine. Just said Print Stopped. I have refreshed the page and redid my settings 2-3 times. It immediately says Print Stopped every time.

1 Like

That’s my exact experience as well. “Print Stopped. Unable to complete the print.” When that message is received I am unable to dismiss the page. I refreshed the page, closed the blinds, and even tried another file- all with the same result.

1 Like

Apologies @julietmoran613 and @mstucker! There was a snag on our end that we’ve just resolved. Thank you for bringing your print stopped issue to our attention. If you refresh your browser and try again you should be Pro Passthrough printing in no time!

9 Likes

Kudos to Kevin for working on Saturday.

4 Likes

Thank you @kevinmcvey! It works perfectly now. So exciting!

1 Like

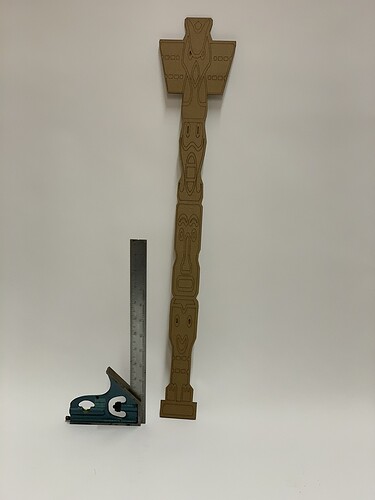
I just tested it, worked great for me. I wanted to test it was something that would go relatively fast, so I made a totem pole out of .1 inch thick corrugated cardboard. The totem pole is 5 1/8 inches wide by 28 inches tall.

I followed instructions in the GFUI, everything went smoothly without a hitch. Here’s a photo of the final product:

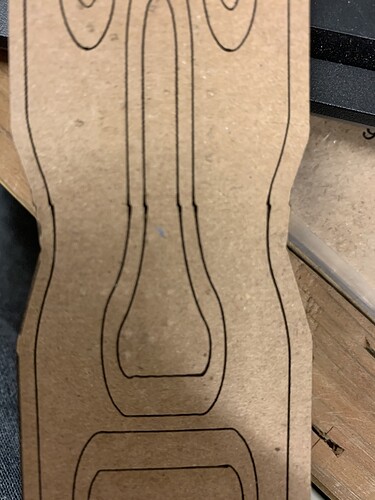
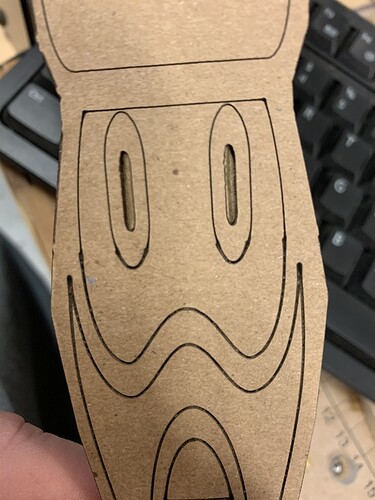
Below are closeups of the joints. While they look pretty obvious in the close-ups, I had to look pretty hard to find them. They aren’t obvious at all on the project.

9 Likes