I am struggling to get my Glowforge to cut through all the way. I have tried to cut a few different sheets of Baltic Birch plywood (3mm), as well as a thinner “wood chip” that I got from Amazon (2.5mm). I also had the same issue with the Proofgrade Draft Board.
So far, out of 20+ tries I’ve only been able to cut through once or twice, and that was within the first 5 cuts I made on the machine. Since then, I can’t get it cutting through completely. I have tried the following:
Doing multiple passes of cuts. When I first got the Glowforge, I did the “Gift of Good Measure” on my Baltic Birch plywood and it cut completely through after doing 2 passes. However, I’ve since gone back and tried that same sheet with no luck, even with 3-4 passes. Looking at the wood, the depth of the cut doesn’t appear to go half way through the sheet.
I tried decreasing the speed of cut. I started out at 168, went down to 165, then 160, and so on all the way down to 120. Once I got to 120, the wood started charring quite a bit, but it still didn’t cut all the way through.
I tried adjusting the focus height to the exact thickness of my wood. I was originally using the Proofgrade Maple for 1/8" plywood which was set to .13. I changed it to .118 inches (3mm), but that didn’t seem to do anything.
I followed all the steps for cleaning the lenses with the wipes. I also cleaned the mirror, which seemed spotless anyway. I didn’t notice anything that didn’t look right, though I’m not sure I’d notice if there was a problem. After cleaning, it didn’t seem to help and I’ve had the same results- it won’t cut all the way through.
I’m really at a loss and don’t know what else to try. My crumb tray is a bit warped, and they are going to replace it, but I believe it is stable enough for me to cut a small piece of wood in the center. I was hoping this wouldn’t be so difficult. I know that using proofgrade materials is recommended, but I can’t fit anything wider than 12" without being un-level and/or wobbling concerns.
Can anyone think of anything else that I can try? I don’t give up easily. I’m running out of ideas. I just want to be able to cut through something all the way. Engraving seems fine, it’s just making the cuts.
Focus on learning to cut one kind of material at a time. If it’s wood, get one sample of the wood and run tests on it until you can cut through in one pass.
Start with the closest Proofgrade settings for that kind of material. If you’re cutting plywood, cut using the Proofgrade plywood settings that most closely match that thickness of wood.
CRITICALLY IMPORTANT - for non-Proofgrade material, measure the thickness of the sheet with digital calipers and enter that thickness value into the Unknown Materials column before you place the design on the material, and watch the units. (The default is in inches.) In addition to helping with placement, it correctly sets the focal point.
Start by cutting at fast speed and high or full power. (Use the PG starter settings.) Full power is several orders of magnitude more powerful than 100%.
Only if you do not cut all the way through in the first pass on your testing, you can either slow it down a little, or just send a second pass.
Get used to sending second passes on non-Proofgrade material. You’re fighting the unknown with those.
Once you figure out the settings that work for a particular sample of material…write it down. Use them again next time.
That’s about it. Testing is absolutely necessary for non-Proofgrade materials - many of them are substandard.
But getting a new tray in is also going to make a big difference, so understand you just might not make much progress until it arrives.
Thanks for the reply. I was doing quite a bit of testing on my BB plywood before I changed over to the small wood cut outs. After trying PG Medium Maple Plywood, I did enter the thickness of the material (based on my measurements with digital calipers). I was converting mm to inches, because I couldn’t figure out how to change the units. I think I found the setting to change it. I’m still getting used to the user interface.
I was pretty much following your steps above. I started with PG settings (medium maple plywood) and I was doing 2 passes every time I changed the speed. Eventually, I got about 3/4 of my wood chip to cut at 130 or so, but it wouldn’t cut the entire circle, probably due to some warping.
I did another cleaning just to be safe, and carefully examined everything. From what I can tell, I don’t see any issues, so I’m hoping it’s my own user error or the warped tray. Or a combo of both. I’m pretty determined so I’ll probably give it another go tomorrow night, double checking everything along the way. Thanks again for the help.
Guys, we have to keep actual settings information for non-proofgrade materials in the Beyond the Manual section. (Forum rules.)
So I’m going to shift this topic into the Beyond the Manual section. Fortunately Support is already aware of this issue from your earlier post and email, and duplicating them actually slows down the process.
Thanks, please forgive my newbie mistake. I am just really hoping to get some confidence that this thing actually works, as right now it’s just an expensive paperweight. My time is limited and I have a lot of travel coming up in Nov, and a lot of projects that I was hoping to start this month. Hopefully, the replacement crumb tray will help resolve my issues. Until then, I guess I’m on my own…
Another evening of testing. I ended up getting the wobble out of my crumb tray by putting some tape underneath the side that was raised up. I carefully checked the measurement of the tray to the gantry, and confirmed it is within .05 mm on both sides in the back. The warp on the crumb tray is in the front right… and I’m avoiding using that side.
I conducted another round of tests, carefully measuring and changing settings. I tested with both the original baltic birch (3mm) that I had successfully cut before. I also did another round of tests using 4mm thick wood. I entered in the material thickness both times. I won’t go into the details here, but I methodically tested using different speeds for cutting.
No matter what settings I tried, slowing down the laser, using full blast, etc. I could not get the laser to cut through all the way. At one point I tried 4 passes and still no luck.
After doing a lot more research in this forum, I am fearing the worst, that I have a bad unit. It seems like I’ve done all the proper steps, including multiple cleanings of the lens, mirror, etc.
Since my crumb tray is warped and I can’t use the full sheet, will support work with me if I cut the sheet down and use it on the side of the bed that isn’t warped? Or do I have to wait until the crumb tray gets here so I can show them that my PG doesn’t cut through all the way? I really don’t want to waste another week or two troubleshooting. Any advice on helping expedite my troubleshooting?
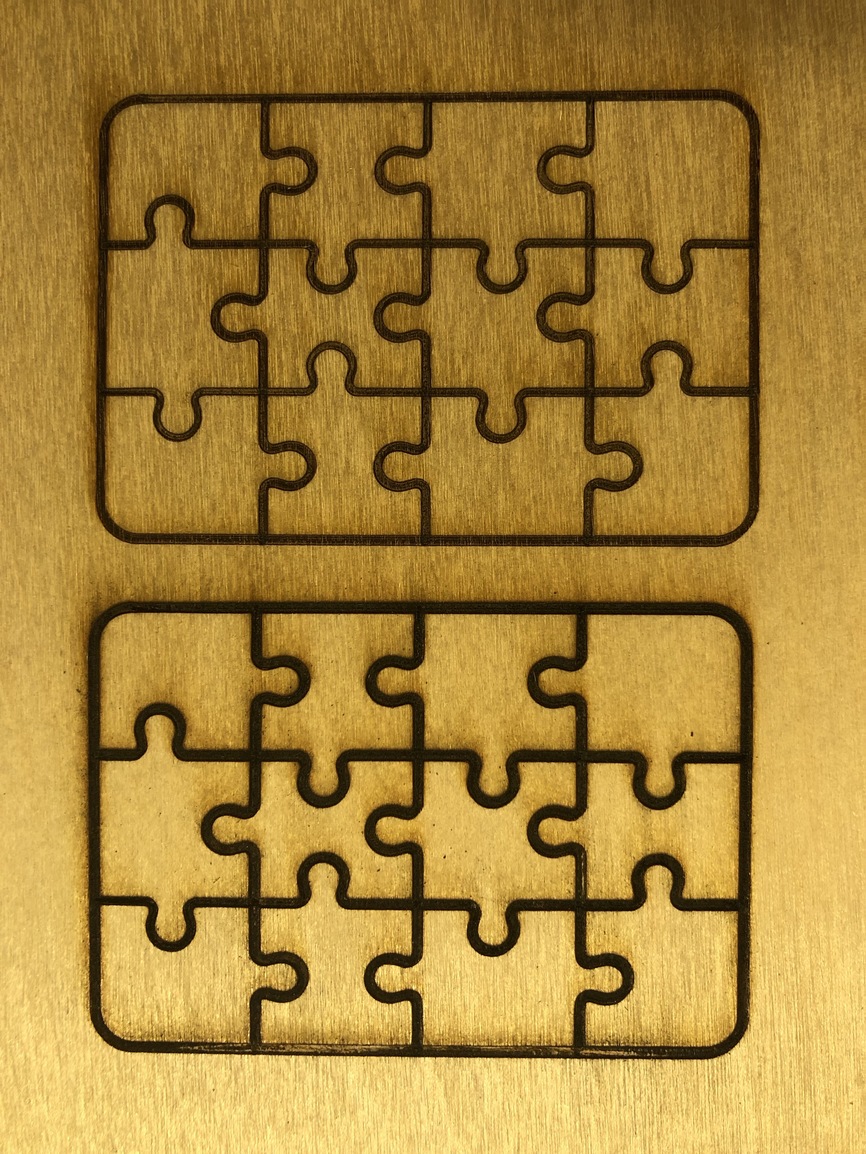
I was using the puzzle piece for my testing on the 3mm Baltic Birch. I had slightly better results on the 4mm wood but the cut still didn’t go more than half the thickness. For the Baltic Birch, it appears to be more like a score than a cut.
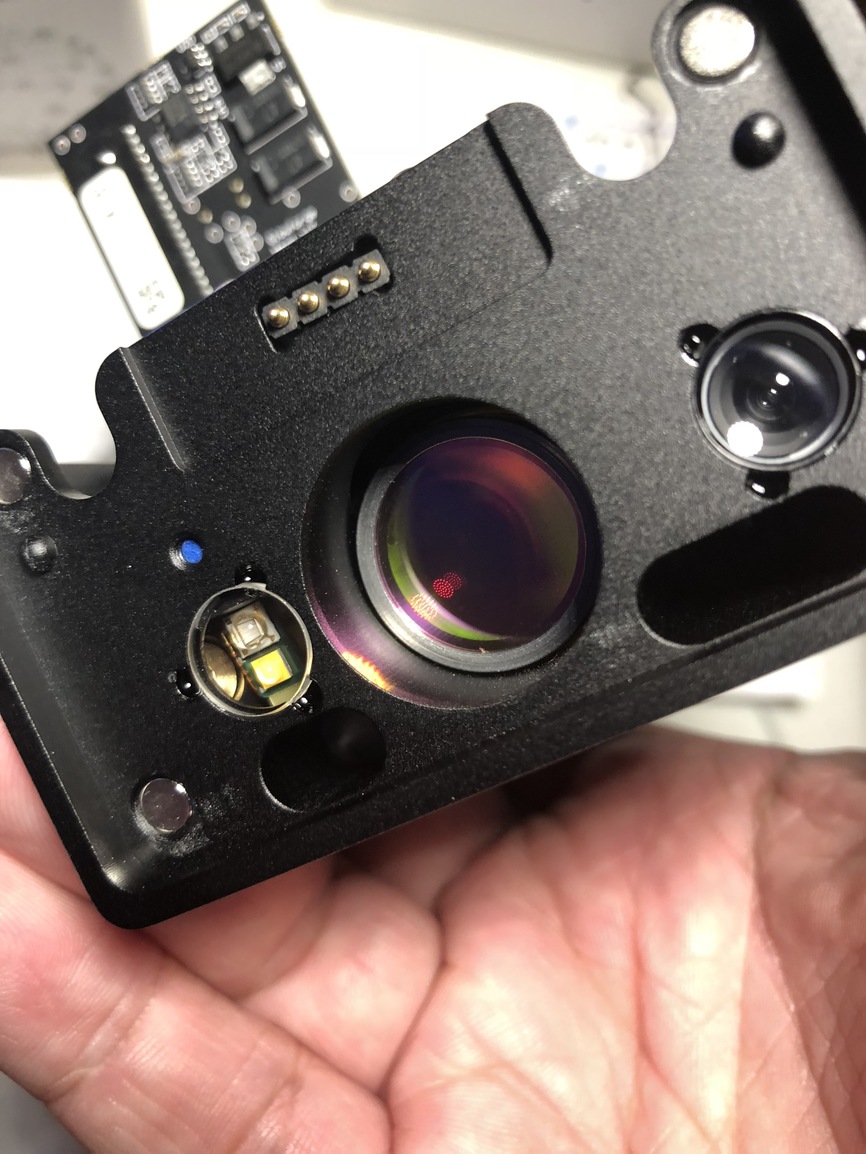
Is this installed wrong? I tried to follow the directions and thought I put it on correctly. I couldn’t find a good picture that showed it, but I thought I put it back on the same way it was.
That looks correct. @jbmanning5 is right, though, your cut lines look really wide.
It’s kind of hard to troubleshoot with you testing on non-PG materials, though, because the results are not as predictable as when you test on draftboard with PG settings.
One thing I just noticed is that I don’t think the lens was all the way pushed in. That might explain it. I just took it out and tried to push it back in as far as it could go, whereas before I think I just put it in until I heard it click.
No, the lens is supposed to fit loosely in there, do not push it all the way in. There are magnets in there that move the lens up and down to focus the beam.
It doesn’t need to be pushed in. Just let the magnets pull it in.
I can’t tell if that’s really right or not. I’ve never looked at that perspective before lol. It appears right though from what I can tell.
The calibration routine when you turn it on, and after a job (the clicking) is calibrating the lens through an autofocus motor.
Personally, I’d run a job with just straight lines. I’d make them different colors and assign different focal heights to them. Probably do .1, .2, up to .5 and just see what they look like.

 I’m pretty determined so I’ll probably give it another go tomorrow night, double checking everything along the way. Thanks again for the help.