Or, perhaps just copy the QR code and put it on the reverse side 
1 Like
im [quote=“takitus, post:59, topic:4422”]
using proofgrade veneer
[/quote]
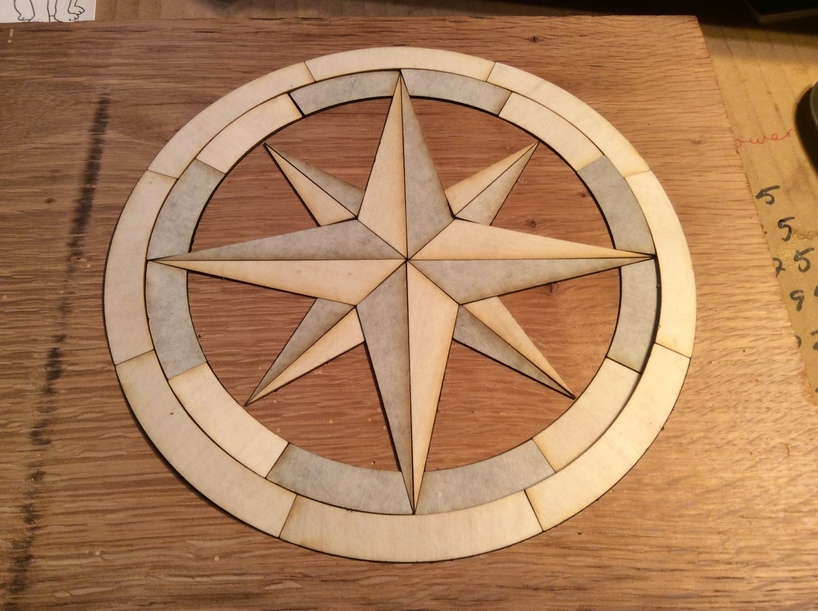
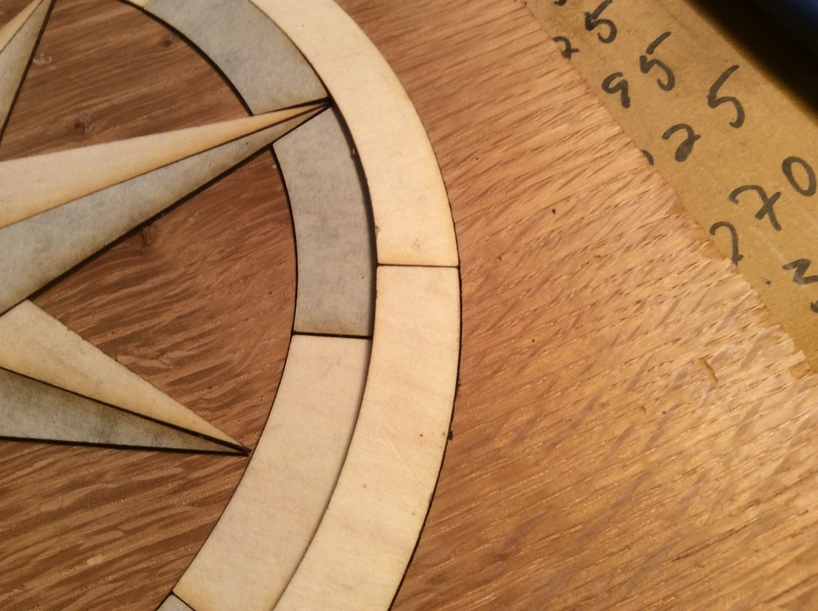
I am using the walnut and maple proofgrade veneer. It’s about 3/64ths. They will be the inlay pieces to make up the compass rose and put in the relief I have engraved into the white oak.
It’s engraving as I write this. Actually 1 hour and 56 minutes. I’ll post it as soon as I do a dry fit. This is a test piece full size to make sure I have the engrave accurately sized.
I have a Grizzly 12", their entry level. This old white oak is pretty tough on it to do a full 8" wide board.
7 Likes
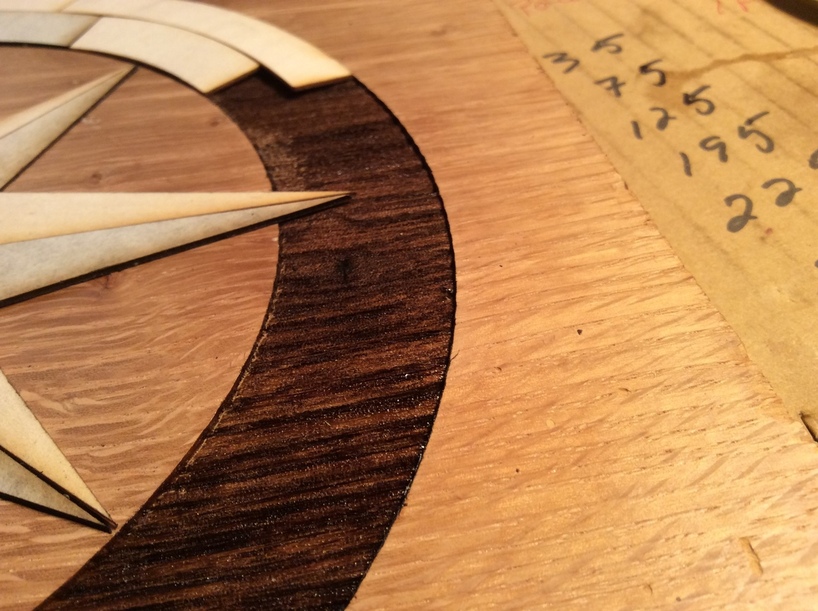
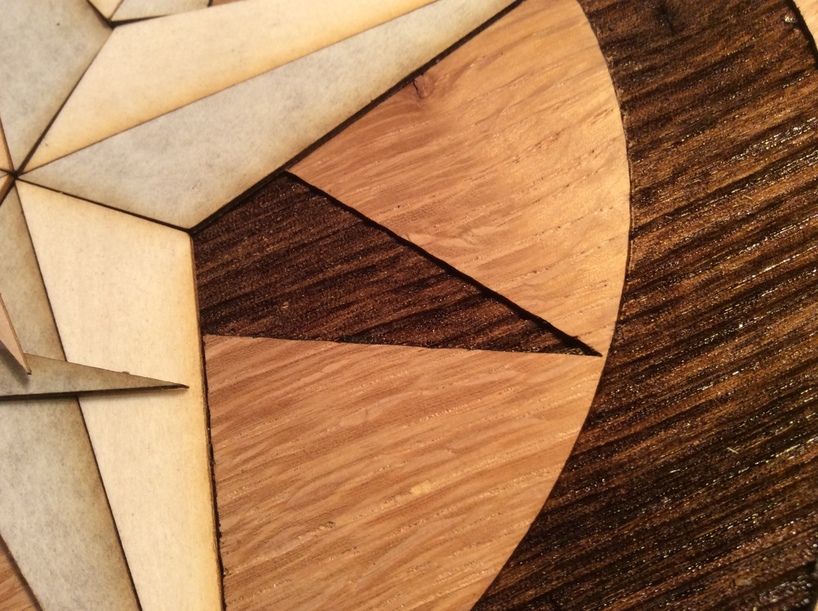
The trial in a full size engrave of white oak is finished. I can’t use this particular wood for the base to inlay into. The engrave doesn’t leave a smooth enough base. This is almost perfect quarter sawn so it is going to expose the most of the growth ring pattern without it being endgrain.
This is understandable and has nothing to do with the Glowforge but demonstrates the variable density of wood according to growth rings. White oak is also particularly dense and aged white oak like this is super dense. Have you ever tried to pound a nail into an old white oak board?
Because of the variations in the surface depth of the engrave the veneer is proud in some places and recessed in others.
The edges of the engrave also are affected by the growth rings so I don’t always get a uniform shoulder to but the inlay against.
There is also a design issue with how all the inlay pieces go together. It seems to bulge out on the right side so my engrave is just shy of large enough on the right side. Everything else will fit in perfectly once the masking and backing is off. Just the whole base variation.
I have some flat sawn white oak I can use. I might just go ahead and use the ProofGrade maple plywood. That would ensure an even depth.
Anyway a learning experience. I’m open to suggestions, comments and corrections.
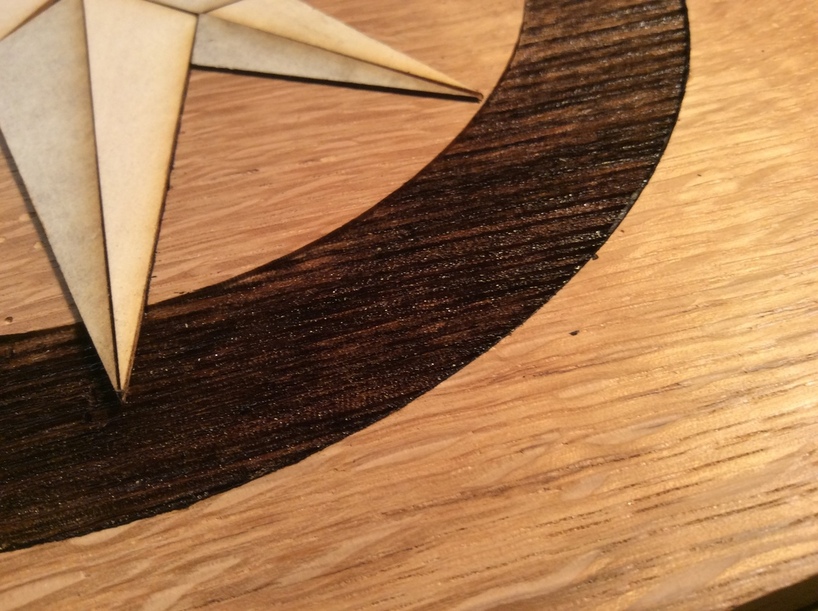
One additional point. The residue like burnt coal tar is pretty strong on the masking. It also builds up on the shoulders of the engrave, depending how it lies in line with the air assist. To get a crisp shoulder I needed to clean it out of some of the edges. Interesting how this would behaves.
36 Likes
Very nice! I hope you can still use that piece of white oak for something (the engraved color is a nice contrast against the lighter wood if you were doing some engraved writing or sign). Glad you were able to find some time to babysit ! Hope the GF isn’t taking you away from any important stuff !
1 Like
Awwww, shame about the white oak not working. Could you maybe engrave very deeply then pour some resin in to level it a bit? That would be pretty hard to do I suppose. Regardless, I think it’s going to be a gorgeous piece when finished.
7 Likes
I agree with Cyndie on this one…that’s going to be stunning when you get it locked down. (Interesting seeing all the wood issues too…inlay is really an art form.)
3 Likes
or engrave just a bit too deep and use some wood filler under the inlay pieces, squish them into it, and wipe the excess off as extra “grout” ? Just a thought… that may be terribly ugly.
I think that you are right that proofgrade for the base is the way to go. I love the design! this is going to be so beautiful, and I’m really enjoying living vicariously / watching the whole process ![]()
8 Likes
I noticed sanding the Beech butcher block top for the automated desk, there are a few pieces in it that are quarter sawn. Running my hand across the surface, I was surprised to find apparently the quarter sawn surfaces are harder because they are slightly raised.
Just an observation I didn’t anticipate, so I would expect that settings for cutting/engraving may be slightly different for the same wood flat sawn or quarter sawn to get identical results.
3 Likes
Chisels, abrasives, lots of time and even more patience?
4 Likes
For sure it would be best if everything is perfectly level, but it might be help if the veneer sits down just a bit and then you sand the oak down to flush. Little variances in veneer height can be handled by sanding through a drum sander or by planing smooth.
3 Likes
In my experience of stone inlay, the final perfect elevation is achieved by cutting the assembly down together. Sanding the base down until you just touch the veneer is how I would approach it also.
4 Likes
I think a drum sander is the next woodworking machine I’ll build, well after the CNC. I’m still going to work with how one would put some inlay in an engraved board like this, but tonight I’m just going to get some ProofGrade and etch that to the right depth and finish it up. I need to put this thing to rest!
4 Likes
Even getting very close to the exact depth, unlikely the two elevations will be perfect. I would count on having to do some sanding to achieve that. After all the work you have put in to it, it would be a shame not to get it just right. if you are weary of dealing with it my advice is to put it aside instead of pushing it through. It will wait for you.
Anytime I ‘cut to the chase’ just to put an end to a project, inevitably there will be some small detail that catches my eye every time I glance at it. ![]() coulda’ - shoulda’.
coulda’ - shoulda’.
You are the artist, so your call. It may be that the precision of the laser will prove me wrong.
9 Likes
I have three hand sanders at the ready with quite a few different grits. One thing is ProofGrade is lightly finished already so to have an even finish, I’ll have to sand off the finish anyway.
4 Likes
It really is a fine piece, looking forward to the finished product - probably not as much as you though!
2 Likes
I’ve been thinking about how I would do this and the only thing I keep coming back to is the following.
- Engrave deeper than the inlay material, maybe even two or three times deeper.
- Then partially fill the engraved area with an epoxy resin that will flow and provide a smooth uniform surface on which to mount the compass rose.
My concerns would be filling the engraved area too much or having the resin up the sides of the engraved area causing the inlay not to fit correctly.
Just my two cents, hope it may help with the brain storming on this project.
5 Likes
Would it be cheating to cut the areas where the white oak shows out of white oak veneer and mount everything on a flat substrate? No more leveling problems that way. Maybe that violates the spirit of inlay?
5 Likes
Not cheating at all. At this point I’d do the whole thing with veneer if I had four different colors of veneer the same thickness. I’m remedying that situation.
11 Likes
You can print on two different materials if you assign speed and power settings manually. It will only autodetect one material at a time for now.
9 Likes
I have an idea that might work for projects like this.
These are the problems as I understand them.
- the recess in the Oak board is uneven after cutting out with the laser.
- The veneer is so thin that it doesn’t sit well on the uneven surface.
There are several options so might not work for this project, but more guidelines for the next one.
- Woods such as Oak and Pine have heavy growth rings. This causes hard and soft spots, Dark is hard, light is soft. When you hit the wood with the laser the soft spots cut away more, causing ridges… When carving oak this same problem appears. You can either sand or plane the heck out of it, use a fine grain wood such as walnut or like somebody else suggested use a leveling type of glue.
- Thin veneers like to be glued to a smooth substrate, other wise all the imperfections in the base get transferred through the veneer and you have to sand them out. SInce the veneer is thin, you don’t want to sand anymore than necessary.
- With an inlay project like this, I am suggesting you look at it like laying tile. Glue your veneer to 1/8" hardboard, or start with 1/8" proofgrade instead of veneer. Cut these pieces out to size. This make for solid pieces and the base imperfections won’t show through.
- Take a 2 part epoxy and mix it up. Add wood dust, (the color of the base material) to the mix to thicken up the epoxy. This is called a gap filler and it helps with the imperfections in the base cutout. Make it not quite as thick as peanut butter but a bit more than honey.
- Smear this concoction in the cutout as carefully as you can.
- install the cutout pieces. Because of the thicker glue you can push the pieces down into the glue to get the top flush like you want. This is similar to how tile is laid.
- Remember, you will never get it perfect just do your best, wipe away excess glue.
- let dry and sand everything flush.
28 Likes