I’ve read through the threads that plexiglass/acrylic has a solvent that helps it bond really well to itself. It was stated in one thread that scraps could be added to acetal to make more solvent.
So, if I was planning to make some box like objects, my mental sense tells me i want to make an L shaped heavy object to act as a true 90° angle frame for the outside, and put another L shaped heavy object on the inside, so I can’t screw up setting two flat pieces exactly at 90°. The first thing I can think of that i could make is an L out of thicker acrylic. Could I line the corner with parchment paper or wax paper so solvent wont seal the frame to the product?
When making your own solvent (as recommended) how would one go about doing that? How to mix, mixture ratios, warnings and tips, if any.
I can’t address how the solvent issue will work out, but the term to search for is “jig”. Welder and woodworkers use them all the time to ensure proper angle and fit. This article will help.
You use acetone to bond acrylic. You
Can apply it directly to the joint using a syringe works well as it tends to evaporate.
If you want you can also put acetone and some small acrylic shavings or peices in a jar and let the acrylic disolve into it thats basically all that acrylic glue is. Takes awhile to dry tho you will want to let it sit for a day to set.
As for the square you can buy them super cheap at any harware store then buy some clamps and ur all good. Nice part about using straight acetone is it will wick into the joint like soldering so you could get your peices setup and square then add the acetone.
Gluing acrylic, or “welding” it, as it’s called, is very cool! You basically melt the two pieces into one (the word “weld” is very appropriate). I’ve only used one acrylic welding solvent myself, but just picture ordinary water and you’ve basically got the idea. One thing that you want when welding acrylic is nice, square, polished edges - exactly what I figure the Glowforge will produce!
I’m sure there’re a ton of videos on YouTube, but here’s one that gives a good overview…
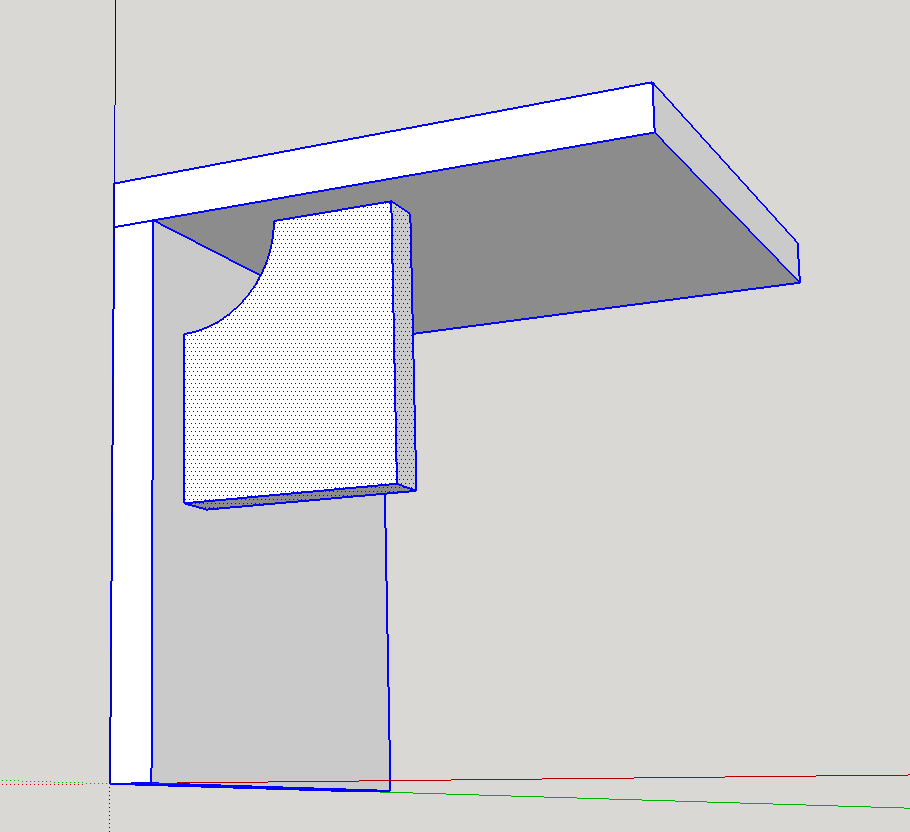
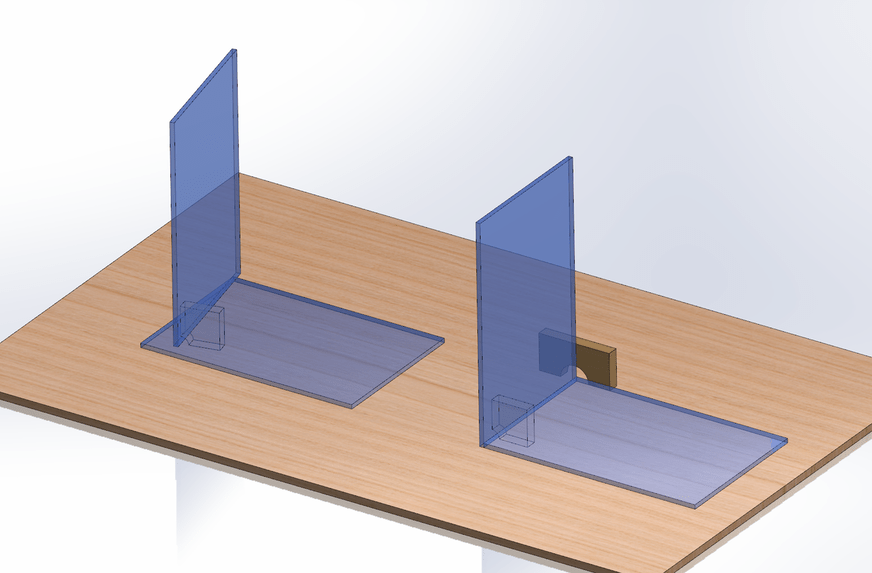
I’ve only made a single acrylic box, so take my advice with a grain of salt… You’ll probably want to employ a flat surface and a second block when you’re setting up the pieces that you’re preparing to weld. The block will keep the two pieces at 90º from each other, but it won’t keep the edges parallel (shown on the left of the image). Using the table and a second block you can set up a better weldment (like the right side of the image).
The solvent is likely to seep through the seem and reach the table. Some wax paper or parchment paper is probably enough to protect the table. (I hope an expert chimes in!)
Another thing to consider: the solvent will accumulate on the table (or whatever) and mar the finish of the acrylic. Perhaps “tacking” a couple spots, just enough to make the connection ridged enough to handle, would be a good idea. Just like when welding metal. Once the tacks are cured you could lift both pieces off the table entirely and finish the welds with less risk of mars.
I spent some time on an Epilog laser, cutting acrylic to join at 90 deg, as you describe here. I found that the cut edge was not really square. There was a slight taper through the depth, so the vertical piece ended up being a little slanted when the edge was flush to the base. I researched the issue and found that a much longer focal length lens was suggested to get square cuts in acrylic, on the order of 5" or more. I was using a 2" focal length lens, same as the one on the Forge.
Another source suggested defocusing the beam to help get a square cut. I didn’t have time to try that.
Just a heads up for everybody: acetone is quite flammable and has a low flash point, so be sure to use in good ventilation and away from spark sources.
I pulled out some samples I cut and a protractor. Holding the cut edge of the vertical sheet flush against a base sheet, I measure between two and four degrees of slant from true vertical. The sheets were 1/8" thick and the protractor had a 3" radius of measurement.
Gah! Really good to know. This could cause serious complications. @dan, @fan-of-glowforge said,
“I spent some time on an Epilog laser, cutting acrylic to join at 90 deg, as you describe here. I found that the cut edge was not really square. There was a slight taper through the depth, so the vertical piece ended up being a little slanted when the edge was flush to the base. I researched the issue and found that a much longer focal length lens was suggested to get square cuts in acrylic, on the order of 5” or more. I was using a 2" focal length lens, same as the one on the Forge.
Another source suggested defocusing the beam to help get a square cut. I didn’t have time to try that."
Assuming he’s correct, having a setting to compensate for that would be great!
You could use a 1-2-3 block as your edge to square against. The advantage they have is they are super square and heavy enough to hold normal pieces of acrylic (and since they are stainless steel they won’t weld to the acrylic). I got some super cheap Chinese made ones at Amazon. Only problem was getting them clean (they come packed in heavy cutting oil and wax paper (seriously?). Took a lot of dawn and q-tips to get it clean…
While it’s possible to align sheets of acrylic so that they meet at right angles, if the edge of the sheet is not square, there will be a small gap between the pieces on one side. That may affect the glue joint strength.
1-2-3 blocks are great, and if you stick a strong magnet on the opposite side they make a very nice jig.
They are not (usually) stainless steel though, and that is a good thing since many grades of SS are not magnetic. The wax paper and greasy stuff is for rust prevention in shipping, and a much easier way of cleaning them is to soak them in some of the “purple” degreaser (lots of brands make this stuff).
One of the benefits of using a thicker (or thickened) solvent glue is that as the solvents evaporate you get some gap filling acrylic left behind. So even if the angle is slightly off as long as you hold the pieces square you can still get good results. It may not be quite as strong as if you have a really square edge though.
I love this whole thread as I am very interested in working with some acrylic when I get my Glowforge. I have added this info. to my growling list of information and tips. Thank you all.
Solvents for acrylic come in different grades. Thicker slow setting up to water thin very fast.
A benefit of the thicker as @jkopel said, is that it allows more working time. The longer the joint is wet, the more melting happens (Ability to fill gaps).
The thin very fast setting is akin to super glue with little working time.
If you use an acrylic solvent like Weld-On… I might just take a second and look at the MSDS, I remember that stuff being really bad for you. I would use a chemical respirator if I used it and probably do that outside as well.
Yes, sorry meant hardened steel (was literally holding a stainless project in my hand when writing that). The problem wasn’t getting the oil off, it was the wax paper. Wax paper + cutting oil = pasty gross glop that sticks really, really well to the threads… Citrus based solvent works great for the oil part, but needed the q-tips to pick out the adhered wax-paper. Silicone based parchment paper would be a way better choice I imagine…
Get Acetone. Disolve your scrap acrylic (you will have tons), and then you get the same thing, but you have control over exactly how thick of a final product you wind up with.
You can use lots of acrylic and barely any acetone, and wind up with a gooey paste, apply it just like caulking. Or you can use barely any acrylic and lots of acetone, and wind up with basically water, apply it with a syringe.
This lets you always have the right paste for the job at hand, without storing more than a single bottle of acrylic and a scrap bin.
So, when you mean a little of X and a lot of Y, or vice versa, what would be some amounts, like, a cubic inch of acrylic to how many ounces of acetal for a thick or thin batch (even at an approximation)? And what would be a safe container for it? When applying it, is a natural OR a synthetic brush fine? What material should the syringe be made of? Is it water soluble(can be washed with water)