Recovering from PVC Cuts and Engraves

Hello All,

So I wanted to start a topic about PVC…Obviously this is for beginners - I am such a beginner and almost had to learn the hard way.

I cut enough PVC vinyl to make a 15" laptop bag not knowing that PVC equated to murder on the GlowForge. Not even two weeks out of the box and my GF Pro was already down…

I could get into the details of working with GF Tech Support - but it would be unproductive and take away from the GLORY that is the rest of this post…

SO…We all know that cutting PVC with a laser creates Chlorine Gas that then mixes with the moisture in the air to create Hydrochloric Acid (HCL) - at least you should if you own a laser anything…In any case, the HCL eats away at the “exposed” circuit board…

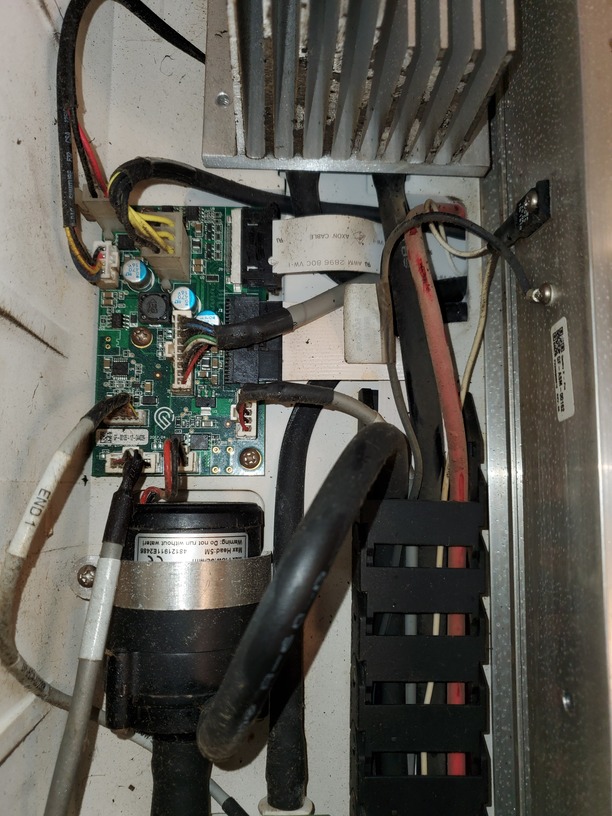
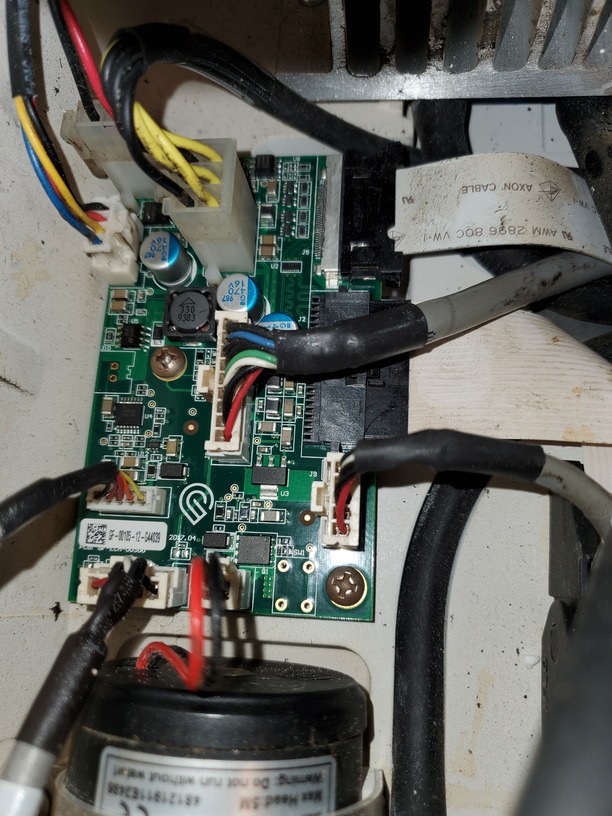
As you can see in the Image above…This was what my Circuit Board looked like. It was like this black, slimy, gunky sludge coating the top of the circuit board and connectors. gross
It also burned the tips of my fingers, on account of the HCL.

It was also causing my GF Pro to throw the Dreaded Yellow Light upon startup. It would not move or respond, no matter what I tried. Finally, Tech Support said that the GF was having trouble communicating with the Laser Arm.

So, logically, if i was exhausting HCL over an “exposed” circuit board, the HCL would ‘eat’ or corrode the metals in the board. Corrosion = increased electrical resistance…Too much resistance and the current cannot pass…if the current cannot pass then the GF cannot communicate with the Laser Arm…Right? Right.

Solution:
Remove the corrosion to restore current flow.

Process:
Remove Circuit board
Scrub with Baking Soda Solution
* 1/4 cup Baking Soda + 2 Tbsp. Water - Mix to paste
* I used a new brush head on my Phillips Sonicare Toothbrush
- It worked perfectly with the baking soda
Synergy: scrubbed and polished circuit terminals while neutralizing the HCL

Smother circuit board in Baking Soda Paste
Let sit for 30 min in warm area to dry
Blast with warm water for 1 - 2 mins to remove baking soda
Preheat oven to 150 - 170*F
Place circuit board on folded foil (non-reflective side on the outside)
Put circuit board in oven and turn it off
Let sit in oven for 60 - 90 mins to ensure ALL moisture is removed

Reinstall circuit board
Re-connect all connectors
Cross Fingers and Pray what you just did - did not damage my GF even more…

AAAAAANNNNNNDDDDD…

We are back in business folks!!!

My GF Pro is back up and running!!! No more yellow light, no more not printing, no more feeling like crap because I just broke my brand new $$$$ Laser Printer!!!

If anyone has any questions, I am happy to explain more in detail.

It woks and I am so relieved that I do not have to send my unit back to GF or go back and fourth over a warranty exchange!

Recovery from PVC abuse is possible - It just takes a little confidence and a little gumption - but you can do it.

27 Likes

HCL also attacks aluminium, and rubber and all the electrical parts and cabling. I am not sure what is actual steel rather than stainless but it will attack those too, There was a photo of one they got back for warranty (warranty was voided) but there was not a part left undamaged, I’m glad you were able to reverse the not working issues early on but you need to attend to the longer term stuff as soon as possible as well, (I would apply a light protective spray everywhere reasonable after cleaning thoroughly with ammonia outside or a super ventilated area)

2 Likes

Thank you for the tip. I was looking at the rubber on the belts and you can definitely see a few areas where the HCL started to eat away. I imagine I will need to contact support to see if I could order those.

I was able to wipe a lot of the machine down with a baking soda cloth. However, I do believe that you are correct in saying that I need to attend to the other parts as soon as possible…Do you think an Electronic Cleaner with a high evap would blast most of the HCL off?

The point of the Ammonia is that it will react chemically with the HCL producing Ammonium chloride while the baking soda makes sodium chloride which is still an issue like a quick dip in the ocean! To get all the ammonium salt and sea salt off you will need something in which they are soluble and that means alcohol likely though a long sitting with fans blowing would be a way to evap it, but of course you want to have moppable excess as it would do no good to dry and leave the salt,

In a different situation I used electronics cleaner on deep wood crud but could not physically remove it, As a result when the cleaner evaporated it left the greasy crud as a solid piece of plastic! :open_mouth:

5 Likes

Hi, glad you got it working again! I think that rather than losing the ability to conduct current by corrosion you actually were experiencing shorting of conductors by build up. If the metal was corroded away, you would not be able to restore it by cleaning. A much better situation to be in.

Thanks for posting - it puts actual experience with vinyl out for us to see. We have been warned many times, but this carries more weight. Cut vinyl and damage your machine.

Once again, glad you are up and running again.

7 Likes

I think you’ve just gotten through a major step 1. But you should also take a look at all of the connectors on the lid cable assembly as well as the little circuit boards and connectors in the head. Those have been known to fail from normal use - getting a corrosive on them is going to fry them pretty quick so it’s important to clean them asap. Someone else on the forum had an issue with corrosion on the board the lid cable plugs into and needed to replace the board. All of those boards & connectors need to be cleaned.

I have been inspecting all the boards, ribbons and cables as I was dissecting the GF to remove the circuit board.

Most of the connections look fine and I cannot see much corrosion on them…however, that doesn’t mean it’s not there.

I’m going to take the advice of @rbtdanforth and wipe everything down with ammonia and then blast it with a high evap alcohol and then blow the salt put with my air compressor. I think that should pretty much do the trick.

My drive belts really took a beating, especially the left one where all the exhaust is plumbed out…you can see visable corrosion on the rubber…I’m going to rehydrate the rubber and monitor it as I use the machine. I imagine I’m going to need to replace them at some point, but for now, they seem to still be stout enough to print with.

I’m not saying my machine is back to the level it was before I cut the PVC - but I at least got it back into production…before it was just a paperweight.

And I wanted to share in case anyone else had/has this issue…for a beginner, it might mean the difference between a $6k machine or a $6k paperweight.

4 Likes

A dielectric spray will help too. A shot in all the connectors - both sides - should go a long way to helping keep everything working.

3 Likes

I think I see another problem. Why is the “brain” of this machine exposed, as you say? I haven’t gotten my gf yet it is in the mail, but if it gets exposed to HCL, I assume it also gets exposed to other fumes that comes off the machine. I would think this is outside of the ‘chamber’ and the filers are supposed to absorb all of that?
Seems bad design or maybe I am missing something

Yes. It is on the right side, inside of a metal case that sits directly above the air inlet fan. It can’t be fully enclosed as it needs to be cooled (it’s a computer.) All vaporized materials are drawn to the left side and out the exhaust. That’s not to say nothing will every get in there, but its case is steel or aluminum and mine looks like new compared to parts on the left side.

Corrosive fumes are damaging even in minuscule quantities, vs. a fair amount of visible wood and acrylic that most seasoned owners have accumulated without issue in their machines.

Have you ever opened an old computer?

2 Likes

Correct. It can take days, weeks, to get to the point where it’s visible and/or causes a problem.

Not saying you’ll have future issues. Just saying visible inspection means little at this point.

1 Like

Thanks for sharing and for the detailed explanation. It helps to show people who are wondering just what could go wrong if they aren’t careful about material compatibility.

5 Likes

That is 100% why I made this post. Mostly to raise awareness.

I just got my machine about 2 weeks ago and I am brand new to lasers.

I didn’t do enough research on material compatibility…and GF did not offer some kind of warning document about what materials are detrimental to the machine they manufacture…

So I learned the hard way and almost broke my GF Pro.

It is my hope that this post will save at least 1 person the heartache of trying to sort out PVC damage - if that’s the case, then I’ll consider this post a success.

Thank you all for your input. I will take the information and use it to continue keeping my machine operable.

3 Likes

@whickmant - just make sure you research comparable materials.

http://atxhackerspace.org/wiki/Laser_Cutter_Materials

I found this guide on the internet that tells exactly what is and isn’t laser safe…please take a look at it as it will help you navigate what can and cannot be cut on your GF.

2 Likes

I thought the same thing…about the circuit board being exposed. @eflyguy is correct. The main computer is on the right side but the circuit board that tells everything what is to is right behind the exhaust - with everything plumbed right over the top of it.

Maybe this was because there wasn’t room for it anywhere else? Maybe this was because GF designers didn’t think it was going to be affected by this exhaust…either way, I also think there should be some kind of protection over a critical circuit board that sits right behind the exhaust…

it would make more sense to provide some kind of protection over the circuit board - weather it be an enclosure around it and/or a silicone coating on top of the board - at least with that we would have some level of protection…

however, at the end of the day if you cut the correct materials, the circuit board should be just fine.

Just gonna put this here in case someone else is under that mistaken impression: https://glowforge.com/support/topic/safety/safety-overview#uncertified-material-safety

RTFM :slight_smile:

10 Likes

This is so awesome! This is exactly what I’m talking about.

This should have been printed on a document with big bold letters that says: “WARNING” at the top and then added to the giant box the GF comes shipped in.

If that had happened, and I still cut PVC and GF came back and said we won’t warranty it - I 100% agree with their decision…because I explicitly went against their material recommendations.

I think it has to do with how they market the machine and who they’re marketing it to…

if they were marketing to an intermediate or advanced laser cutting user pool - then I could understand only “mentioning” materials dangers…because they would already know with relative certainty.

But to market to everyday customers that have little to no laser cutting experience and then expect them to have the same knowledge of an intermediate or advanced laser user is a bit much - don’t you think?

And the documentation that is offered is hard to find, often goes overlooked and is overall, vague in the dangers of which materials can and cannot be used…

Just seems like something isn’t quite right.

Thank you for bringing this forward! I hope other beginners will be able to find this information easily.

2 Likes

I strongly disagree. It’s covered pretty clearly on pages 7 and 8 of the user manual, which you are meant to read before operating the machine.

To paraphrase, unless you know a material is safe to use in a laser, don’t use it.

5 Likes

You know @eflyguy you’re absolutely right.

There is no way a beginner user such as myself would know what I’m taking about.

I acknowledge that I messed up by cutting the PVC. All I was asking was for GF to shoulder some of the responsibility for not making the information readily available for someone such as myself.

Clearly, it’s all moot at this point because I fixed it myself.

I just wanted to share the good news with the community and raise awareness about material selection…however it seems that I was met with people poking holes in what I’ve experienced.

Thank you for all the helped and made suggestions. And Thank you to all that have been critical of my post - different views are always better for the whole.

5 Likes

You’re being a good sport about the counter-opinions. I think it comes down to there’s a whole bunch of stuff you shouldn’t do and to put big labels about all of those things would result in one of those boxes that looks like it traveled the world getting country stickers like old time steamer trunks :slight_smile:

I teach laser operations at the local Makerspace and never thought I needed to warn people not to put a can of soda down inside while they were arranging material, close the lid and start the job…until someone did and the head smacked into the can but kept going after slicing through it (the aluminum in soda cans is pretty thin) and sprayed Coke all over the inside of the machine.

I did add that warning to my classes although I didn’t add a sign or label to the machine. (I figured I had learned my lesson and everyone I taught would remember not to do it too :crazy_face:)

6 Likes