Anyone else now have a great desire to engrave names on pencils from a spreadsheet?
6 Likes
I think I would engrave days of the week. Then lay them all out on my desk and only use the pencil for that day…
3 Likes
Why does this remind me of something.
1 Like
One of my favorite uses of any office productivity software are mail merges. I want to engrave large carpenter pencils with personalized messages or names. So “merge to the Glowforge” would be quite an add-on feature in my repertoire since it would simplify the batch process. Although it can all be done within Inkscape to generate the cutfile:

1 Like
@dan Here is a concrete example for you from a project I did a little bit ago. I make playing cards and often do highly custom boxes, in small runs. Let’s say that in this example I take what you see in the screen grab and print out on paper the parts that are black. Later, those printed elements will be run through a foiling process. I then need to take that prepped piece of paper and cut/engrave it.
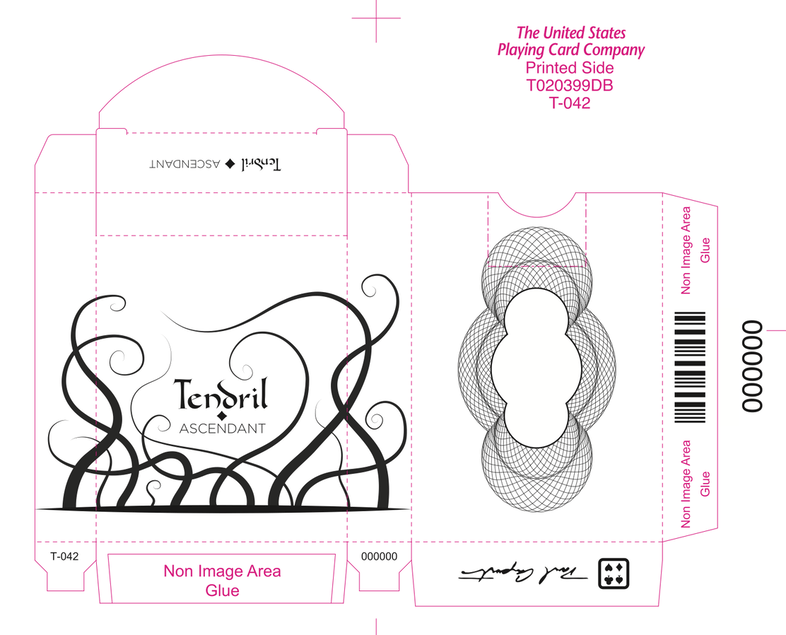
So what I need to be able to do is set this ready-to-go sheet of paper in the GF, then overlay my (pink) cut/engrave lines precisely, and then let it do the cut. If I could drop the cut lines .ai art onto the paper and then nudge it with the keyboard or some arrow controls to get it exactly where it needs to be, that would be immensely helpful.
10 Likes
One of my uses will be to take a piece of heat-fusible fabric with embroidery thread stitched into it, put it in the Glowforge, and use the laser to cut and seal the outside edge of the stitching. I can overlay the outside edge shape of the design on there, but I would definitely need fine control to make sure I’m hitting exactly the edge of the stitching and not cutting too far into it.
3 Likes
Me too! I have done sweatshirts with an interesting print stitched under and holes cutout to reveal the design. Underside applique. I have no idea what this technique is called and Google has failed me for an image.
Guessing here…it may be called ‘cutwork’. Or cutwork appliqué.
1 Like
Cutwork is good, still not coming up with the right images. Must not be in style anymore! I have a friend from Croatia whose sister did some amazing cutwork on a tablecloth for my sister’s wedding gift. They use it a lot there in the native shirts. Thanks for the suggestion.
I too have seen old table linens with cutwork. I had one made of linen that had been my moms.
Nice work there! I think this is a key use case, as there are lots of situations where we are going to want to cut a complex shape that has to be registered against pre-printed art work. Such as packaging work, various folded paper constructions, “die” cut greeting cards, etc.
1 Like
OK, brainstorming a couple of theoretical use cases and potential issues. My definition of “pre-printed” here is being stretched to include any pre-existing shape/element to which the laser must be precisely aligned, preferably by hitting the arrows keys or on-screen arrow buttons (with selectable 1", 0.1", 0.01", 0.001" units of up- down- left- right- and 360* of rotation)
Use: altering existing/pre-printed business cards, either by cutting or marking.
Example: you have a box full of business cards that were printed a while ago. You want to alter them slightly using the laser for a more custom look by by cutting and removing the center of the dots from each letter “i” but not the entire dot, so that you have a tiny outlined hole.
Issue: If you don’t hit the center of the dot directly, the effect is lost, and you just have a business card with little holes in it.
Use: Cutting around and between vinyl decals
Example: Customer wants to modify a box full of existing rectangular wooden way-finding signs into directional arrow shapes, but there are existing reflective vinyl decals that must not be modified and are too expensive to re-create.
Issues: Precision required to precisely lay the arrow shape onto the rectangle while avoiding any chance of the laser touching the existing vinyl decals.
Use: Marking items on an anodized parts tree
Example: Custom race-numbers for a drone/RC vehicle need to be marked on both sides of parts while they are still on the parts-tree.
Issues: Parts tree is not rectangular, so there is no 90* corner to register from when flipping it over for the reverse side.
5 Likes
So this is my use case. I recognize it is different from the initial feature request of pre-printed alignment marks, but it is similar and has been bumping around my head for a few months. I’m hoping it’s already in the software.
I place some leather in the glowforge and press print. The glowforge cuts out a shape and my thread holes. I remove the excess leather and flip the cut-piece over. My goal is to have a very precise engrave on the back side (think a V-shaped trench in it so when it’s folded the leather nicely folds over and those holes line up). My file for the backside engrave operation will have the outline of the leather piece and the greyscale engraving on it. I was really, really hoping the glowforge would identify the outline and print accordingly. The same thing could apply to thick, or non-cuttable materials (particularly ones with non-rectangular shapes) where you have an outline in your print-file and the glowforge aligns the piece to the outline. Adding Shift-Arrow keys for fine adjustments to the glowforge’s best guess alignment may be necessary.
3 Likes
In this case, would Glowforge create the outline? Or would you have already precisely measured your piece of leather and created the outline at the beginning, in the original file?
Yes, thanks for requesting this! I absolutely hate software that is designed for… let’s say… unexacting people. I want to be able to modify/align/whatever my drawing using NUMBERS! Scroll bars and “+” and “-” buttons are not very useful if you actually have a value in mind.
I never want to say “OK, that looks pretty close” when using the software.
Usage case…
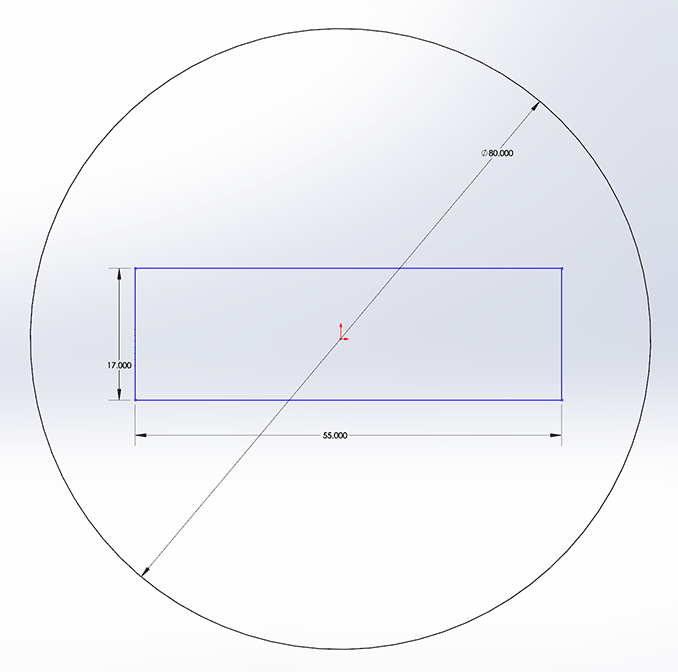
Say I have the lid of a jar or something and I want to engrave the top. If I know the diameter of the lid and the dimensions of the image I’m going to engrave, I would like to be able to use math and numbers to make sure the image is centered.
For instance, if the lid is 80mm in diameter and my image is 55mm x 17mm, I want the top left corner to be 12.5mm from the rightmost edge of the lid and 31.5mm from the topmost edge. I can squint and close one eye and get it pretty close, but I’d prefer to simply type those numbers into a dialog box.
4 Likes
I agree this capability would be nice to have but what happens when the lid isn’t exactly 80mm? Im hoping that the software can measure whats on the tray and determine a centerpoint and maybe some axes guides. Then you could dimension from there.
And by the way the precision of your diagram gave me a chuckle  It is very helpful in getting your point across though.
1 Like
In my experience, finding the centroid of an object from an image is usually a bit more reliable than getting a super accurate measurement of the perimeter. Depending on the object’s material, shape, and lighting it can be hard to tell exactly where the edge should be. If these confounding factors are the same across the whole object, when you calculate the center of the object the errors on opposite sides will often cancel out.
TL;DR: Making cuts based on an objects center as measured by the camera should work fine, and might even work better than edge finding.
I agree and I never thought about it splitting the error. The only issue would be rotation. For something like the lid mentioned above it wouldn’t be such a big deal but for other polygons where you may want lines to be parallel to edges may become a problem.
I’m not sure I understand your question. Perhaps my drawing is throwing you off. In my example I’m starting with a lid that is 80mm in diameter. By that I mean: I grabbed a lid, measured it, and the result was 80mm. If I measure it and the result is 80.25mm, then I’ll need to increase the offsets by 125 microns. If there’s a concern that the part isn’t actually round, I would want to take a couple measurements.
If you’re envisioning a situation where a person has 100 lids and measures only one of them and assumes they’re all the same: that’s a different scenario than what I presented. I’m not sure how “eyeballing it” would somehow improve that situation, but that’s beside the point.
Fair enough. In that case, I’d want to move the top left corner of my image exactly -27.5, 8.5 (X, Y) from the center point. Either way I’d rather use numbers than the “squint 'til it looks good” method.
Yes, the file for the flip side of the object I send to the glowforge has the exact dimensions (plus/minus the kerf) as it was derived from the first file. The outside cut lines in the first file would be tagged as the outline of the object to find in the second file. I expect to have to designate the outline by color or some other tag/property.
1 Like