I am about to receive a new PRO. I’ve had 4 other GFs (not pros) and in those I removed the internal fan (not an easy process) to make the inline fan more efficient. Is there any trick on how to remove the fan on a pro? I Believe there’s a big heat sink in front of the fan. I haven’t done any of these mods prior to the warranty running out.
I’ve done the basic, but looking at the pro I just gave up and left in there. With new design grill it seems to be less of an issue.
What I have done is run the fan cleaning routine, and very gently put a household 1/2 paint brush into the fan to clean - but since I can’t see I’m not sure how much good that has done.
Thanks @sqw. I will leave it for now and see how it goes. I ran a plus with the fan (turned off) in it for about a year until it was nearly entirely clogged.
Easy way once warranty is not an issue is to nip off the backside of the grill, disassemble and unplug the fan from the back.
There will still be an outer ring left from the fan but nothing inside the hole, so clear sailing.
I have left the fan but removed the grill. If the fan ever balks I will just disassemble it.
Mine is left in. as it can spin freely with air movement the build up is no worse than the rest of the path and when I am cutting something extra smoky I turn it on and get a lot less crud build up inside the machine as it does not hang around there as long to build up.
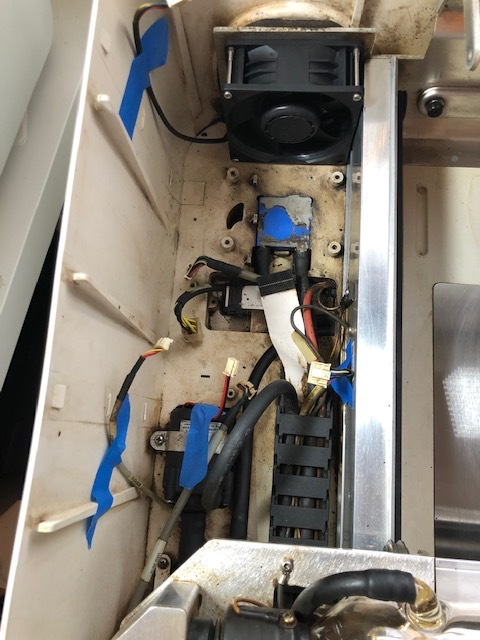
It looks a lot better then it started. But this photo will give you an idea of what you are looking at.
The heat sync is really not too hard to get out. Some notes on it:
It is the easier to access out of the connectors on the control board because its connector is not being overlapped really. I assume you already know how to get the side cover off, correct? Once you get in there then just disconnect these two connectors from the control board first:
Then you will want to unscrew the 4 screws for the heatsink
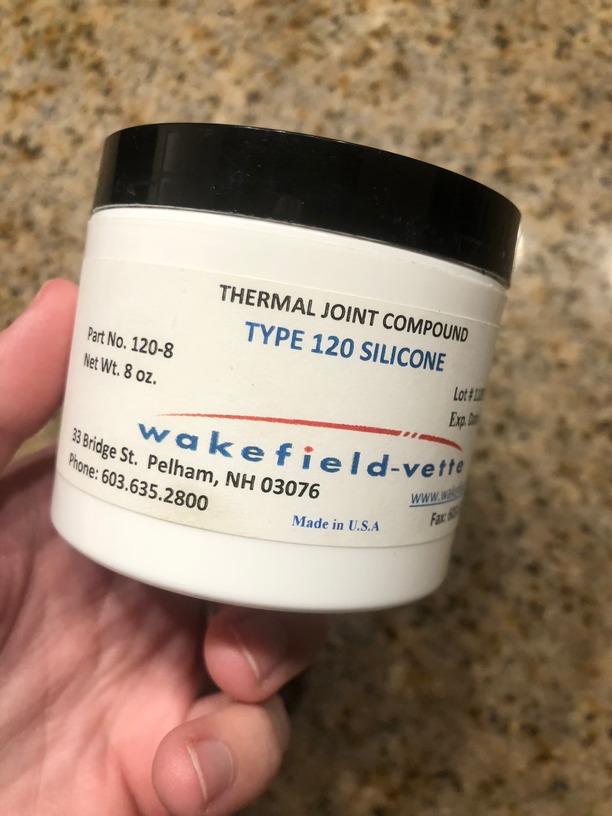
The heatsink has thermal paste under it (well the Peltier module) and so keep that in mind when you try and pull it out. Also keep that in mind when putting it back in you will want to clean off all the remnants of the prior paste and apply new paste. With my rework I was having to get the heat sink out and back in a lot and it was not until I knew the machine was finally running well before I put back the paste. So you might want to try out making sure you are fine with your mod for a few prints before adding it back in but make sure to add it back in the end
Also, It’s illegal to void a product’s warranty simply because it receives an “unauthorized” repair. So doing mods like this do not actually legally void warranty as long as you can prove that the repair made did not cause or create any factor into an issue the machine eventually might have and you need your warranty for. Although who wants to deal with court over that all and the task of proving that you did not cause any future issue is really a difficult one.
IMO, the heat sink is the easiest part to remove on a pro when it comes to the assembly on the left side and as long as you research into what you are doing then I think, go for it.
Also, I am assuming you are putting the heat sink back in the machine after you do the fan, correct?
What I always wondered is if it would be beneficial to remove all the electronics and move them to a separate box instead of exposing them to all the crud floating in the smoke during its life. I am not sure why this was not done in the first place or at least isolate them in the same rig.
Just a few items that I figure might be why that wouldn’t be the best solution
having a separate box would increase difficulty to repair and access components. All those P&S tickets where you need to send staff a picture of the control board so they can verify there are no bad connections, well they would be not doable without asking the user to open up the side panel and enclosure that the board would be in. I don’t think many people would be okay with doing that.
the box design would have to not impact the circulation of air in the glowforge
the box design would have to allow the arm to clear its path and give the cables going from the components up through the cable track enough slack to support the movement of the arm
it would increase costs
it would increase size
conformal coating on circuits is meant to protect the circuit from outside elements and it does a good job and counters the need to isolate them
debris from the circulation would cloudy up the enclosure and that can cause issues of its own. More stuff to maintain and have to replace when simply conformal coating offers the same protection
Yeah I’ve often wondered why the heat sink wasn’t in the air intake instead of exhaust. Seems like that entire system could have been moved to the right side which is far less junky.
Maybe it’s a matter of physical space in the machine? Maybe it’s easier to assemble if there’s more room for components.