We are a handcrafted Tile Manufacture located in Dana Point California. I have used my Glowforge mainly up until now to translate our designs into wood blocks to press into clay. Now I have discovered that it makes my Sample boards look so much more professional.
One Issue I have if anyone can help me, Is I set up all the prints and then hit print and things change size and placing. I then cancel the print and reset everything but as you can see the second line 6 looks so much bigger then the third line 6 and it is but when I set the size it is the same.??
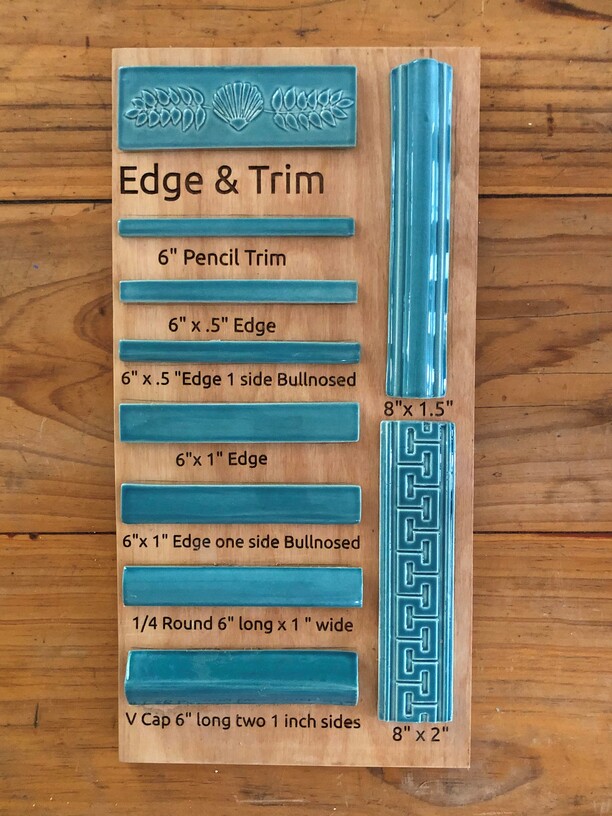
These are very simple tiles. and the Dado rail is from a wood mold that you get at any hardware store. Of course not anything original here except for the 6"x 2" tile on top I made that on the Glowforge as well using a shell and flower designs found on the web and worked together. We also have that same tile with a starfish in the middle and 5 others can be added. Actually with this machine I can put your mothers face on a tile. We have done some rockers on a tile. But I didn’t take pictures before I sent them out. Always learning .
We would need a little more information to help sort out your scaling issue. There are a number of ways you could stumble into what you describe.
What are you using to create the file you are sending to engrave? Inkscape, AI, Corel Draw, etc. or, the GFUI?
For most of the design programs, the general best practice is to set your canvas to 20” wide by 12” tall and, make sure you are working at 96 DPI (some programs default to 72DPI). There may also be specific recommendations for your export settings, depending on the software.
You can also export as PDF rather than SVG. PDF generally includes scaling information for any embedded graphics.
Resizing can very easily happen accidentally while moving things around in the GFUI, too.
It sounds like maybe you’re creating your design with the built-in tools in the Glowforge interface, and eyeballing their size and placement? Unfortunately, what you see is not always what you get – due to the fisheye lens of the camera, small variations in height can make a huge difference in where things are placed on the screen vs. where they actually land.
If precision is important, it’s usually better to design in software like Inkscape or Illustrator, to the exact size and position you want, then load that file in to the Glowforge page. This gives you more precise numerical control over everything, and you can ensure your text is the same size in a way you can’t achieve by dragging the resize handles until it looks about right.
If you haven’t already, running the calibration routine can help a lot, and using the set focus tool before placing your artwork is crucial.
Something I have learned is to wait a moment after I hit Print to let the software give the time it will take, and then check my design again. I see subtle shifts in location–everything moves together, so it’s easy to just tweak them into the right position. My design doesn’t change, nor does their relative placement to each other; it’s the location on the board that shifts (as seen through the camera).
Now that I know it happens, I don’t get truncated elements (because I’m so cheap I nestle them as close as possible to existing cutouts). This may not be your problem, but watch for it next time and see if any fine-tune is needed.
So, because of the fisheye lens, there’s image correction happening to the camera image to approximate where things will fall on your material based on the material height entered. Then when you hit “print,” if you haven’t used the Set Focus tool, the autofocus goes in and checks the material height and updates the image based on the new information. I’m thinking your material height setting may be incorrect, and that’s why you see a shift when the image goes to print. Using Set Focus somewhere in the middle of your design before you finalize placement might solve the issue for you.
Good observation; I was wondering why I didn’t get that shift on every single operation. I do Set Focus about half the time. I would probably improve my odd cuts if I center them right under the lens as well. When I’m cutting/drilling things like 3/16" dowels, I zoom in to x1000 and check everything. There is just enough variation in the heights that it must drive the software nuts.
Thank you Chris,
I was using the built in tools and can totally see your point, it crossed my mind it was the camera’s view that was messing me up.
I will look into illustrator, i tried to inkscape but the commands were tiny and i could not figure how to make them bigger.
Thank you for the advice. This is the first time I have used the community and I must say I am impressed.
The other issue I have is different depths. Can you suggest a tutorial or a project that can give me an idea of how to set the engraving setting with skill.