Just getting back to my Glowforge after having to send it in for a new power supply, and then being on the road for 5 months, and I have a pile of little projects lined up.
I’ve googled around in the GF site and out to see if anyone has advice for setting specific depths of cuts in acrylic proofgrade.
I’m trying to make a custom casing for a flash drive which lost its case. The idea was two pieces of PG Acrylic, hollowed out to hold the flash drive sandwiched in, but I have NO idea how to make the hollow to a specific depth. Was hoping someone had done a lot of bench-testing, and might have created a chart of power/speed settings relative to depth in PG Acrylic, before I go try and do it myself…
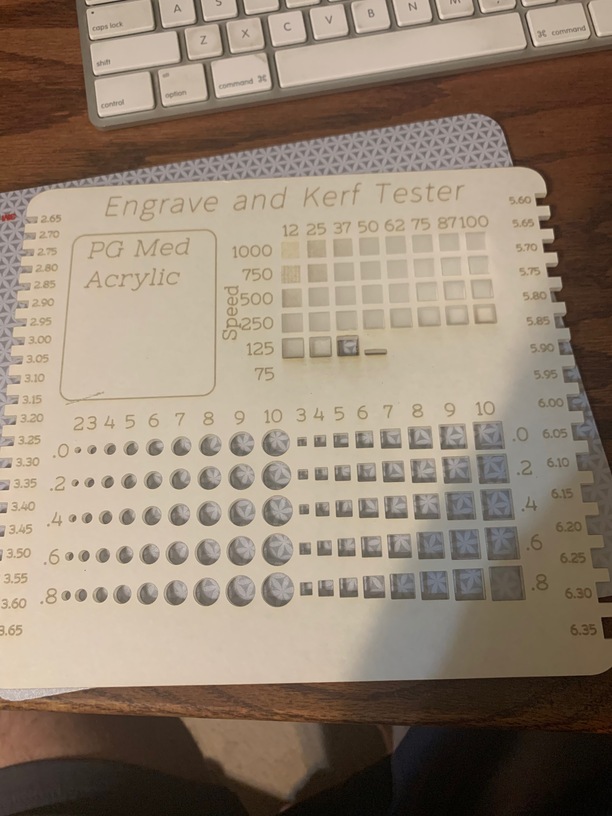
I created a version of the material test board that contains a grid of squares where you are supposed to vary the power and speed. I just completed one for pg clear acrylic. But I did not measure the various depths.
How deep do you need the hollow? One brute force thought: Why not three pieces? Two outer thin covers with a third sandwiched between them and around the drive? If the acrylic is an identical depth as the drive it might be a simpler approach.
For the record: I’m very interested in a real answer on how to depth-cut like you’re asking.
Here is a great example of depth variation from a gradient pattern. You can get some hint as to depth and power and speed from there, but I suspect you would like illustrations of power powerfil on acrylic that gives an exact depth.
I’ve searched the forum for a lot of the old posts. There was a lot of experimenting and documenting engraving depths, but some of that was using the original pre-release power profiles.
I have done this multiple times and for each project I repeat my testing. It all depends. Acrylic can be variable as to nominal thickness and that can make a huge difference, especially if you are trying to match one half to another.
I make a small coupon and test it out. You also get different effects with multiple passes and different LPIs so it isn’t as simple as just saying full power at such and such a speed.
Then you can add a defocused engrave to have a smoother surface.
That is a great test @stoli. What is the LPI for the depth engraved squares?
A simple one would be using these coupons and start with full power at about 800 speed with one of them at 340 LPI and the other one the same but give it two passes. See how that works. Measure it with a caliper. Then you can evaluate the surface and residue.
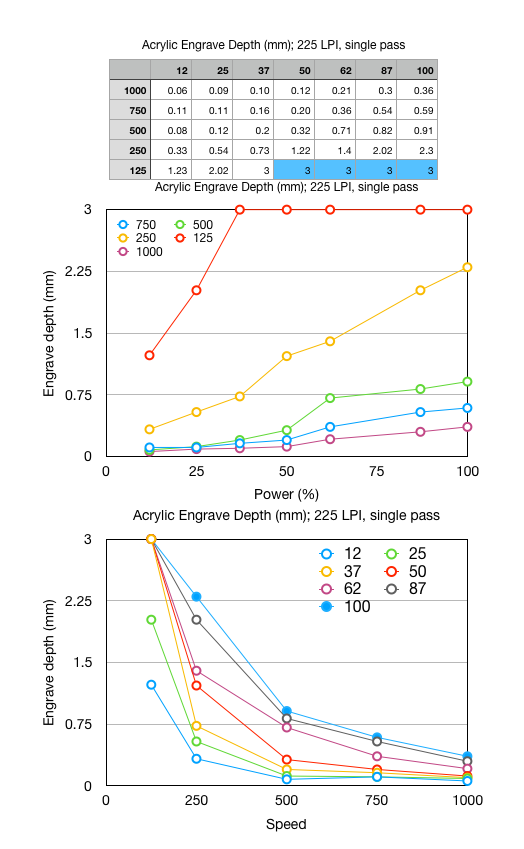
I used the default 225 lpi. I should update my template to include that info because I am likely to forget. The test was also single pass.
I like your simple test coupons for the original request here. It will be easy to place the thumb drive on the ledge and feel if the engrave was deep enough. It is always better when you can avoid making a measurement.
OK, I just measured my test samples for you. I did not clean out the residue, so any measurements below about 0.3mm are a bit suspect, but I also don’t think you need that kind of small engrave. I fully engraved through the PG medium at 37% power and 125 speed. Any more power deposition than this will also burn through, so I just left them as 3mm, but colored them blue.
Here is the data, and 2 plots. The first plot shows the engrave depth as a function of power, for various speeds. The second plot shows the engrave depth as a function of speed, for various power settings. The two plots use the same data, just viewed as transposes.
You’ll never get ironclad precise depth measurements on an engrave, there are too many variables. Material variation, focus height, ambient temperature, cleanliness of optics, etc.
My suggestion is to design your projects to avoid strict pocket depth, you’ll struggle with it every time if you try to get an exact depth.
Perfectly true, but it’s a handy technique to create pockets for perpendicular pieces with shallow tabs, such as dividers inside of a structure, without having visible slots on the outside. A ~2mm pocket for a 1.5mm tab works great.