I thought that was a conche, but having never seen one in person wasn’t sure. Did you make the conche yourself? I’ve made chocolate from the bean once, but with only a heavy duty food grinder I could never get that final grit out.
3 Likes
Random Llama! Random Llama! Llama
I should start selling these Random Llama Cake Pop for your campaign! LOL

21 Likes
Those are just excessively cute! 
8 Likes
Adorable!
5 Likes
No. I bought it. It was pretty expensive for what it is, but a stone grinder is the best way to make chocolate… though there are other viable options (like a ball mill). I assume the cost of the equipment is because it has to be heavy duty enough to run for days on end without stopping. A conche is basically the same machine with all of the tension removed from the grinders so that it is running but not grinding. This essentially aerates the chocolate… like Willy Wonka’s water fall! It helps to develop flavor without further processing the chocolate.
9 Likes
A few things I made last night. 

Not sure why the top one turned sideways…
14 Likes
Ah, the mitten state. I’ve lived in Michigan for almost 20 year now.
Nice projects!
2 Likes
I make wooden things. Here is a custom house address powered by wind…
52 Likes
That is absolutely awesome. I bet it also helps to keep the moles away as it looks like it has a good amount of vibration due to all of the moving parts.
2 Likes
I stabilized it a bit to remove the wobble seen in this gif. But all the moving parts still move and may help to deter wildlife in general (but we do not have moles where I live currently - for now in any case).
4 Likes
That’s nicely done - I love mechanical wooden toys, and I like the fact that you automated it using the wind.

5 Likes
HA! I think we are starting a movement!
3 Likes
I’ve posted this in other places but also wanted to add it here where it makes more sense. My current favorite thing to make are wooden Mugs.
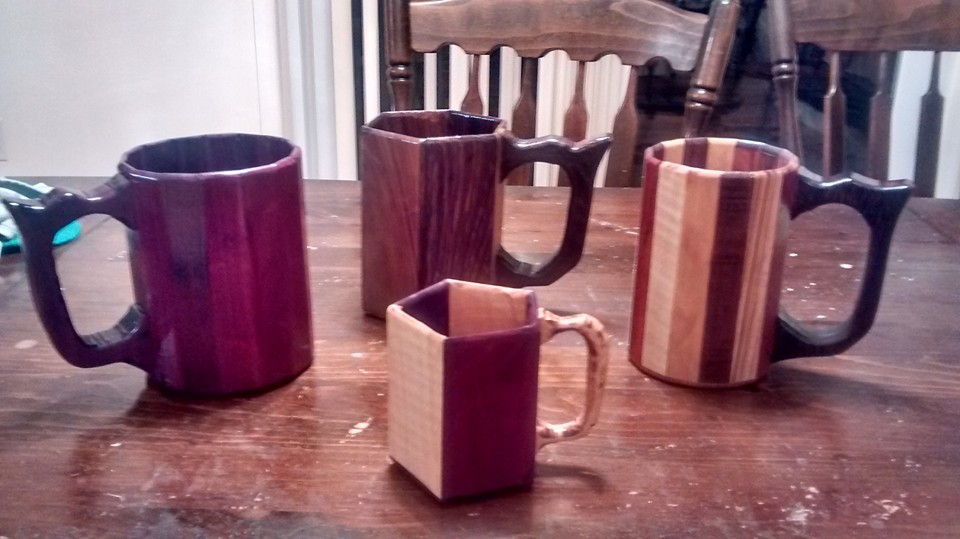
I generally make them in Nalgene sizes (around 32 ounces of liquid), but I’m starting to branch out into smaller sizes. There is a lot of math that initially goes into these mugs, but once you’ve recorded it (just like what I expect recording power and speed for my GF), the next one you make will be MUCH quicker. In the picture above, the mug on the left is 15 sided Purpleheart, the back center is an 8 sided Wenge/Walnut, the front center is a 5 sided purpleheart and curly maple, the right mug is a 15 sided “sample” mug I made for myself with 15 different kinds of wood: Leopardwood, zebrawood, columbian rosewood, cherry, curly maple, bloodwood, walnut, purpleheart, hickory, wenge, yellowheart, bubinga, soft maple, mahogany, and dark bubinga. That one is meant to show which woods are available to make other mugs from.
This Fall/Winter I have an idea of making a series of mugs, 3 sided, 4 sided, 5,6,8,10,12,15, and 36 sided. Each in a single type of wood and each mug different from the others (mug 1 in bloodwood, mug 2 in purpleheart, etc…). I hope to upload more pictures as this series gets made.
23 Likes
You do realize that eventually you have to eat its face right?

5 Likes
Love the “roots”!
Great idea, thanks for sharing 
@robroy865, nice! That row boat is so cool!
I presume it will “vane” with the wind direction? What a fun project!
Thanks for the inspiration!
2 Likes
I often end up with small remnants of beautiful woods, great project for a resource like that! Very nice.
absolutely! the more sides you have, the smaller the pieces required (and more of them…). They are also only 1/4 of an inch thick.
This leads to many ideas of how the GF can be used in making these. The dovetail discussion a little while ago was VERY interesting to me because of these mugs. I can’t use the “step” design that some had suggested because I have to put angled face to angled face, so they have to be flat. Maybe someday the variable power engraving will be made to work so I can maybe make these mugs about 80% in the Laser.
The way that these are assembled I’m hoping will allow me to engrave on the surface before I glue the slats together. I just make a jig to hold them all tight together and straight and then the final glueup will have to be done carefully, but I can add whatever graphics I want to the outside.
Another idea is to engrave snarky sayings on the inside bottom of the mug. So when you finish your drink you can read something like “Broken Mug, you need another!” or “if you were looking for comfort at the end of your drink, you have found the wrong mug” or really anything fun or interesting.
SO many ideas of what I can do with these once I get my GF.
6 Likes
I’ll bet you will be able to do them completely with laser precision!
The hardest part will be the handle. They are typically 1" thick, and only as thin as 3/4" thick. BUT, I can engrave the design on the top and use my bandsaw to cut to that line. Right now they are hand-drawn so each one is unique (and by unique it’s just that a curve or thickness might be a little different between handles. I could absolutely just build a template to make them all the same but just haven’t felt the need to do that.)
But everything else could be lasered. I have visions of an intricate Irish knotwork design stretching all the way around the mug.
3 Likes
It’s for a good cause! LOL