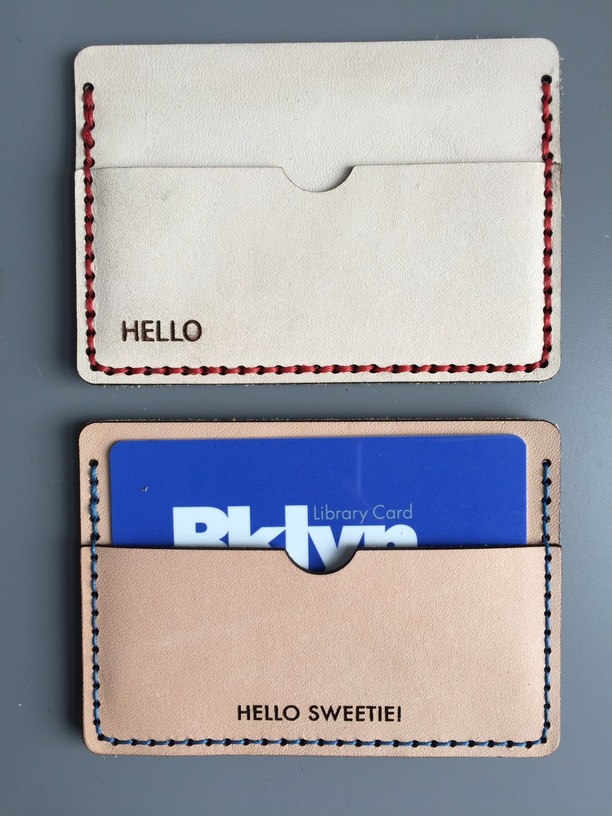
I chose a simple card case for my first project. I’ve made this piece many times by hand, cutting each piece individually, marking the positions for the holes, and hammering the lacing holes with chisels. The Glowforge did all that work in less than 10 minutes - pretty flawlessly.
I used Adobe Illustrator to create my SVG files. I used a line weight of .001 for the cut lines and set my stitching holes as 1.5mm circles, then set the type in Futura Medium and set it to expand.
On the first test I used the Glowforge Proof-grade Medium Natural Leather. The proof-grade leather was a little soft for the engraved type. In some places the type lost its sharp edges. I decided from the first test that 1.5mm is slightly too large for a stitching hole, so I changed the file to 1mm circles for the second test.
For the second test I wanted to use leather that I already had. I used this leather:
I used the Glowforge’s “Thin Natural Leather” material setting, which almost worked perfectly. The first three pieces cut perfectly; the last did not. I think the slight curl in my leather might have caused that.
A couple things I learned:
I store my leather rolled up. To use it on the Glowforge I will need to cut it down and weight it flat so that it will be perfectly flat for cutting. The areas in the leather that wanted to curl did not cut perfectly.
I think I’m going to invest in some calipers to measure the thickness of the leather I’m using, so that I can manually set the material thickness for my cuts.
I found when stitching, that the char in the holes was getting all over everything including the thread (was using that expensive hemp thread). So I took a waste piece of thread and stitched through all the holes with no knot, just to clean out the holes. Made a big difference to the cleanliness of the finished product. I don’t see any char on yours so maybe you already did that.
Glad to see you comparing the “new” to the “old” methods. They both look great.
You can set your line weights to 1 PT or bigger if you like. That makes them much more visible in the GFUI and the line weight doesn’t affect where the cut is made.
In cutting leather, I’ve spaced magnets around the area I want to cut to hold it flat to the crumb tray. When I didn’t, with just a slight bulge, it only cut mostly through.
I went to Tandy. I only wanted a cheap belly piece for learning and experimenting. They went to roll it and I said, no that’s okay, and they looked at me like I was a nut case. It came flat and I’ve stored it flat for this reason.