Simple tool for tiling any image to break up large engraving into smaller jobs

No I haven’t. Do you have a link? Especially if it has the same print area as the glowforge?

The ones I’m talking about definitely aren’t the size of the glowforge. I don’t know if they exist. These ones are small handheld ones that you manually move across the surface. I just googled “print on anything” and different options come up.

1 Like

I’ve attempted to nail down what causes a seam to appear when engraving. I don’t have access to how Glowforge generates its toolpath, so this is mostly just a guess. Also, this information will only interest you if you care about the nitty gritty details of how images are represented and displayed.

My guess is it comes down to how the pixels of the tiles are interpolated and, specifically, how Glowforge is performing that interpolation. SVG is a spec and many edge cases come down to how they are implemented. I suspect this is one of those edge cases.

In my initial implementation (before I posted), I embedded the images into the SVG without an image-rendering property. When no image-rendering property is specified on an image tag in SVG, it defaults to optimizeQuality. When in this mode and sampling an image, the spec says, “The user agent shall employ a resampling algorithm at least as good as bilinear resampling.”. Bilinear resampling will combine neighboring pixels based on the distance to each one. So in the center of a specific pixel it will be that pixel’s color, but as you move continuously over to the center of one of it’s neighbors it will transition smoothly to that other color.

In this application, where we’re splitting up the image, we lose the ability to perform this continuous interpolation because each tile is now a separate image. Instead of interpolating between neighboring pixels, I wanted any sample within a pixel to be that pixels color, which is referred to as “nearest neighbor resampling”. This would prevent pixels at the edge of each tile from interpolating to white as seen in this image:

So, in the version of the application that I released, I specify the image-rendering property to be optimizeSpeed. Unfortunately, the SVG spec isn’t very specific about how this setting should be handled (and there isn’t a more specific option as far as I know). Under optimizeSpeed the spec reads:
“Indicates that the user agent shall emphasize rendering speed over quality. The user agent should use a resampling algorithm which achieves the goal of fast rendering, with the requirement that the resampling algorithm shall be at least as good as nearest neighbor resampling. If performance goals can be achieved with higher quality algorithms, then the user agent should use the higher quality algorithms instead of nearest neighbor resampling.” This suggests that nearest neighbor sampling could be used, but also says a “higher quality” algorithm could be used. Unfortunately, any “higher quality” algorithm in this case will give us undesired artifacts. This seems to be what is happening here. Glowforge is likely preferring a higher quality algorithm which introduces a seam into our tiles. Again, this is just a guess.

One option to avoid this specific issue in SVG is to use patterns. The original image could be embedded in a single pattern and rect tags could be used to reference different portions of that pattern. This would avoid having seams where the interpolation implementation introduces artifacts, but unfortunately, it looks like the Glowforge app doesn’t support patterns (I tried!).

3 Likes

Great detail, but this might also explain exactly why my detailed engrave passthrough jobs appear to “skip” a line between steps, even though the head moves over that area. It’s resampling the job for each step, NOT continuing the previous step.


image

1 Like

I don’t have a pro machine, so I’m unfamiliar with the process, but I wouldn’t be surprised if Glowforge is doing a similar split process. What is the bottom screenshot of?

Microscopic view of an area in the other pic. I meant to attach a larger version so you can see there are dots along what appears to be a “skipped” line, so it’s not actually skipping it. I edited the post…

Here’s another one. Apologies for the huge file, but if you view the full size image, you can see (again) there are dots in the “skipped” line:

1 Like

That certainly looks like a similar issue. Maybe someone from Glowforge can chime in? Are there known issues with interpolating raster images in an SVG? Are these seams caused by something else?

this capability is out there. i know of two ways (that aren’t transfer) right now.

you can user inkjet printable (or laser printable, depending on the size you want to print and you printers) veneer sheets. one source for them is Blank Wood Veneer Sheets & Panels | Cards of Wood. i’ve printed on their 24x24 sheets on my office’s wide-format inkjet. then mounted them on wood or acrylic.

there are large, flatbed printers out there that will print on many surfaces. i have a vendor nearby that can print on anything up to 60" wide and 2" thick that will hold the ink. one of their first tests was to pull the bathroom stall door off and print a poster sized image directly on it.

that’s not something you’re likely to do at home, but depending on what you’re doing, it may be worth having someone print for you.

1 Like

I need to get some bathroom stalls for home. Just to give that public restroom feel that I am missing out on with covid-19.

3 Likes

I performed a test that better visualizes the problem. Here is an SVG with some simple raster images embedded in it in various configurations:
raw link to test.svg

test.svg on GitHub

The left most image is a 2x2 pixel image rendered 2 inches x 2 inches with image-rendering set to optimizeQuality. The next one is the same image with image-rendering set to optimizeSpeed. The next is 4 SVG Rects in the same black/white configuration as the pixels should represent. The next sets image-rendering to pixelated, which is in the CSS spec, but not the SVG spec. The final image is 4 separate 1 pixel images, which is how my splitting tool would handle splitting up the first 2x2 pixel images into 4 separate tiles. You can see that Glowforge doesn’t sample the pixels the same way that Chrome or Inkscape do (it seems like they treat the upper left corner of a pixel how Chrome and Inkscape treat the center of the pixel). Inkscape seems to be the only one that treats optimizeSpeed differently than optimizeQuality.

Here is a screenshot of this image rendered in Chrome:

Here is a screenshot of the same image rendered in Inkscape:

Here is how the Glowforge handled engraving it:

1 Like

If Glowforge supported patterns, image splitting would be possible while avoiding the fact that the interpolation implementation differences exist. This image, for example, while it looks different rendered in Chrome or Inkscape, would properly be split into 4 tiles if Glowforge supported patterns. Even if Glowforge’s interpolation algorithm is different (which it looks to be), the splitting would work. It would also allow for SVGs to be split up without the need for rasterizing them, or manually splitting shapes.
Same image link on GitHub

1 Like

I reached out to Glowforge on their support forum about the seams that are introduced when engraving the tiled version of the image. I performed a couple more tests and while I still think the interpolation issues are introducing the seams, I found a way to make the Glowforge behave a little differently. The seams don’t entirely go away, but do seem to be less noticeable when a new Wrap Tiles In SVG checkbox is checked in my tiling app.

2 Likes

Got any pics of the difference and details of the change?

This is the test that I did where I discovered the difference.

In #1, I embedded #2’s SVG into a single image tag. The clearest example of the difference is the first pair of checkers (the 2 pixel x 2 pixel one). You’ll see that there is a distinct checkered pattern in the one that is made up of 4 different 1 pixel images, because it doesn’t interpolate the edge pixels to white (like it does in #2), but rather maintains the pixels color as it transitions over the pixel. As the resolution of the image gets bigger, you’ll see the seam artifacts diminish, but are still present until the DPI of the images exceeds the LPI of the job. Now, #1 was engraved as a single job, so it demonstrates that the seam artifacts are still largely due to the interpolation differences, but wouldn’t show any extra issues that may crop up when the tiles are separated into separate jobs on the Glowforge.

Here is a picture of a more representative real world demonstration:

The left image leverages the new Wrap Tiles In SVG checkbox to trigger the better interpolation algorithm, while also engraving 4 different tiles as as separate jobs. You’d likely only notice the seam if you knew it was there (and even then it’s very subtle). The middle image is a non-tiled engraving (so no seam at all). The right is another tiled version (so 4 separate jobs) generated with the Wrap Tiles In SVG unchecked.

2 Likes

Even knowing it’s there, I can’t see it in the left image. :slight_smile:

The horizontal seam looks to be gone. There is a more subtle vertical seam, that unless you’re looking for it could easily be part of the image. I imagine how easy it is to detect will depend on the image. The picture I took may not be high enough quality to really see it.

Ah… I don’t see the vertical even in the right image.

They closed my support ticket, but I ran a couple more tests which indicate that the seams are not solely the interpolation issues.

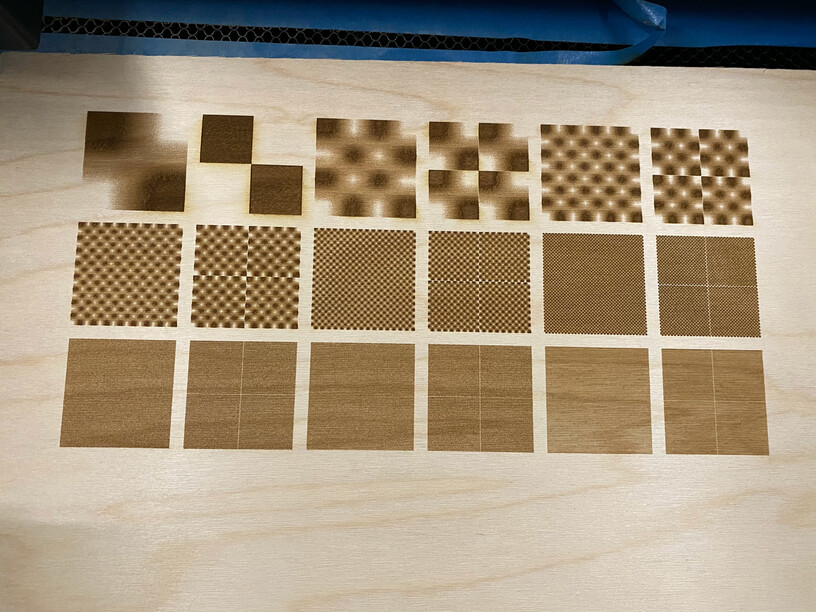
This one embeds each raster image in an SVG and that SVG is embedded in an image tag in the SVG that is ultimately uploaded to Glowforge. Doing it that way triggers a different interpolation algorithm when engraving the raster image. The seams are still very recognizable.

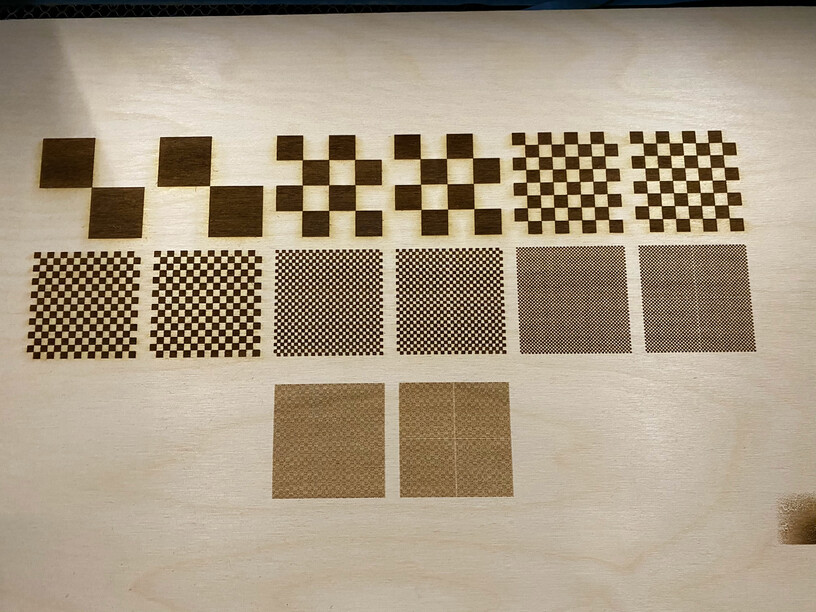
And then the final test I performed seems to really indicate that the interpolation algorithm isn’t the only culprit, because this one converts each pixel into an SVG rect tag, so no raster image is included (this would theoretically represent the same thing as a raster image with an image-rendering property set to pixelated as I’ve been advocating for). I wasn’t able to engrave the largest resolution image of the previous tests due to the much larger file size, but it’s clear from the next resolution down that the seams are still there.

Anyway, we’ll see what Glowforge is able to do about it, but from the sound of it there’s much less of a need to split an image since Glowforge allows for much longer engravings now.

2 Likes

This topic was automatically closed 32 days after the last reply. New replies are no longer allowed.