I have been in awe of the designers and people on here who have been so helpful. I’m using Inkscape now and at least i know how to do a few things. i do a lot of photography and photoshop has always been my ‘tool’ and i feel very comfortable with it…but i’ll learn. I try to pick one thing a year to really learn. This one will be my task for at least 2 years to get it where i’m comfortable with it. Thanks for the encouragement! It’s helpful!
2 Likes
10 Likes
 you never know when you will invent a new word!
2 Likes
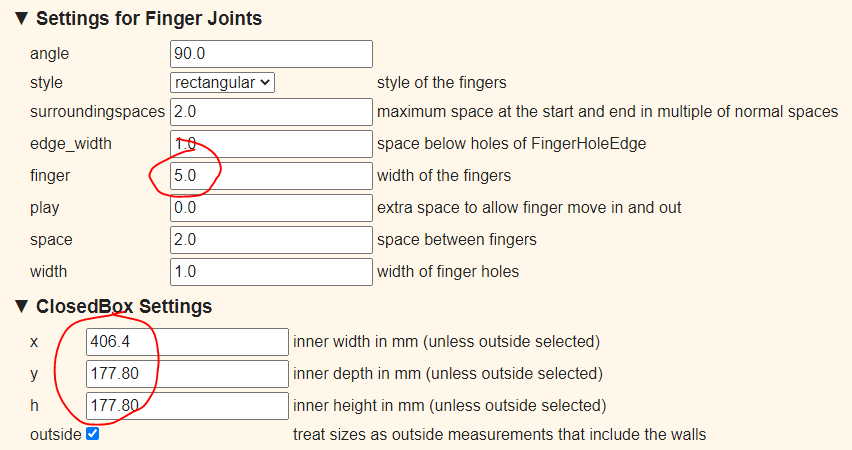
You didn’t specify depth so I made it 7" deep as well:

Gets you:

Gets you:

(In Inkscape) take the top, and the top edges of one of the 1st image, and copy that into the 2nd image. Then delete the top, and the top edges of one of the 2nd image and paste the parts you stole from the 1st set. Once they’re lined up you can do a Path > Combine and they’ll glue themselves together giving you something with the single large tab on the top, but lots of small tabs everywhere else.
See if that gets you started
2 Likes
Thanks, i’ll give this a try right now!!
1 Like
Big surprise, i have questions:-). My edited file now has the five sides/top, one of which is from the first set, the rest from the second set. i clicked on one of the long sides from the second set thinking it would break down to small chunks and i would highlight the whole row of finger joints and delete, however it doesn’t break apart when i click on ungroup…multiple times. How do i delete the top edge…and, do i need to delete the top edge of all the pieces that will be on the top part of the box the lid sets on? Once i get the top ‘off’, i just align them and combine?
thank you!!
As soon as this episode is done, I’ll make a write up for you if you like!
i would love that:-) I have a few things i’d like to make and i need to make sure i understand it. Everyone has a bit different thoughts and hearing all of them helps too!
My husband didn’t want me to type this up because he worries about too many people using my style of boxes and then they aren’t special. But really anybody could figure them out if they try. I just happen to have had time to have done this design, and I am pretty sure I was not the first person to do it, I just may use it the most. I am glad that people have been using my boxes from my original thread to make cool gifts for others!
8 Likes
Well they are very special. Okay, i have the box downloaded then you told me to set the line formatting…where in the world do i find that? I’ve clicked through most of the options…and believe it or not, i’ve watched a few inkscape videos!
oh good grief, never mind, i see it:-)
1 Like
so i have it downloaded after doing all the above. when i open the file, it appears the boxes are there but i can’t get them visible. i have changed the stroke color etc…haven’t had this issue before…what have i done wrong?
Thanks
Change the stroke width - third or fourth tab within the same area you changed the colour.
1 Like
Thanks, i guess 3 pixels wasn’t too bright 
1 Like
So when i delete the nodes, i then used the bezier pen and connected the two nodes. is it supposed to create basically a new line? It looks like each of the lines i added are ‘new’. i know i can group them together but i want to be sure i’m doing it right. Also, there’s no 'outer outline (I haven’t done the offset yet). Okay so far?

in inkscape there is a dynamic offset and a linked offset under ‘path’ when i click on each of them, i don’t see where i have the option to enter a value… i have combined the above screenshot.
So another option is to just use the pen- (in Illustrator there is pen, pen+, pen- and anchor manager thingy) and remove the nodes instead of delete. IDK how inkscape works. This way you’re not deleting anything you’re just removing the extra nodes/anchors. Sorry fam, I’ve done as much as I can. I don’t know inkscape at all so I can’t help you, but maybe someone else can. Part of it is also just keep messing with it.
I’ll keep messing with it and i really appreciate what you’ve done. i have the idea and i’ll work on it from here. Thank you so much!!
1 Like
You would use the node editing mode and tools, specifically selecting and deleting the unwanted nodes (just draw a select box around them), and using the join and delete segment “between selected nodes” tools. You can also use the bezier tool to draw straight lines between nodes - it will snap each end to an existing node, then you can join those as well to make a single path (makes cutting cleaner.)
It takes a little playing around, but you can always hit Undo (⌘-Z) until you get it right.
3 Likes
Up and a fresh mind:-) I ‘think’ i got it. i won’t be able to print it this weekend, but when i do, i’ll share. Thanks again everyone for your patience!
4 Likes