Slant kerfs (not cutting square/normal to material surface)

I’ve been battling an issue for a few weeks now and I’m at the end of my wits! If anyone has experience or suggestions I’d love to hear. I’ve already contacted support by email.

I have a second and new Glowforge basic. I’m seeing the same issue that the OP in this thread observed:

  • the kerfs are slanted
  • slots or finger-joint boxes do not assemble properly
  • a circle piece can’t spin in place (since it’s slanted on the edges instead of flat it only fits in one way)

Side side of a finger-joint box piece. The box does not join up when you cut 6 out like this and wants to twist.

In addition, I’ve observed that engraves are sometimes out of focus, engraved too lightly, and/or not as detailed as they should be.

I thought that the issue was due to the crumb tray not being flat. I drew out what I think is happening:

I’ve tried to level the machine and added pieces of scrap acrylic to the four corners. I tried so many different arrangements but I can’t seem to get it right. (In my previous set ups, just shimming one corner was enough.)

While checking things, I noticed that my crumb tray wasn’t flat and rocks when removed and placed on a flat surface. It doesn’t move when it’s inside the machine, though. Support is sending me a new crumb tray, but I’m unsure if this was causing the issue.

I’ve checked the “normal” things like cleaning the lenses/ensuring they’re seated properly, removing any debris between the bottom of the machine and the crumb tray, etc. but none seem to help. Any ideas while I wait for the new crumb tray? Is there a better tool for leveling than a bubble level/phone app? Or a surface that makes leveling the machine easier?

Another possibility is that everything is flat, and somehow the machine’s gantry is not?

1 Like

Kerfs from laser beams are slanted, they do not run straight up and down. (Normal, but it can vary quite a bit depending on the material.)

Found this online to explain it…the narrow point is the focal point. From there, the beam loses power as it expands and spreads, and there is less material burned.

laser beams

So you always have more material eaten away at the focal point (usually the top) and less material eaten away at the bottom, creating a slanted kerf. Also, thick acrylic will slump a little sometimes in the heat. Best to move rapidly out of the way so it doesn’t melt.

Or, and I do this, you can run a second MUCH faster high speed pass to chip away at the bottom of the kerf profile and try to even it up a little.

3 Likes

By the fact that it is focused the cutting kerf is at a slightly cone shaped cut. As better explained above… :man_facepalming:

Files, sandpaper etc can also do this,

2 Likes

I just re-read your post a little more closely, your newer machine might just be a little over-powered compared to the other one, which you would expect with a newer tube. Maybe try speeding up the cut just a few points to see if it’s a melting problem?

1 Like

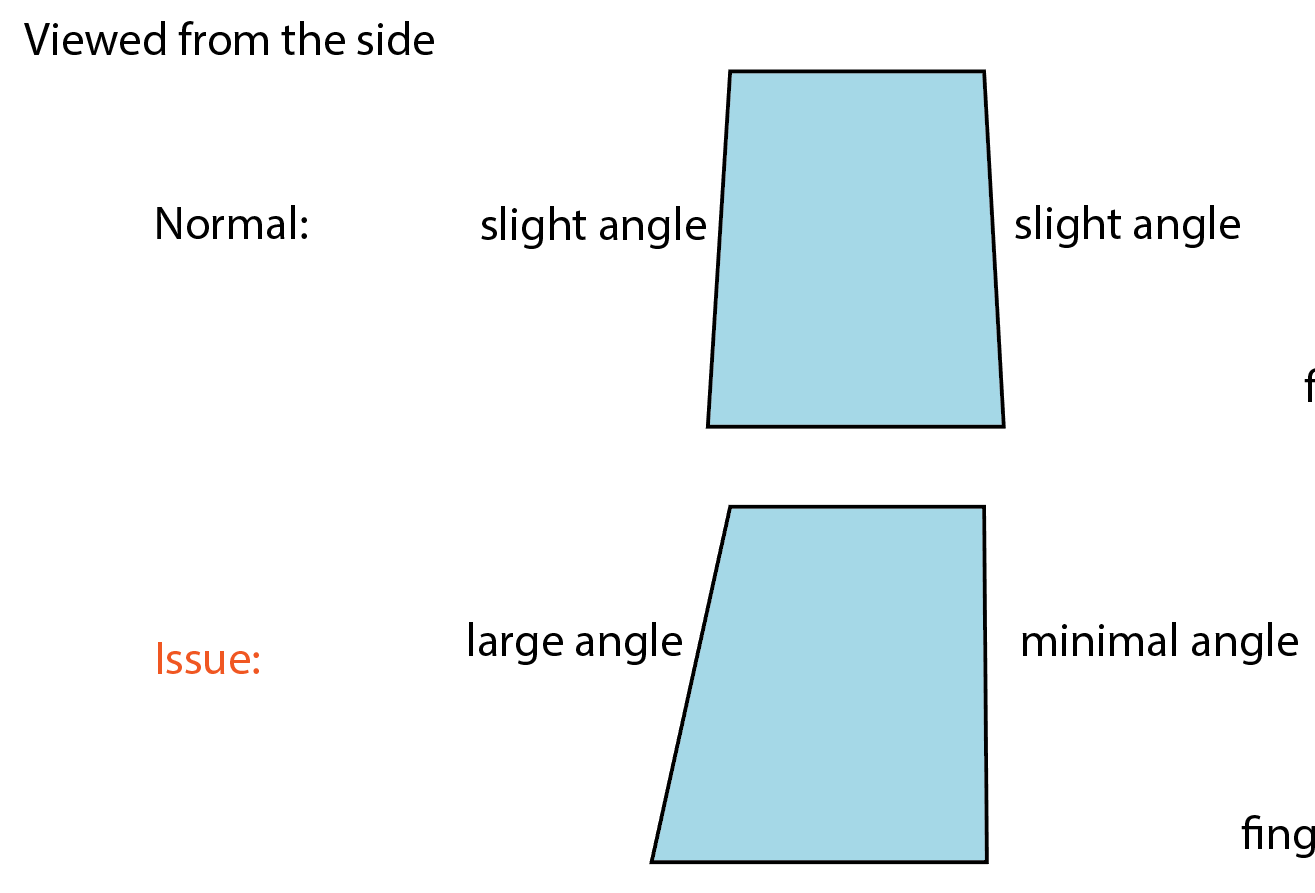
Thanks, I’m aware the kerf is cone-shaped and that it will never cut perfect squares. Did you get a chance to see my second diagram? My prints are fine when the angle (say 5 degrees) is the same on both sides. However, it is tilted much further to one side (10 degrees) than the other (0 degrees). This is causing issues with the finger-joint boxes, and is likely a symptom of a bigger issue.

I’ve printed the same design thousands of times, and it comes out perfectly on my other machine. Therefore I’m very certain it is a machine issue and not a misunderstanding of physics.

3 Likes

Thanks for the heads-up, I am aware that kerfs are cone-shaped. However this machine’s kerfs are not even on both sides (and only along the x-axis.) See below:

1 Like

I’ll try that and see for the melting! I only observe it on one axis, but if it was due to melting, I would expect to see it on every cut.

1 Like

I’m wondering if it might be the lens. Debris between the lens rim and the magnet it mounts to might tilt the focal point…?

3 Likes

As you’ve discovered, and as was noted in the thread you linked, the carriage plate does not always sit perfectly parallel to the material - or, at least, the head is not guaranteed to be perpendicular. I did similar tests and found mine to be the same, it is canted “down” at the front, which leads to the beam being tilted towards the rear. I think I discussed privately with Ben, but it’s been so long, I forget - it might have been someone else. The “forward” edge of cuts are near perpendicular, but the “rear” edge is slanted. For me, this is really only an issue with acrylic, and when doing inlay. I rarely work with material >1/8", but with thicker material it would be much more noticeable/a problem.

Edit - I found the discussion, was a different member. Mine is actually canted the other way - higher at the front. My description of the direction of the slope is correct, however. I first spotted it when running cut tests on 0.39" maple.

As best as I can guess, the spring-loading of the carriage plate wheels means you could never guarantee perfect alignment. The way the head attaches to the plate is pretty crude, a speck of dust could cause it to be tilted. The lens adjustment mechanism is equally crude. It is what it is. Without in any way trying to being derogatory, this isn’t a precision industrial device, it’s a hobby machine. Compensate in your designs.

4 Likes

Thanks for the idea! I gave it a clean and it did not change anything.

1 Like

Thanks for the insight. I’m not willing to change every design since the goal of getting a second glowforge machine was to retain the same files that work on the first machine. In addition, my glowforge’s canter causes issues with engrave jobs. Since it’s a new machine, I am going through the motions with support. Did you discover your machine had that issue before or after your warranty ended, or discuss the issue with support? Curious as to their solutions or if you had gone through many machines all with similar issues

Would it be possible to slightly shim the bed itself to the same angle of the beam to compensate?

2 Likes

I’ll give this a try! I thought about it but kept shimming the machine but I think I can’t make it any flatter

I will try to raise one edge with shims. Also thinking that I may have to lower the whole thing by filing away at the crumb tray’s feet if it becomes too high to focus properly

Yeah, shimming the machine helps with the lid sitting square but it’ll move everything inside in almost tandem. You may be able to get what you want that way but probably not. Figure trying to adjust the bed is a lot simpler than trying to adjust the head which is pretty solidly constructed.

1 Like

I added some cardboard to two of the crumb tray’s feet and I think it corrected everything! I’m still testing every engrave job type, but the finger-joint boxes don’t have the slant anymore and fit well.

Hopefully the new crumb tray will fix things, otherwise I will need to find a more permanent way to shim the crumb tray so it doesn’t change when I remove it to clean.

edit: after some test with the engraving, there is still a slight canter. When I engrave a perfect circle on file, I get an oval on the material. The settings are inconsistent on different parts of the bed. But I’m more hopeful about a new flat crumb tray resolving these issues

Hi, @lazurin. I see that we are working on this with you via email.
I also see some great suggestions from other folks.
To simplify our communication, I will close this post so we can continue to work together via email.