I have made a lot of different things around the house, using standard woodworking techniques. Besides the large turntable on our circular table in the kitchen nook, one of the simple things I’ve made that people ask me to make for them (that I don’t due to lack of time) is a wooden serving tray.
The GlowForge will allow me to make such an item faster and fancier, with personalization based on the individual or season. For some, I will probably engrave the art touches, and for others, I will probably cut them out. Where the side panels are engraved, sometimes, I may do it on both sides. So many options!
Just as with the original tray, I will use tiny nails (in addition to glue) to secure the bottom so it does not fall out.
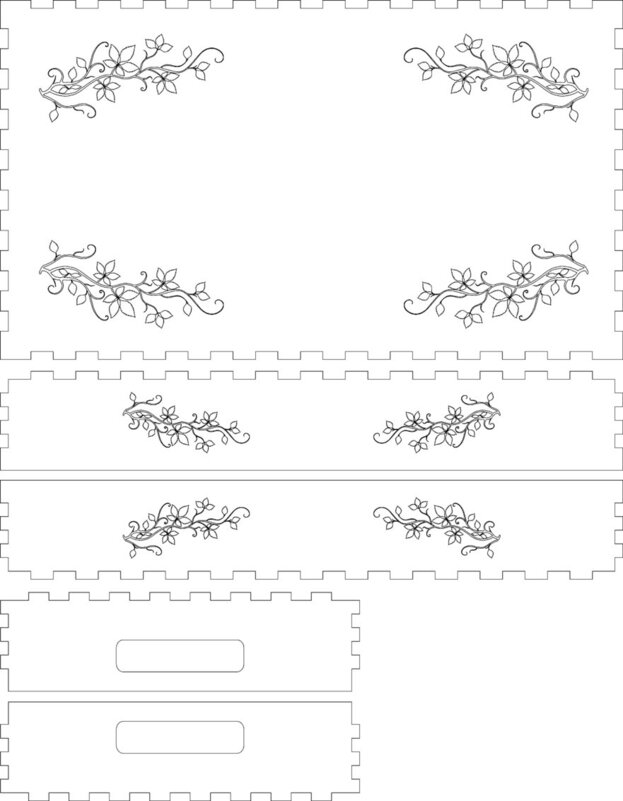
Here’s a rough design, using 1/4" thick wood panels that can fit in the bed of the GF.
I recently checked out the Inkscape tabbed box extension and that allows for making something like this very easily by leaving off the tabs of one edge. Very clever! Will look good when you bring serve me my tea this afternoon!
This makes me think of a good design question: how many tabs and how big of tabs are adequate for a design like this? It seems that wider tabs and fewer of them might be more pleasing to look at but just as strong. I think some tests with cardboard might be good to try out to see what is the good ratio for tabs.
The more tabs there are, generally speaking, the stronger the linkage should be because more tabs = greater surface area for the adhesive. Of course if you get TOO narrow with the tabs, they will be fragile and easily break off.
The rule of thumb I use, and I’m open to a better one, is to use from thickness x1-x2, so for 1/8" I’d use something between 1/8 and 1/4 spacing. I will sometimes break this if strength is unimportant.
That looks great! I do wonder, however, whether you might want to go to captive tabs rather than the finger joint. Not only for strength, but because there’s a tendency for big flat panels like that to bow.
I have plans for trays, but I will need material so I can do test pieces for the slots…
If you use the openscad laser utilities at https://github.com/bmsleight/lasercut you should be able to do it. A few more steps, but it should be worth the trouble. (It’s on my to-do list, but I need to clear out a couple days to wrap my brain around it properly)
If by ‘captive tabs’ you mean set back and inclosed then F360 would work great. In my tutorials for F360 we build a box with finger joints, it would be just ever so little extra effort to set them back a bit.
Hidden ones would be doable but much harder with a laser as you’d need to engrave the hidden holes and would have to work out just how much engrave would consistently give you enough depth without going too deep.