Sony E Mount Body Cap Pinhole - First Prototype (For Worldwide Pinhole Photography Day 2023)

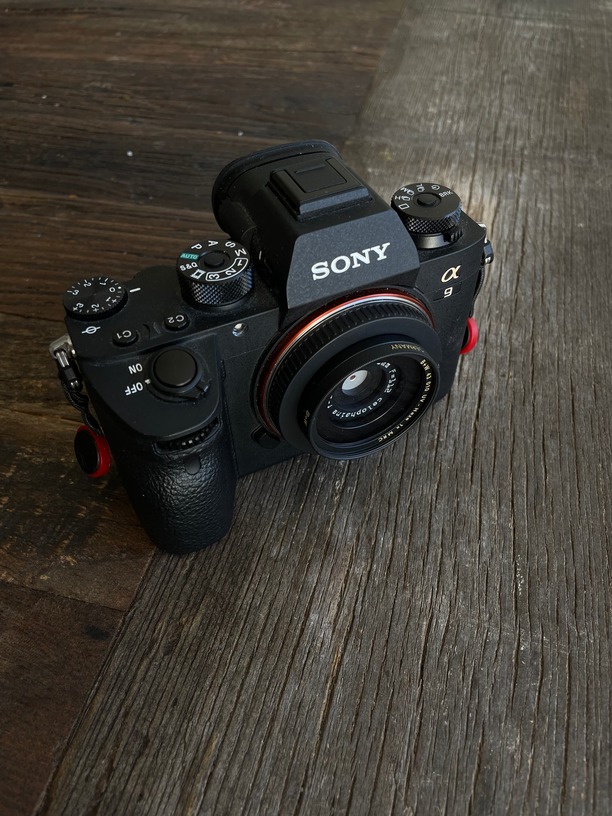
I suppose it is tradition for me to post two write-ups on Worldwide Pinhole Photography Day (the last Sunday of April) so here is my build for a body cap pinhole for my Sony A9 (it can be any Sony E-mount camera).

For those of you who aren’t photo enthusiasts or don’t have interchangeable lens cameras, a body cap is just like a lens cap, only it is for the camera body. It covers the internals of the camera when the lens is not attached. In the digital age, the sensors must be kept clean and dust-free. A particle of dust that finds its way onto your sensor means you will have to remove it on post. And there is never just one dust particle!

A pinhole body cap is a pinhole that is mounted to a hole made in the body cap and “voila,” your digital camera is now a pinhole camera. This is quite handy since modern mirrorless cameras can have crazy high ISOs, which means you can get normal shutter speeds instead of the long exposures of traditional pinhole photographs. Of course, you don’t really want to do that, since the blur of long exposures is part of the appeal of pinhole photography, but a 1/2 to 1 second exposure can give you nice effect.

Pinhole body caps are commercially available and for pretty cheap. They are usually a third-party knock off body cap that’s had a hole drilled in it and a pinhole mounted behind it. Simple and it works. The big problem is that you now have a hole, albeit a small one, exposing your nice sensor to dust and the elements. Not ideal. Read above.

Wouldn’t it be nice if you could mount a lens filter ring in front of the body cap and fit a UV or haze filter on it to protect the insides? Sure, I do that with all my pinhole cameras!

So I got some knock-off body caps and did some cutting tests.

Pew! There’s a reason why we use cast acrylic in Glowforge-land. The ABS plastic (at least that’s what I think it was) of the body caps just made an awful stink. I’m sure I’m going to get cancer from it.

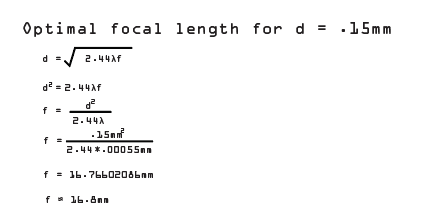
The design was straight forward. I wanted to get the pinhole at the optimal distance from the sensor relative its diameter.

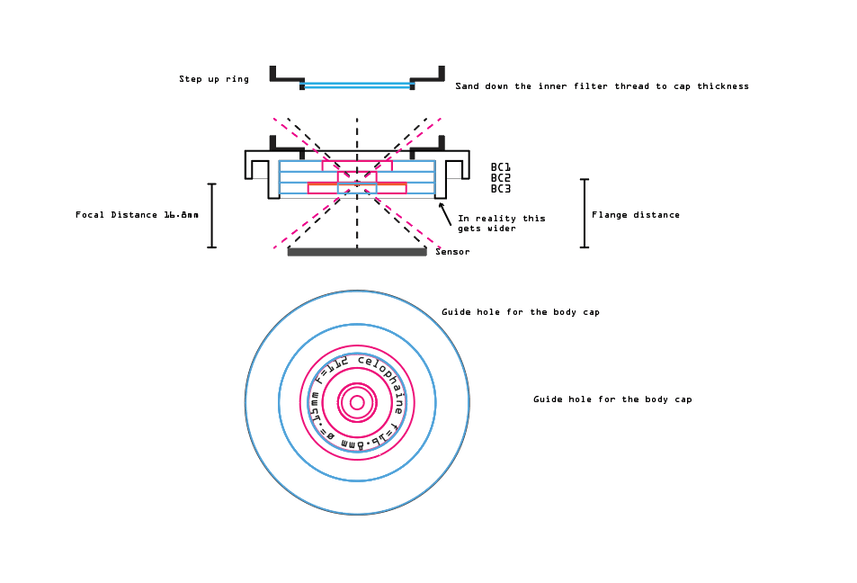
The flange distance (the distance from the lens flange on the lens mount to the sensor plane) on my camera is 18mm. The focal distance I wanted was 16.8mm. So all I needed was to stack some rings to move the pinhole position 1.2mm from the flange.

I used regular cast acrylic for the parts.


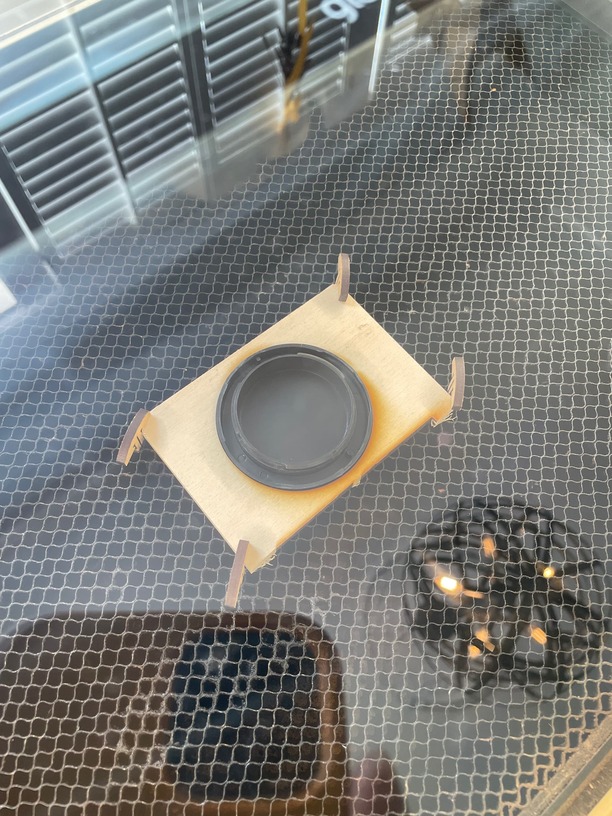
Class photo of the parts before assembly.

The acrylic was black but quite shinny so I sanded them all with very fine sandpaper to achieve an even matte finish. I kinda like the look. It’s almost like stone.


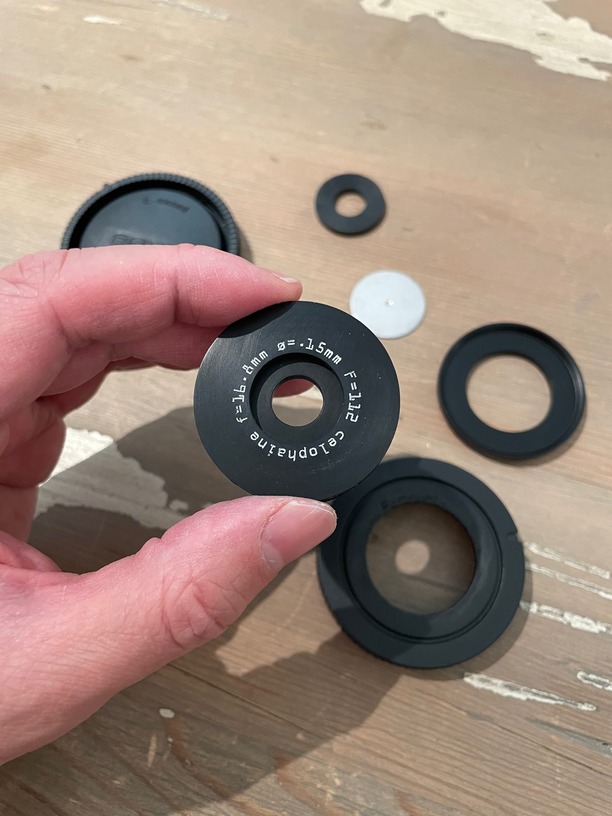
The front element with data engraved and filled in with white paint.

I used my regular step up ring as the filter mount and the rest was gluing it all together. The pinhole is not removable like my other cameras. This is because I did not want to use magnets near the sensor. Probably a bad idea. I did not want to use screws either since I was just not sure how strong the build would be and did not want jagged metal parts rolling around the sensor either.


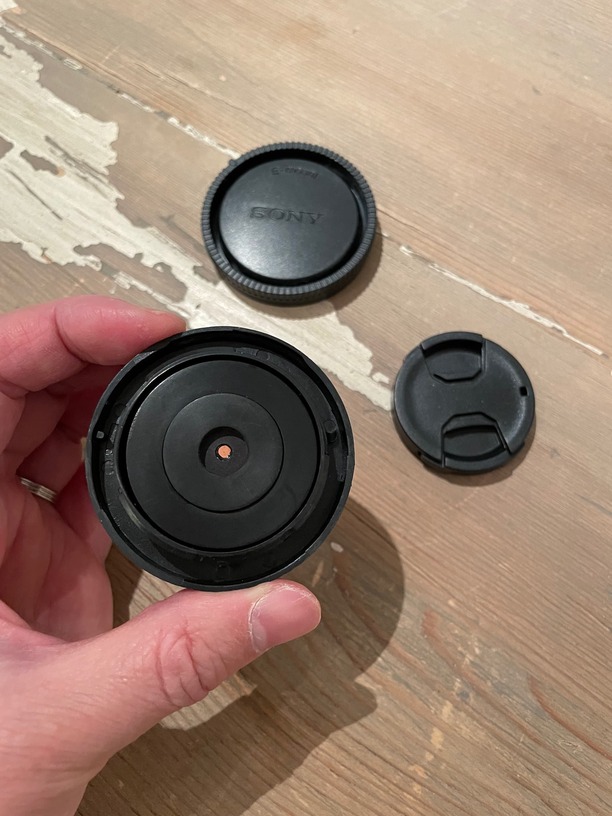
The back of the body cap. The pinhole mount is fixed permanently with a retaining ring.

At any rate, it’s a cheap enough and fast enough build that I won’t be too bummed if I have to replace the pinhole for some reason.

The nice thing about digital is you get instant results. I don’t mean in the field. I mean at the end of the day. Looking at the display after each shot is exactly the kind of habit I wanted to wean myself from. But look at these results comparing the digital and the film.


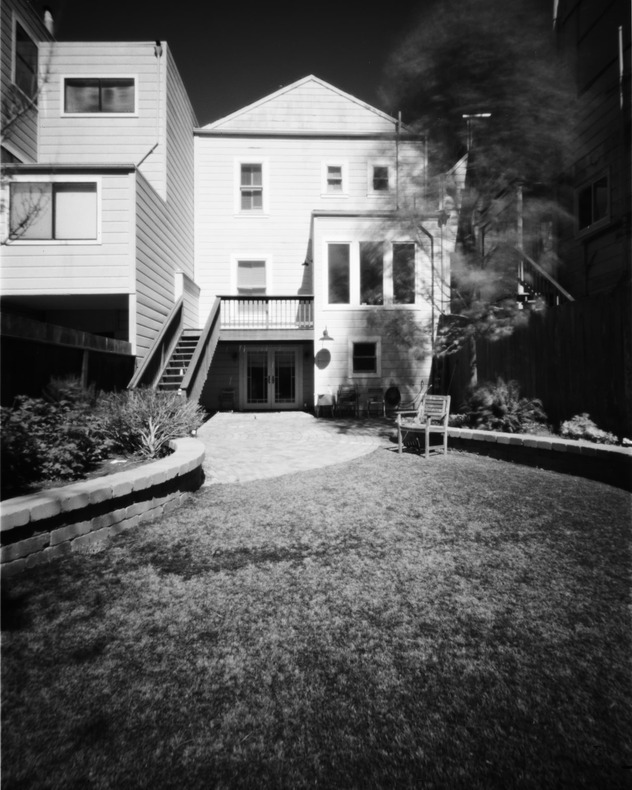
The back of my house with the digital pinhole.


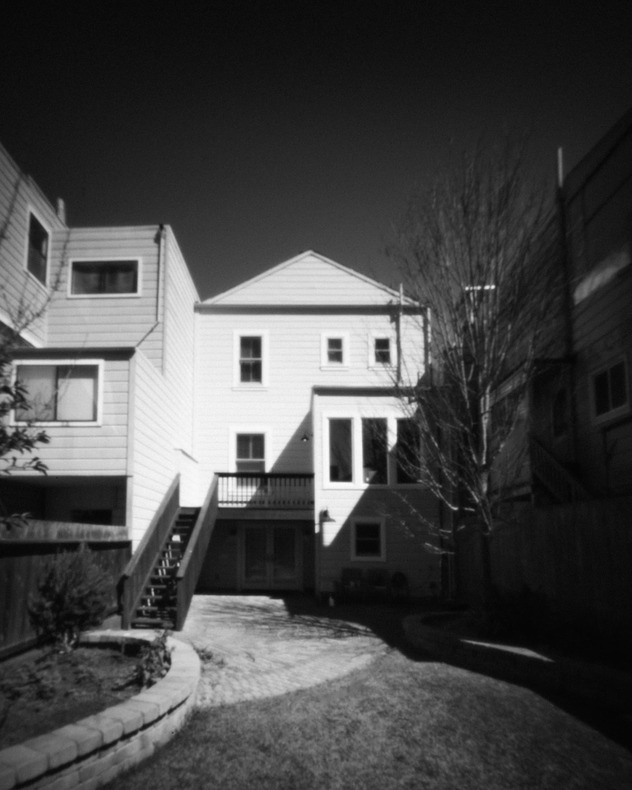
The same shot with my 4x5 pinhole camera in 2021.

It’s not entirely a fair comparison since they are different formats and the resolutions are different. If anything the film version, because it uses a 4x5 inch negative is sharper and has more contrast. But both are unmistakably pinholes. For street shots I think this is potentially a great option.

Shooting a digital pinhole is straight forward but different from the film method. The aperture is fixed. In this case, it turned out to be F112. The shutter speed is the critical part. Do you want to freeze action like a normal picture or do you want the intentional blurring of movement? I want the later, so I set my camera to 1 second. It can be longer but you really need a tripod after that. 1 second is enough to let things blur yet hold steady so that you have some objects not blurred as a point of reference. My camera has in body stabilization so sometimes I need to give the camera a bit of a nudge otherwise it is too static! The final step is to set the ISO to auto. Unless you are shooting in the night or a dark interior, you’ll never get above ISO12800 and for my sensor, that is a perfectly acceptable noise level. When shooting, if the shutter speed is 1 second or slower, I noticed that the “live view” is not able to give you an accurate preview. Don’t worry about it. Pretend it doesn’t exist and just compose the shot.


A quick self-portrait in the bathroom with a 1 second exposure time.

In practice I am able to shoot with the wild abandon I do not have with film. But I realized I have fewer keepers. With film I have to think more about it and I get better results. With digital there is the temptation to rapid fire a bunch of shots so I need to remind myself the approach is the same as film. So when I got my head back in the right zone I was able to take pictures like these:


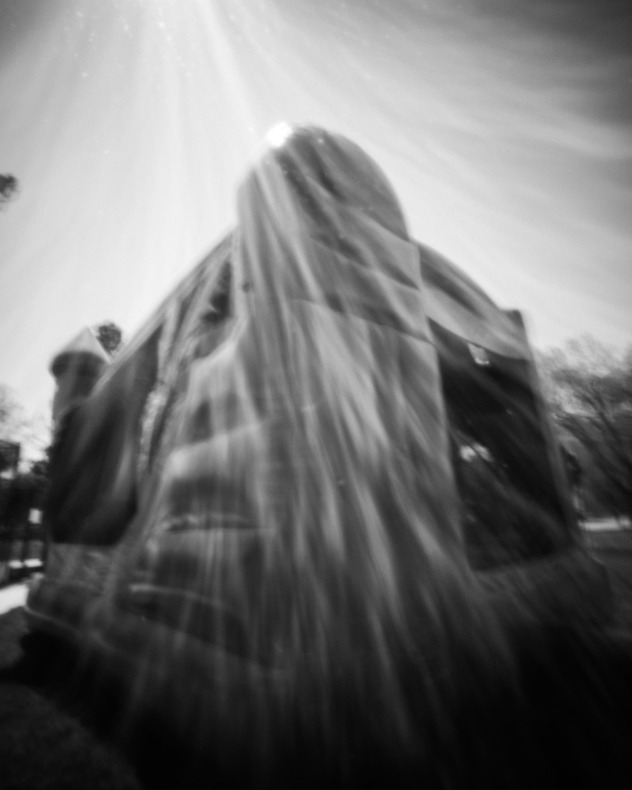
An ominous bouncy house in the park.


Wild children devouring the carcass of a piñata.


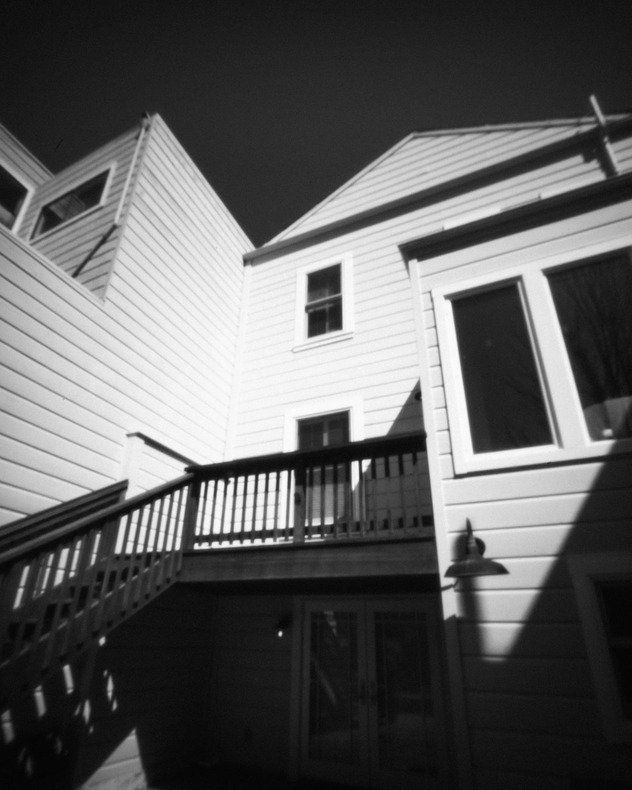
An angle of my house that would have been less intuitive to take with my 4x5 camera.


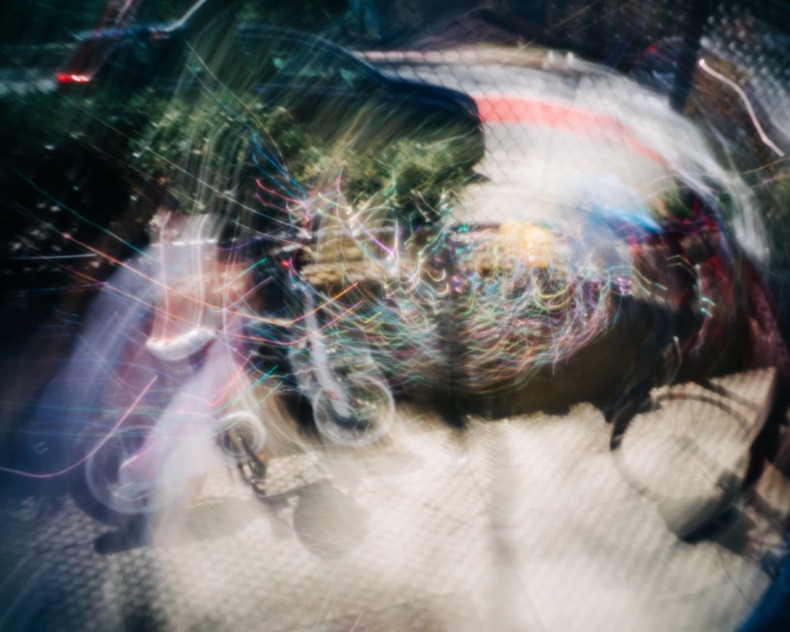
A swirl of light from intentional camera movement.

Anyway, I like the results and I think I will use this body cap pinhole as the body cap for my camera from now on.


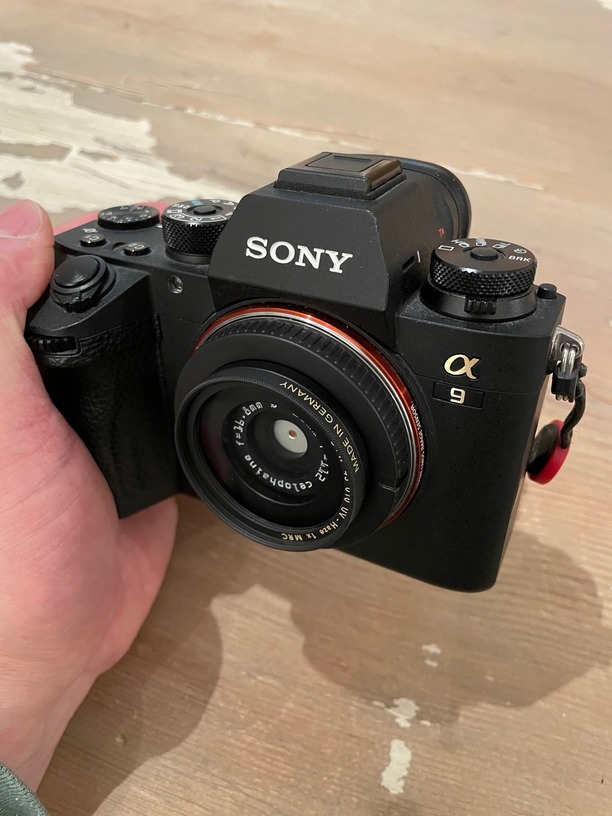
With the UV filter mounted it looks like a real lens.

Why not? This way, even without a lens, my camera will always be able to take pictures! Cheers!

31 Likes

This is a great writeup and I love how these pinhole images feel less digital, definitely more like a film camera.

5 Likes

Just wonderful, I’ve always loved pinhole photography.

Did you cut the pinhole itself or was that a purchase?

6 Likes

I’m confused about the distance from the sensor part. How far from the sensor should the pinhole be?

It it based on the possible spread of the image due to the size of the pinhole vs the thickness of the material?

6 Likes

Outstanding writeup. The time it took you to share this is very much appreciated, thank you.

8 Likes

As someone who edited sensor dust out of a pinhole image in post yesterday, I applaud your efforts! Very cool!

6 Likes

It does, doesn’t it? I think part of the digital “feel” is that they are too perfect. Many of the manufactures are chasing numbers: fast lenses, corner to corner sharpness, flaring, fringing, and the list goes on. I feel however, that imperfections are what give an image a soul (for lack of a better word). Our contemporary lenses have perfected the spirit out of our images.

Another aspect of pinhole photographs, be they film or digital, is the diffuse (scattered) quality of light. Being slightly fuzzy is not a negative for my work because I am trying to capture a quality of memory, and memories are always separated from what is happening in front of our very eyes, by a veil. Pinhole photographs, for me, emulate that veil of memory.

6 Likes

Thank you, @ekla !

Although one can easily make a pinhole from a thin sheet of metal, a pin, and some sandpaper, I have always relied on precision etched pinholes. The reason for this is partly because these are prototypes and I want to ensure that certain aspects of the design can be counted on as being the same. That way, when I do another iteration I can say with some confidence that the changes in resulting image quality can be attributed to the changes and not the pinhole.

Another reason I continue to use precision pinholes even on my more mature designs is a combination of the format I am using and the focal distances I am choosing. I think on larger formats like 4x5, or focal distances longer than 60mm, pinhole diameter is not so critical, but as you get to 35mm and focal distances that are in the sub 20mm category, precision is more important.

I have a large format camera in the works that uses multiple pinholes and those will be hand made because I’d like some variance in the image the each one makes.

So it all depends.

6 Likes

Hi, @sqw !

The distance from the pinhole to the sensor is really up to you. I wanted the optimal focal length for my pinhole diameter size. The equation for this is a comprise of two factors you want to avoid: blur due to the shape of the pinhole, called geometric blur and the distortion caused by diffraction.

Screen Shot 2023-05-01 at 10.36.07 2

The 2.44 bit is the result of trigonometry. The lamda sign is the wavelength of light which we are targeting which in this case is 550nm. This is roughly in the middle of the visible light spectrum which is 400nm to 700nm. I am converting everything to millimeters.

Why did I choose a .15mm diameter? I know from experience that smaller pinhole diameters require shorter focal lengths and I wanted a wide angle image since that’s what I like to shoot for street photography. The result of this build is something close to a 17mm lens on a 35mm camera and that’s pretty darn wide! The really, really cool thing about pinholes is that there is no barrel distortion! Manufactures spend tons of time and money on research to mitigate the distortion of wide angle lenses, but pinholers don’t need to worry about that. Pinholes are great for architecture. With a large enough negative (like an 8x10, for example) and some sharpening in post, it can be argued that pinhole cameras are superior to lens cameras for architecture in this one aspect. Well, I might be overstating that but you get my meaning :sweat_smile:

This is an excellent question. The pinhole diameter and thickness of material effects the view angle of the image projection. This is the formula:

123

This is the view angle the pinhole will project onto the sensor. As you can see the thinner the material, the wider the projected view angle will be. Earlier I remarked that the focal distance effects the view angle and that is true in terms of geometry, but it does not mean that your pinhole can achieve that! What do I mean by that? If the material is too thick, even if your pinhole is close to the image plane, you will get vignetting because the projected image cone will be too narrow . The formula below then takes lets you check if your material thickness will provide the view angle necessary for the angle of view you want to achieve at the image plane.

Screen Shot 2023-05-01 at 10.57.33

So you plop in the view angle result from the previous equation and then you get the image size that hits the sensor or film. Note that this is much bigger than I need - the diagonal of a 35mm frame is 43.27mm so I can be confident that I am covered.

Note, this will not eliminate the vignetting completely since the corners will always be further away from the center of the image meaning it will always receive slightly less light. Having that big image diameter from a really thin pinhole material really helps.

8 Likes

Thank you for reading, @evansd2 ! It’s very much appreciated.

1 Like

Thanks! :rofl: :rofl: :rofl: I know thy pain.

5 Likes

Yes! Plus with the added image processing everyone seems to want, things quickly turn too digital. I think something about your pinhole makes it too confusing to the firmware that tries to sharpen and futz with levels. May I just say I love this thread and am happy to see more optics here!

6 Likes

Ah, well thankfully I have control over this aspect on my camera (on my A9 it is called Creative Mode) so I am confident it is not doing anything more than store the raw file. Indeed many shooters like to put their cameras on “vivid” “deep” “clear” “light” or whatever mode. Even “standard” makes some adjustments. I choose “neutral” on all my photography just because I want to be the one who makes those decisions. Are you a photographer?

4 Likes

Yes, one of several hats :rofl: The A9 is a wonderful camera. I keep thinking I should to switch to Sony but I have so much Canon glass. Sony has done an amazing job with, well, everything.

5 Likes

Ah, I thought so! Canons are wonderful. I had a 5D MII. No need to change systems unless you want to shoot in an entirely different way.

At the time, I switched to the A9 because I was taking a lot of pictures of dancers and that is almost like sports photography in terms of capturing movement. I was not very confident with manual focusing back then, and even less so with jumping and spinning ballerinas, so the A9 was revolutionary.

Nowadays, I enjoy the mirrorless system because it opens up a huge range of vintage lenses. I can use all of my M39 lenses which include vintage Leica’s, old Soviet lenses like the Industar and Jupiter, and Japanese lenses like Nikkor and Canon from the 50’s. I use M42’s like Pentax and the Soviet Helios 44-2. I can use the half frame Zuiko lenses and get a dreamy vignetted feel as well. Of course I use my Leica and Voigtländer M mount glass, and with a M to E-mount close focus adapter I can half the minimum focus of those lenses. Close focus distance was always something of a weak point for rangefinder lenses but that is completely circumvented.

And now I can shoot pinholes! Just a lot of flexibility. Of course, the preferred method is to shoot on the film camera bodies of the respective lenses but it is a nice option to have. It’s also really handy to do comparisons between lenses. I even use my A9 to scan my 35mm negatives :sweat_smile: Poor A9… So, a great work horse. Cheers!

4 Likes