Hey pals! My apologies if this has already been addressed somewhere; my attempts to search were not fruitful.
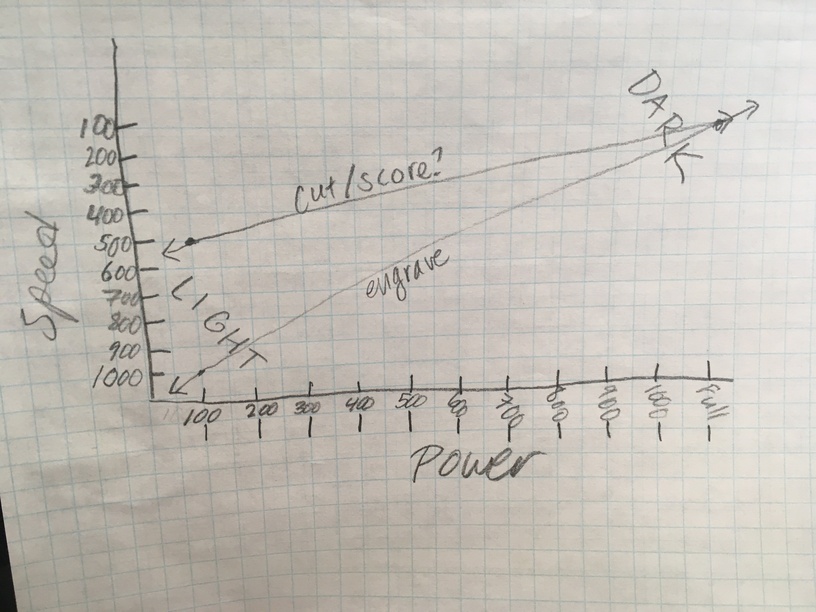
In an attempt to approach a quicker way to calibrate new settings, I was wondering if anyone had pinned down exactly how the settings for cutting, scoring, engraving relate to each other, since the “units” are kind of made up. I’m sure the exact numbers would be difficult to pin down from the user side, but I’m trying to get kind of a general idea. Since the units are consistently “speed” and “power”, would you chart a trendline of their effects like this -
— meaning speed/cut/engrave at, say, 500 speed and Full power would all produce exactly the same line, regardless of which function you choose? From using our GF regularly, I don’t suspect this is the case.
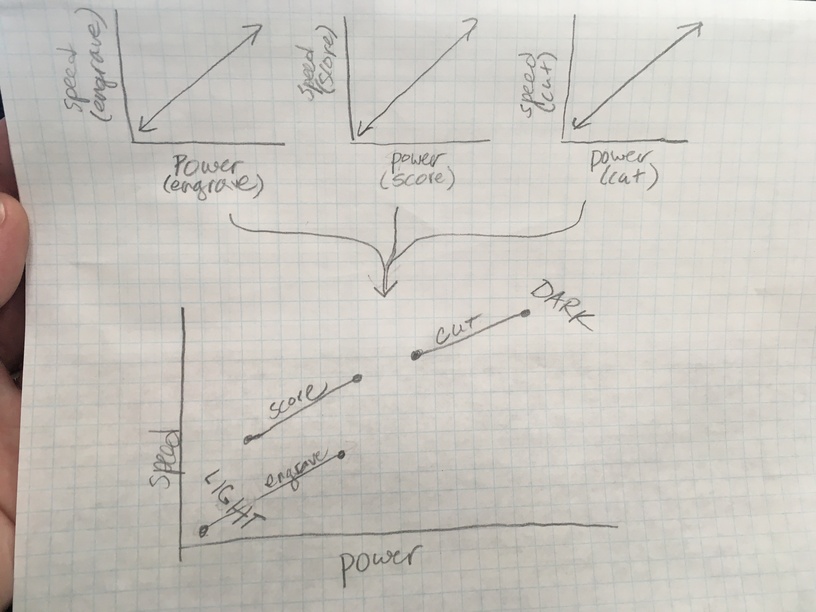
I suspect that each function would actually have it’s own matrix of values, and that to chart them all on the same axis would look more like this -
If so, has anyone worked out the relation between those three lines? Ie. Score at 500/Full would make a line half as deep as Cut at 500/Full. (Bonus points if your matrices also include the effects of defocusing the laser!)
There is no matrix that will give a precise answer to your question. Reading all of this will give the best understanding of the relationship: Working With Manual Mode – Glowforge
It’s not quite that easy although that’s an excellent start. You also need to take into account the LPI, (Lines Per Inch), that the laser head travels for Engraves, the focal point placement of the beam, and things like the composition, density and flammability of the actual material, and the amount of air being fed underneath the cut.
Few too many variables for quick answers. But in general, the slower the cut, the deeper it will be, and the wider the kerf will be. That’s because we are burning, not cutting, and the longer the source of ignition (the beam) lingers in one area, the more fire it makes. If the wood is very porous and lightweight with a lot of air in it, it burns and chars easily. Needs less power. If it’s dense, it does not burn easily, and needs more power applied just to cut through it. Lots of variables, and it’s different for every material. Some materials melt, others burn, others vaporize, and those are the ones that tend to cause fires if there’s too much power applied.
How are you with Excel or Numbers? Going by the graphing paper, I’d guess ok.
This will take you to the promised land:
A long time ago (early pre-release days) the GF used inches per minute settings in the settings menu. Now they don’t. But, the numbers do still mean something (or more accurately, relate back to a machine speed).
What we don’t know is the power scale of what 1% really is… and since 1-100 is the same for all of the models, presumably there is a power gap between 100 and Full for a pro. They make laser meters that can test output power, but the Gf doesn’t have a user facing test mode where you can pulse the beam to read the power. You’d have to do some tricks (tight spiral maybe?).
Anyways, the power to speed relationship as far as cutting is pretty linear: 5 inches per second at 40 watts would be the equivalent of 2.5 inches per second at 20 watts.
This can actually be a really useful thing on very thin, fast cutting materials that have intricate geometries. If you can cut at full speed and say 100 power, your job will likely be faster if you find the optimal speed (since it’s not really going at full speed if the design is intricate - it’s modulating the power - and constantly accelerating and decelerating. But, it takes a little while for it to accel and decel also…
I should add, engraving will be a different animal. That will be much more difficult to pin down than cutting because it is different reactions going on. I would suggest getting a grayscale matrix (I can link one from Trotec if needed). You can run that on vary-power and get a pretty quick idea of the shades you’ll get with different power levels at a given speed. But, that relationship would be tough to extrapolate at different speeds (ie faster speeds) since materials react differently. Some take a mark really easily, others need to be “toasted.”
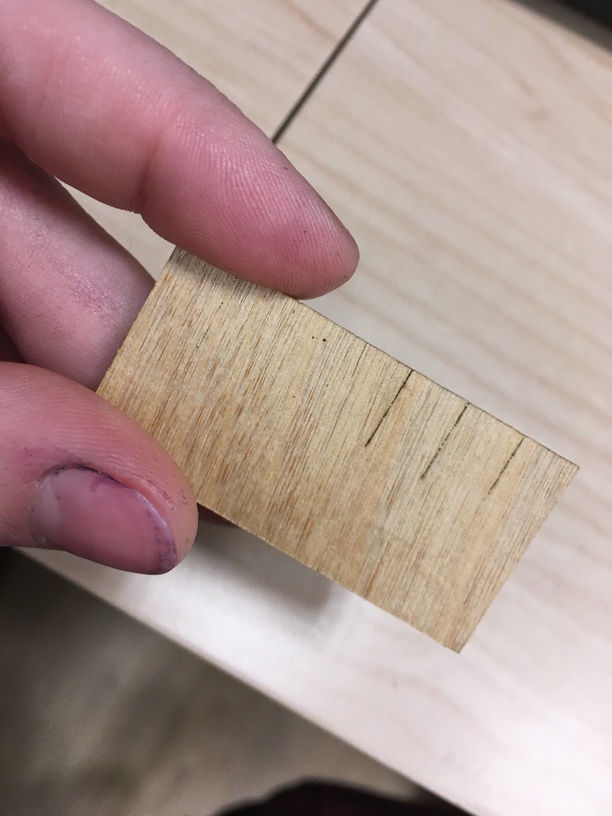
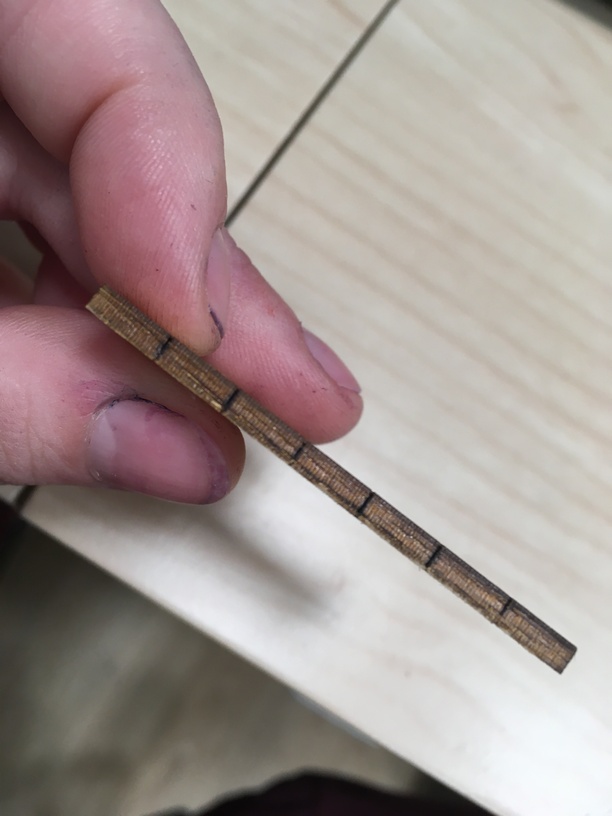
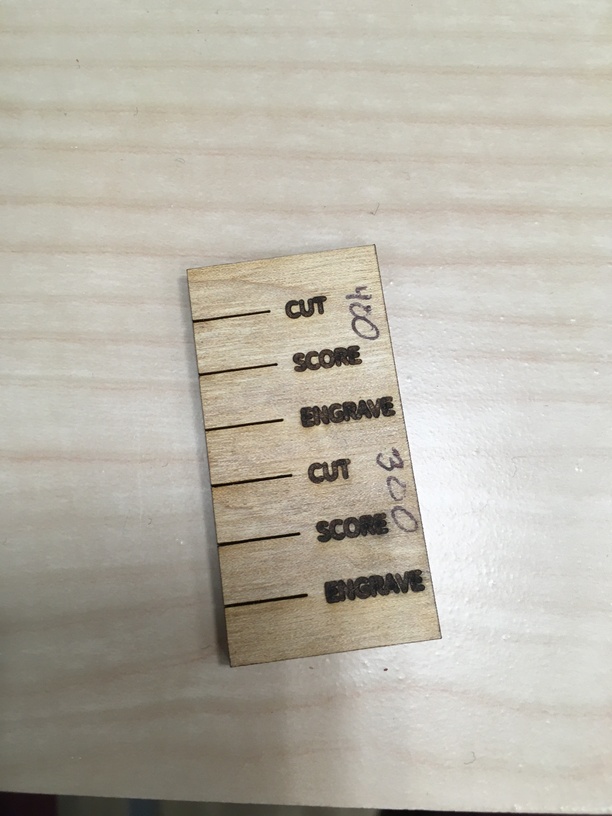
Thanks so much for all your replies. I get the difference between the three functions, I was just curious if anyone had ironed out the details. Interestingly, I did run just a simple test chip on a material I’m familiar with just, to see -
We’ve got a pro. The settings for each line were
400 speed/full power (cut)
400 speed/full power (score)
400 speed/full power (engrave)
300 speed/full power (cut)
300 speed/full power (score)
300 speed/full power (engrave)
Obviously this isn’t a huge sample size, and definitely doesn’t account for the material imperfections of shitty home depot plywood, but by appearance it looks like the score and cut settings had the same effect. So I guess it is more like the first graph? Which was surprising to me.
I guess I read your original post incorrectly. Score and cut are functionally the same thing — the primary intent for naming them differently is just for organization. For example, on the Trotec and Universal I have, they don’t actually have “score” functions — you just assign a different color and reduce the power and/or increase the speed.
The actual output though is the same.
The engrave line is somewhat interesting. 400 speed is different for cut/score vs engrave:
400 speed for a cut is about 119 IPM
400 speed for the engrave function is a touch slower at about 114.5 inches per minute
Power and speed give the amount of energy on the material. So for the most part Cut, Score and engrave will seem very similar at the same settings at any particular spot for a black and white pattern. Cut and Score will be the same at the same settings. Engrave is different because of how the head goes back and forth horizontally to cover the intended design and also how the image is created by either varying the power according to image contrast or by using a dot pattern for greyscale.