Squaring X-Y stage

I had determined my GF X-Y stage was skewed, such that squares came out as parallelograms - bummer. I’m not the first, and there are other postings that discuss at length:

[Square corners not square!]

I tried the staff suggestion to power off the GF and wiggle-wiggle-wiggle the stage. I think the theory is the GF can power-up in a less-than-optimal alignment sometimes, so you keep cycling until the dice roll in your favor. That produced variable results and I never got it to be reasonably square.

Another response I’ve seen posted, was to replace/repair the machine - yikes. I’m out of warranty now, and not enthused about spending the money and downtime to correct the issue. And, IMHO, the design of the GF can’t maintain a stable and perfectly square X-Y stage over time and across all the GF’s out there. HQ needs to address the issue in the context of 10,000 machines, but I need to fix the issue for just my machine…

So here’s what I did:

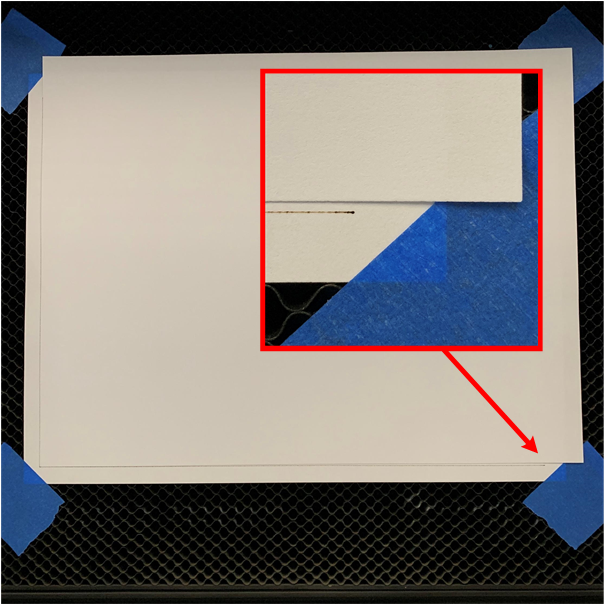
I taped a sheet of paper on the bed:

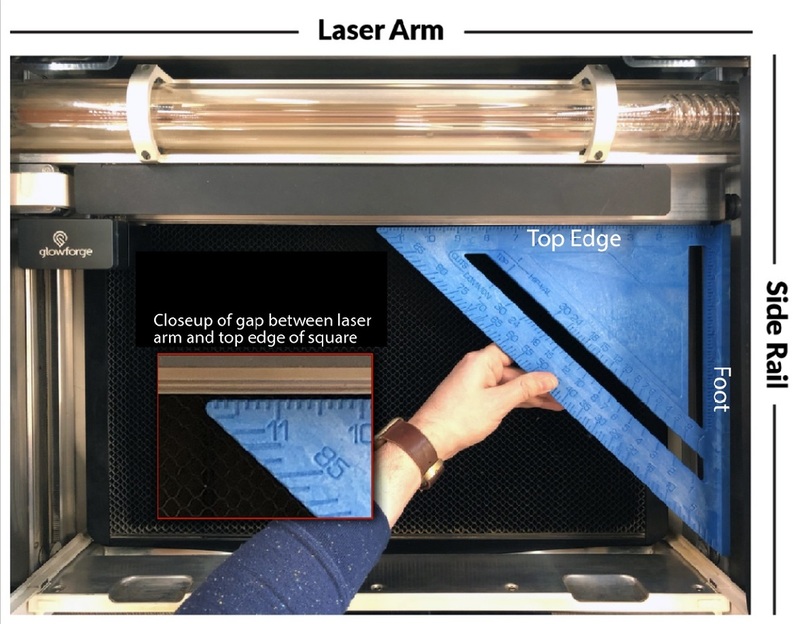
I set the power level to 1 and scored a right angle over the span of the paper. Then I used another sheet of paper to check the square-ness of the score:

My GF was off by over a millimeter, over a span of about 250mm. sigh

With the GF still powered on, I very carefully and gently rotated the front-right stepper motor:

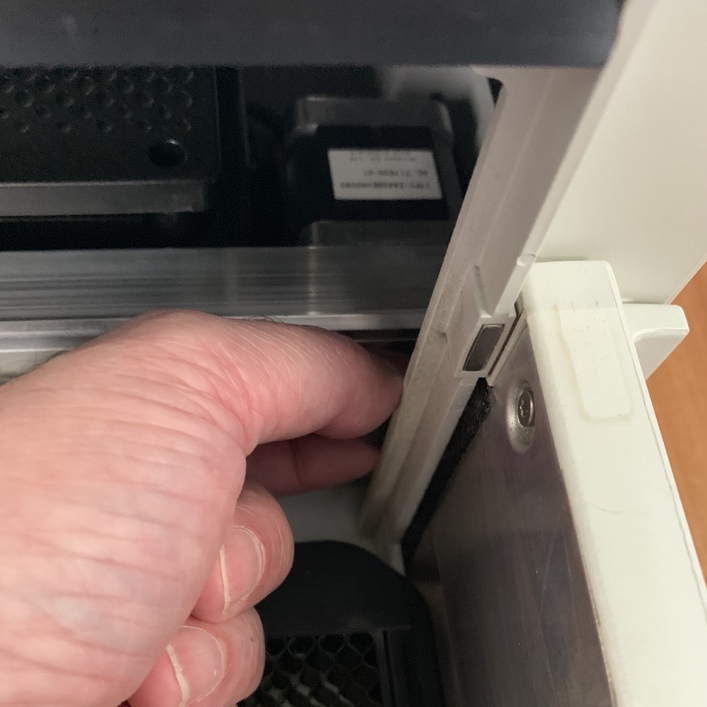
The stepper motor is powered and will resist attempts to rotate - until it doesn’t, at which point it will jump to its next index position. After a few attempts, I was able to rotate the motor one step at a time. I repeated the right-angle score and test until I obtained a near-perfect square after four trys:

My preliminary testing shows the GF holding the adjustment until I power it off. I’m still inclined to check periodically anyway - especially if I’m about to cut some expensive material.

In case GF staff reads this, please consider this a feature request to add a skew adjustment in the GFUI. That would keep people from reefing on the stage to try and bend it back into square (which sounds like a horrible thing to do) or sending the machine back for repair/replacement. Rather, the owner could score a simple test pattern on a sheet of paper, measure the skew, and enter that as an offset so the GFUI can index the Y stepper appropriately - one and done. Embrace the skewiness and give us a ‘knob’ for it. I suspect this issue will grow over time, as the machines age and suffer the insults of usage that could throw a currently square machine out of alignment.

15 Likes

Check the benefits on the credit card used to purchase your Glowforge. A lot of cards offer extended or double warrantees on your purchases. This won’t solve your time problem but it might help with the wallet .

1 Like

Good suggestion @ekla, I keep forgetting about that.

Even if the repair was free, I’d still tweak the stepper motor to square up the stage. The design of the machine can’t assure perfect-square results every time, as there’s no built-in system to test and adjust for it. So even if I did send my GF in for service, I would simply get back another version of the same problem.

I’m guessing the majority of GF users aren’t sensitive to the issue and therefore don’t even know/care if their GF is cutting skewed. I have one of the first production units, and didn’t notice until just now, once I started on a project that required square cuts. Fortunately it’s really simple to fix on my own.

1 Like

This post now has me paranoid that mine may also be out of square, as you said most people (myself included) probably didn’t think about this. :grimacing:

1 Like

@icirellik, I think if it mattered you would have noticed by now. It wasn’t until I started cutting a pattern that had registration holes that needed to align when flipped - and even then I was in denial for months, thinking the root cause was my design file or the material I was using. I conflated the GF’s precision with its accuracy.

If it’s important, it’s easy to check. I can’t seem to attach a .svg of the pattern I use, but it’s just a simple right-angle that spans a 8.5x11" sheet of paper. A square/rectangle would also work.

Good luck!

1 Like

I think if you make any sort of boxes or trays, which most of us do, you’d notice pretty quickly if things weren’t cutting square. :wink:

@geek2nurse, in retrospect there were cases where the fit between cut parts was dodgy but not a showstopper. And it was different every time I power-cycled the GF, so there was never a consistent trend that I might eventually notice.

The error I’m fussing over is a small fraction of a degree, so it would take (in my case) a run of several inches just to equal the kerf. I also tend to assemble the components in the same orientation as they were cut, which can hide the problem.

So net effect is it took me nearly two years to become skew-aware. The most recent post I found on the topic was from last year, so this must not be a common concern. I wasn’t comfortable with how the problem was addressed by bending the gantry, hence this post - this is for anyone that wants insanely square cuts.

That the GF cuts as square as it does is a testament to the build quality of the X-Y stage. I salute the peeps that assemble these machines!

2 Likes

Thanks for letting us know about this, and I’m sorry you’re still running into trouble. I have another method you can use to reset your laser arm. All you’ll need are your own two hands and large square layout tool with a foot. If you don’t have one, you can purchase one here or find a similar one at your local hardware store.

Once you have your tool, please follow these steps:

  1. Turn off your Glowforge.
  2. Open the lid and the front door.
  3. Gently slide the printer head all the way to the left.
  4. Gently push the laser arm to the back of the bed.
  5. Grasp the silver metal front of the laser arm with both hands.
  6. Simultaneously hold the laser arm gently in place with your left hand and pull it slowly with your right hand until the front wheel on right end of the laser arm rolls off the rail. The laser arm will sit at an exaggerated angle.
  7. Press the foot of the square against the right side rail as depicted in the photo using firm pressure. You may need to use the top edge of the square to slowly push the laser arm away from you so the foot of the square will fit inside your unit. Make sure the foot is flush against the right side rail and that the laser arm is still at an angle.
  8. Still using the square to apply pressure to the side rail, continue pushing the square towards the back of your unit until the metal part of the laser arm is flush against the entire top edge of the square and the wheel pops back onto the rail. If the laser arm is not flush against the top edge of the square, try the process again starting from step 5.
  9. Remove the square, being careful not to bump your Glowforge or the laser arm.
  10. Turn on your Glowforge and wait for the lights and fan to go on.
  11. Close the front door and the lid.
  12. Wait for your Glowforge to calibrate and try a print!

Please let me know if it helps! If you’re still seeing the issue after trying this method, there’s just a few more steps we’ll have you try. Thanks in advance.

@vee, thank you for re-opening this thread!

To clarify re: the squaring procedure you posted here, I’m no longer ‘running into trouble’ with this issue (yay!) - but I found a different way to do it. Using the servo-rotation technique I described at the top of this post, I can achieve perfectly square cuts - without having to bend the X-Y stage around.

I was originally hoping to post this under ‘Tips and Tricks’, but I don’t have the necessary privileges.
If you think this has any value, could this post be moved?

I would also like to reiterate my suggestion to include a Y skew in the GFUI. It would have the same effect as the official GF repair procedure, but without risking damage from over-bending the stage. Thanks!

2 Likes

That’s a great suggestion. Thanks for letting me know - I’ve passed it on to the team!

As for this thread, I’ve moved it to ‘Everything Else’ so discussion can continue there, and others can discover the solution you’ve detailed above.

This topic was automatically closed 32 days after the last reply. New replies are no longer allowed.