Thanks for letting us know about this, and I’m sorry you’re still running into trouble. I have another method you can use to reset your laser arm. All you’ll need are your own two hands and large square layout tool with a foot. If you don’t have one, you can purchase one here or find a similar one at your local hardware store.
Once you have your tool, please follow these steps:
- Turn off your Glowforge.
- Open the lid and the front door.
- Gently slide the printer head all the way to the left.
- Gently push the laser arm to the back of the bed.
- Grasp the silver metal front of the laser arm with both hands.
- Simultaneously hold the laser arm gently in place with your left hand and pull it slowly with your right hand until the front wheel on right end of the laser arm rolls off the rail. The laser arm will sit at an exaggerated angle.
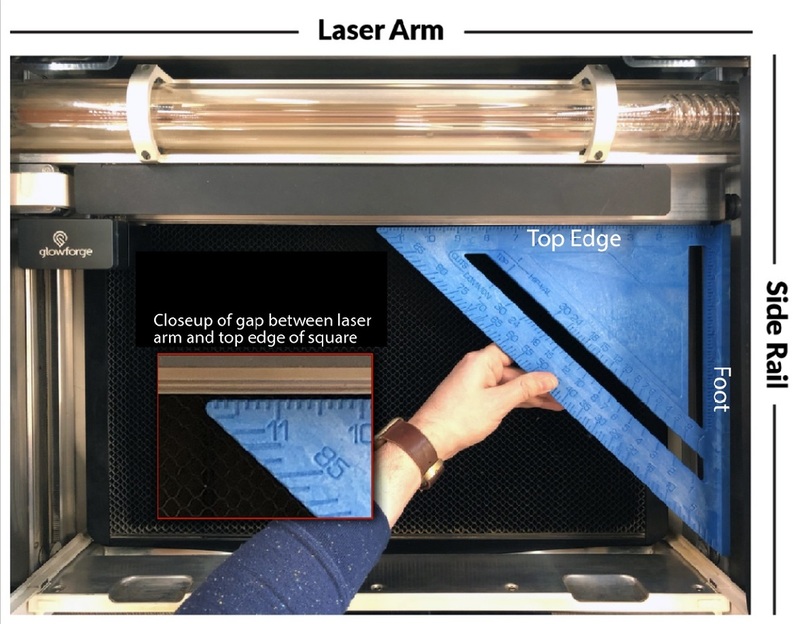
- Press the foot of the square against the right side rail as depicted in the photo using firm pressure. You may need to use the top edge of the square to slowly push the laser arm away from you so the foot of the square will fit inside your unit. Make sure the foot is flush against the right side rail and that the laser arm is still at an angle.
- Still using the square to apply pressure to the side rail, continue pushing the square towards the back of your unit until the metal part of the laser arm is flush against the entire top edge of the square and the wheel pops back onto the rail. If the laser arm is not flush against the top edge of the square, try the process again starting from step 5.
- Remove the square, being careful not to bump your Glowforge or the laser arm.
- Turn on your Glowforge and wait for the lights and fan to go on.
- Close the front door and the lid.
- Wait for your Glowforge to calibrate and try a print!
Please let me know if it helps! If you’re still seeing the issue after trying this method, there’s just a few more steps we’ll have you try. Thanks in advance.