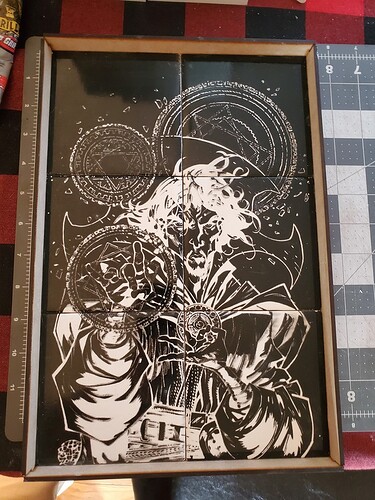
playing around with a thought I had, sprayed some cheap tiles black and etched a piece of comic art into it. Laid it into a box, and voila
Gorgeous!
Presumably the tiles themselves are not etched, just the paint burnt off?
Very cool effect!
The settings I used technically did etch the tile, though yes, the picture is coming from the removal of the paint
Did you put all the tiles in the GlowForge at once or did you do them individually.
All at once. It was easier than trying to split the image to fit the tiles. However, the next one I use i want to do a 9x9 mandala style design, so I’ll have to split and will do some testing.
That would be pretty easy with tile, using a jig for several tiles at once. Number the back side before you engrave! 
How do you perfectly line up your designs? I was tempted to make a jig, but outside of hoping I never move the ignored box design, i wasn’t sure if there was a better way? I want to be able to do it again and again if needed
Break up the design in Gimp or similar, then import and scale in your design app. They will “snap” to the corners of the jig cut. You can either make multiple copies of the “jig” cut and put a segment in each, or what I normally do is use the same file - I place the objects or delete the unwanted layers/parts, save, load in GF, print, go back to inkscape, undo changes, lay out next part, save, print, repeat.
If it’s a one-off, the latter. if you intend to save for later, individual files.
9x9 is a lot of tiles, assuming you’re using 4" tiles, I’d break it up into 2x3 segments, which would make the last row 1x tall, 15 prints overall. If you did 8x8, however, now you’d only have 8 files/prints. Of course, if they are 3" tiles, you’d get 3x5 on a bed, so you’d only have 6 prints.
Love it!! Did you made the frame for it?
Awesome project. Yes, I’m a comic book fan. What paint did you use?
Yes I did, I used https://en.makercase.com/#/ to create the .svg for the box design. Make sure you don’t make the same mistake I did and make the measurements for the INSIDE of the box, not the OUTSIDE. had to do some sanding on the tile edges to get rid of the spacer bumps.
I just used the 2x Rust-oleum paint Walmart carries, used a gloss black for the paint and a high gloss 2x coverage spray poly that I had on hand to make sure the parts that were etched into the tile also shined. I like the etched effect that ended up in the surface of the tile, almost made the artwork stand out even more. Plus it gives it a little bit of a textured feel.
I’m trying to think of the process you used to get the image ready. I assume you found the picture, turned it to a gray scale, or B&W and then inverted the color? Is that correct? Did you do anything else?
Thanks.
Makes an impressive art piece!
So the image I used was actually already in black and white. It made it easier than trying to work with gradients to get the solid details. Also, because I spray painted the white tiles black, the image didn’t need to be inverted. It created the jnverted colors by doing it this way. Plus it made the print take less time
Thanks!!
Thinking more about this…as I would like to try it. Did you use a raster image, or did you vectorize it and do a normal engrave?
Thanks!
I used a raster image, but the resolution was high enough that scaling it had no effect on the pixellation of the final print. The good thing with this is that the materials are so cheap, you can play around with it and it isn’t an issue
