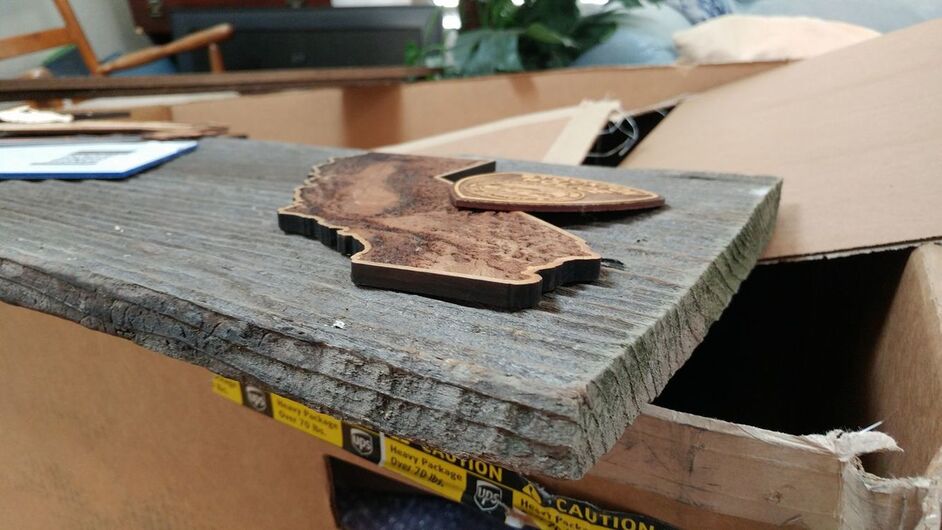
So I have this (gorgeous) piece of .85" old barn wood I need to cut down and I’m trying to figure out the best way to maintain a nice raw edge. I think using a saw would be best mechanically, but I don’t want the fresh-cut look on the edge.
A dark laser edge would be great, but don’t know if I can get through it without charring the heck out of it. I’m going to test it on the laser, but in the meantime I’d entertain a good method for aging/coloring saw cut edges if anyone has any suggestions.
Oh yeah, it’s a bit heavy too. Any nice hanging suggestions would be cool too. This is for a charity auction and appearance is important.
they make some nice grey stains / paints you can dilute and match. alternately, DIY network has this suggestion for grey weathering:
Chemical Weathering: Light Grey
To add an ashy or grey hue (to mimic sun fading), fill a spray bottle halfway with white vinegar. Then shred one pad of steel wool and push it into the spray bottle. Let the bottle sit in a warm sunny area for at least 3 to 4 hours and then spray its contents onto the wood and allow to dry. Age, species, surface cut and sap content of wood will affect the process, so experiment with the amount of steel wool in the bottle, the amount of time the solution soaks and the number of coats applied. Always do a test piece first and stop applying solution when the wood achieves a color that is slightly lighter than the desired hue; the aging process will continue for a short while after drying.
Gonna sound really lame, but Sharpies work extremely well, they’re permanent, and you can get a rough weathered look by applying and then quickly wiping away with a damp melamine sponge. (Or superfine grade sandpaper might work better with rough cut edges.)
I used the technique on the Jester acrobat toy if you want to see an example.
To duplicate those colors, you’d need gray, taupe, pink and green Sharpies (They do sell a big box of assorted colors at Office Supply stores - just try them out on a sample cut edge.)
I don’t think it sounds lame at all and it looks awesome! My problem is the piece as pretty large at about 12"x10" so Sharpies might not be practical. The end grain is what I’m having the most too as it’s very porous and gets really splotchy with color. I’m going to do a little sharpie testing though!
ROFL! I understand completely! Remind me to show you the four closet door sized panels I drew with Sharpies sometime… I breathed so many fumes working on it that I’m pretty sure I cut my IQ by about 40 points…it took months, and I went through 3 boxes of Sharpies.
(NSFW though…a representation of wrestlers in the ancient Greek style. Can’t display here.)
I’m not sure how well this would work on smaller pieces of wood, but it’s something I’ve always wanted to try on larger projects.
Have you heard about shou-sugi-ban? The process goes like this: Take perfectly good wood, then burn the c**p out of the top layer, rough-file the excess burnt material down with a wire and/or softer brush (think of them like grits of sandpaper, but don’t use actual sandpaper). Wash the wood down to remove loose bits of char, then apply a coating of tung oil and reheat to lock it into the fibers.
Trivia: the process actually even helps make the wood more fire resistant.
I’ve seen some amazing effects with that technique!
@kittski I’ve been researching weathered wood effects lately too. Haven’t had a chance to really dig in to it, but if you check out this pinterest board you’ll find a handful of aged wood tutorials that I’ve pinned. FWIW, out of all of the ones that I’ve read through, the steel wool/vinegar techniques look the most authentic to me. They’re also the most straightforward.
Hi Drea,
There is a video by the southwest wood turners, they are using archival India ink as a way to ebonize wood. He discusses 3 methods and compares the results vinegar a iron is one method discussed.
It’s a long video and a little boring, but he concludes the Ink is the way to go. I have not tried the system yet but I did check cost stay away from the 2 oz bottles and do a little searching and the cost for the ink is really low.
Hope this helps your research it did mine.
-D