Suspended ablation

@evermorian - ooops, my bad - I’ve deleted my references to non-standard Proofgrade settings.

2 Likes

Ditto this…me.

1 Like

@ben1, I don’t stack dissimilar materials and concurrently cut them - that seems really ill-advised, as the beam can only be tuned for one material at a time. I confirmed as much when I tried putting on some thick paper stock under the acrylic - it was a fire hazard and it gunked up the acrylic cut.

Simply elevating the acrylic at least 1 mm off the build tray seems like a decent alternative to inserting a shield material under the acrylic, IMHO. As for the material to use for elevating the acrylic, cardboard was a cheap and convenient source for me - but it could have been anything else, since it wouldn’t be in the beam path.

1 Like

I had a flare up the first time I used cardboard, and it wasnt pretty.

I personally cover my bed in masking tape which helps prevent flashback, and also has other benefits.

Having said that, make some of these, and use them as standoffs… they work great:

2 Likes

My reply was to deirdrebeth, to ask specifically what her experience was, as indicated by the reply icon in the upper right corner of my reply.

I have had bad things happen when covering the bed holes. The exhaust pulls smoke down into the bed to help clear it. When I cover the holes with tape, etc. I find that the smoke builds up under it, and the tape acts like cardboard; it can catch and burn because it isn’t cleared by the air assist.

If it works for you, great, just adding my experience.

1 Like

I’ve always wondered if glass would be the ideal flashback-eater. It absorbs laser energy, it’s very flat, it has a high thermal and physical mass, it doesn’t gas out or make much if any debris when lasering 1 , it seems like it’s a good option. I’ve yet to hear of anyone using it, maybe because of the difficulty in cinching down your material. IMO tape would work very well here, it’ll adhere well to the glass and keep your material from moving… I wonder what it would do to the cutting to have zero pathway for the smoke/gases to go down.

1 (yes yes silicosis, but we’re not pulverizing it, just lightly scoring it, I don’t think you’re blasting glass chips everywhere)

1 Like

@takitus, thank you for that link! It got me thinking of something similar - but rather than a hold-down, a rise-up:

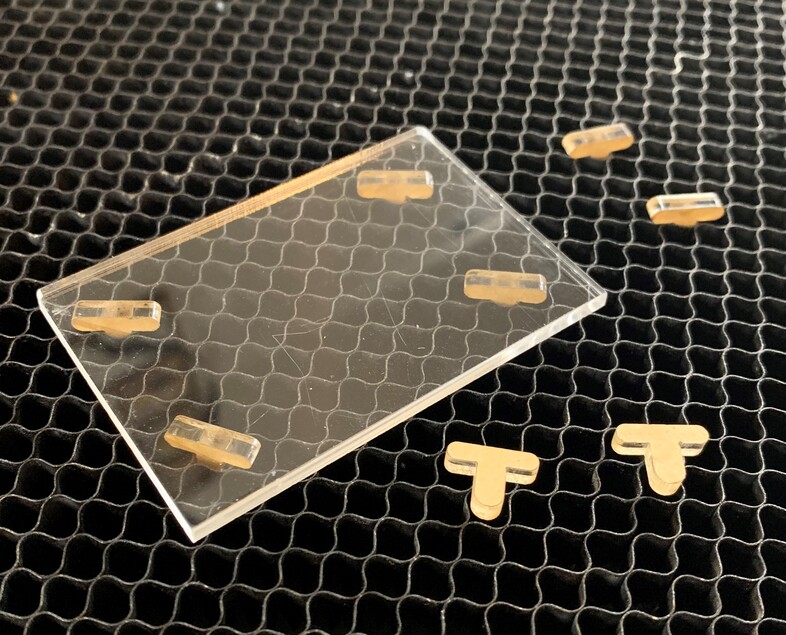
I used some scrap acrylic, but it could be any material less than 4 mm thick. The eensy risers elevate 3mm, which is plenty high enough to avoid flashback, low enough for my magnets to still work well, and be easy to pluck out afterwards. I’ve attached the .svg (or at least I think I did…)

riser

6 Likes

@ben1, - sorry about that - hopefully I backed you up.

Currently your .svg is a tiny little dot
image

If you edit your post there will be a size next to the link (something like [image|1x1]), if you edit that to something in the hundreds it’ll be easier to see

and thanks for the rise-ups :slight_smile:

Heads-up: moving this thread to Beyond The Manual, my true home…

yep, standoffs, exactly =)

@evansd2, I had to try…

The laser ablates the acrylic, and that hot gas has to go somewhere. If not down, then up, spraying all the debris, gas, etc. all over the cut edge. The result is a significantly duller edge.

Dumping a 40W laser beam into a glass plate seems really dangerous. There was chipping, and I imagine the heat buildup could lead to the glass shattering at some point - probably just as I lift up the lid and lean over to pick it up. So I think this is past my “Jackass meets Glowforge” limit.

My vote is for a black hole in sheet form, so I can send the beam off into another part of the universe :slight_smile:

4 Likes

@deirdrebeth, bumped it to 1000x1000 - still looks tiny, but hopefully more clickable. It still doesn’t appear as a downloadable .svg to me however, so I think I’m not getting how to post files correctly. Sorry, but fortunately the design is really simple and easy to duplicate.

1 Like

It’s tiny because it shows the entire page of your svg. Change page size to 2x2” and center your part and voila. Big.

As for downloadable, right click and save as. Instant svg.

This is why a lot of people zip up svgs for uploading it looks a lot more downloadable that way.

Totes clickable - and you right click to save-as

image

“set page size…” - that was it! I learned something new today - thanks @evansd2!

1 Like

Typically I set my page size to be 19.5w x 10.9h, helsp me understand how much space I’m working with. I frequently make huge grids of many small parts and I have to pack them as tightly as possible.

But when I want to upload something with detail I either take a screencap or change the page size so it’ll be visible. On windows, hitting windows key - prtscr immediately saves a screencap to the screenshots folder in your pictures folder. This is sometimes faster and easier than resizing page and uploading svg.

This topic was automatically closed 32 days after the last reply. New replies are no longer allowed.