THANK YOU! 
2 Likes
@jules, I have been testing settings this morning and finally got around to looking at scores. On my test setup, even though I made the line thickness pretty thick, a score makes a very fine line. I guess I was expecting the line to be wider. I guess since the laser is a fine point it only makes a single pass. Is there a way to score a wider line?
2 Likes
Thank you, This is SO professional looking.
2 Likes
No, a Score line is always the thickness of a single laser beam. If you want to make a line that looks a little thicker - you have to Expand the Stroke (which makes it into a very thin filled rectangle) and then Engrave it.
It takes a lot longer to engrave a line than it does to score it though - there is a lot more travel movement necessary for engraving.
(Which design software are you using? There are tutorials for how to Expand the Stroke for Illustrator and Inkscape.)
3 Likes
Awesome! Thanks for sharing this.
3 Likes
I am using Corel. So far I like it a lot. BTW your engraving test is the bomb. Thank you very much for sharing that.
3 Likes
Oh crud - i have no idea how to do it in CorelDraw. We have experts here who can tell you how though - @smcgathyfay and @johnwills . Either one can probably tell you really quickly. Guys? 
3 Likes
Score or vector etch would be a hairline width in corel.
If you want to raster etch or engrave a thicker line, decide the width of the line then do outline to object.
5 Likes
What about this file tells the glowforge to use the power rating that you indicate? I am surprised to see a rainbow of colors instead of percentages of black.
1 Like
Filled vector shapes of different colors means different operations in the GFUI. The colors separate each oval into a different operation that you can enter your custom engrave settings. If you just used a percentage of black, it would see the vector fill as black no matter what shade of gray you use since it doesn’t do vector filled gradients yet.
You would have to make each one a separate bitmap of percentage of black which would be a worthy test, but not what we are looking at in this test.
3 Likes
Me. I tell it what to use when I set it up. Manual override on the power settings.
Those colors are keyed to fall in descending order when the interface picks them up. @marmak3261 worked it out a while back and gave us the coded order. I set them up in Illustrator that way.
(There are a couple of write-ups on it.)
3 Likes
I thought the engrave by color function worked by percentage of black to white though? So if I set the power to 100, black would be 100 down to white at 0. Unless I am totally misunderstanding that. Either way thanks for the explanation.
1 Like
By the by guys - I am having to reinvent the wheel on the leather - that stuff is a pure -D beeyatch to engrave without making a mess. If I succeed in figuring it out - I’ll post a “Lower Power Settings” version of that engrave file - you’re gonna need it. All of the settings on that original file are too high for leather. 
6 Likes
It does that for raster images. (The grayscale engraves.)
Vector fills are treated as a solid block of color, the interface doesn’t try to figure out what color you want based on the color of the fill. You have to specify what you want it to do for that solid block. (Either Light/Medium or Dark from the defaults in the interface, or you can override it completely and set your own values. That’s what I do…I’m using a pre-release unit.)
4 Likes
Yes. You are correct. But engrave by color as it appears as a default operation on Proofgrade in The Glowforge with a bitmap is a very different reality from engrave by color of a filled vector in the design program. In the first instance, that is Glowforges way of giving you a few options for darker or lighter engraving, which is also affected by the greyscale of the bitmap. So you can do a lighter color engrave of a lighter bitmap or a darker colored engrave of a lighter bitmap.
In the second instance you are determining the amount of darkening of the material by dialing in the settings manually of speed, power and LPI. In this instance we are referring to the color of the design file not the color of the resulting engraving.
4 Likes
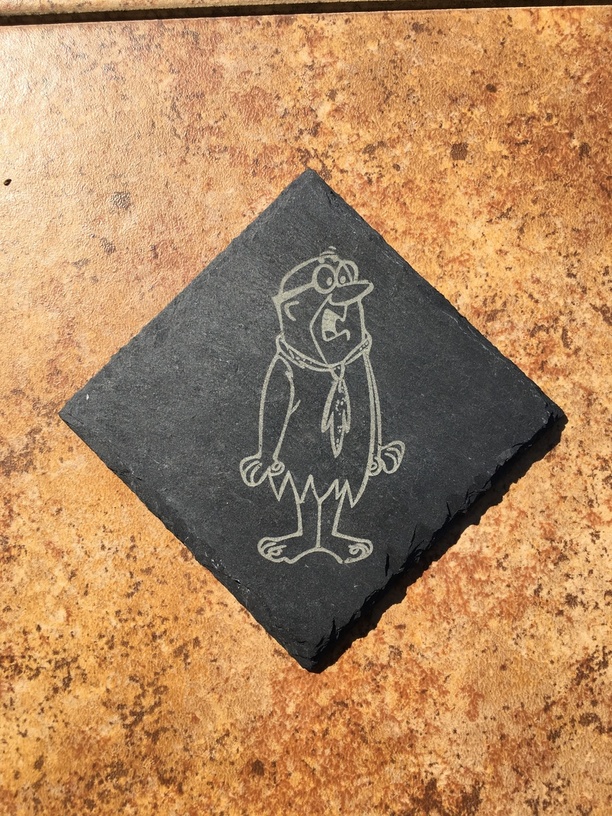
Flintstone! You’re fired! 
(I already feel stoooopid for picking up two sets of the damned things for $8 a set.) 
6 Likes
Yabba-dabba-do!
4 Likes
Okay @Jules. That’s sort of not what I was doing 
I have a grid of Power across the top and Speeds down the side. I kept the LPI constant. I was using 340 but it works with any of them. I did the power from 5-100 and speeds from 1 to 335 like this:
Power: 1 5 10 15 20 30 40 50 60 70 80 90 100
I had originally thought I’d get away with 10 power boxes but I didn’t want to lose any of these. I figure I can interpolate from these to things in between - but honestly, I won’t  This is also good because it matches the color values that @marmak3261 tested for ordering.
Down the material I have 10 rows of boxes. These are for the Speed settings like this:
Speed: 335 275 225 175 125 75 50 30 10 5
The first row has the colors @marmak3261 discovered. I have a custom palette in Corel so I just started at the left and assigned over to the right. The first one looks black but is really #0000A0 so it’s after black (#000000).
There is a cut out box that is a different color so I can wait until I’m done to do that one. The 2nd to 10th rows are a green with no stroke. Those will be ignored. But they give me a placeholder so when I copy the first row to the 2nd I get them lined up with the labels.
The way I run it is I load the file. Ignore the cut operation and rows 2-10. Specify the power & speed for the different box colors in order. Run. Then I move the first row onto the 2nd row. Set the new speed settings. Run. Repeat until all 10 rows are done. On the last run, also enable the cutline for the box (this is for a 6"x12" rectangle so I cut it out last).
It’s tedious and I’ll do more once the GFUI will save settings so I’m not redoing it everytime I want to run it. Right now it’ll give me a rough idea of what to do with my settings.
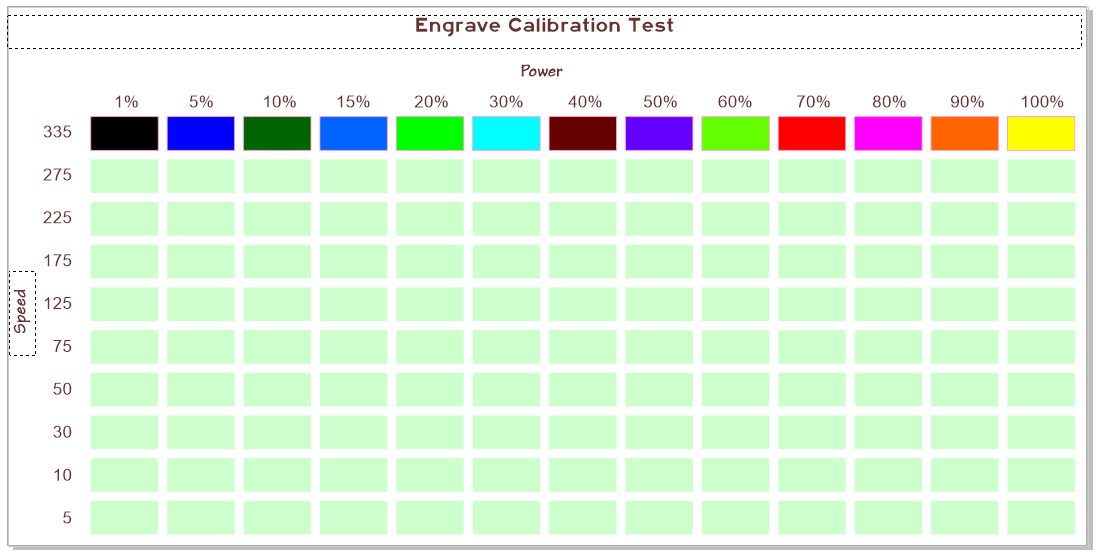
I’ll figure out colors that will move the cutline box, text and scores to the end of the stack so they aren’t intermingled but I haven’t done that yet. Need to play with the color settings to add 3 more to @marmak3261’s list.
21 Likes
Thanks Jules, very kind of you!
2 Likes