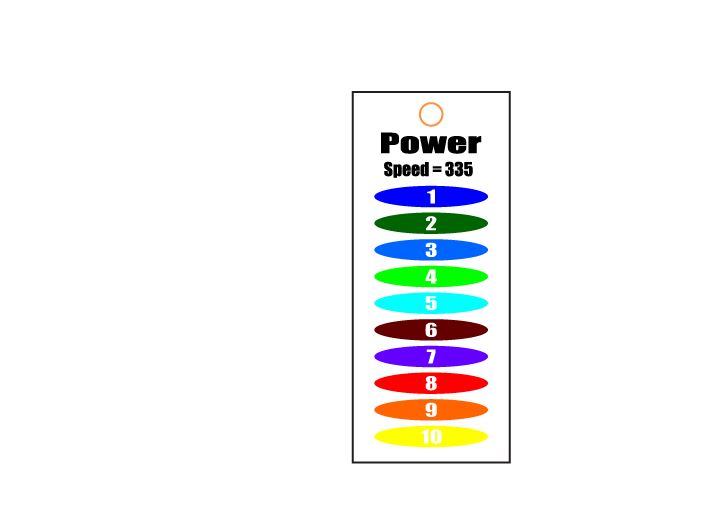
I think we’re doing the same things, I just run my speeds across the top and vary the power vertically. After the initial test to see if there was any difference in the LPI results, I just fixed the LPI and started testing for color at a few speeds.
The first one I tested though, I noticed that even large variances in the speeds weren’t making much of a change in the actual color of the engraves…so now I pick the fastest speed I can get away with (optimizes time) and just look at varying the power to change the color of the engrave.
Saves a boatload of time testing. (And I’ve got a lot of materials to run these things on.)
Okay, all you leather peeps probably already knew this, but the leather really only engraves one color, the engrave can be darkened a little bit with a second pass, and it looks much more even, and you need to use really low power settings and fast speeds if you don’t want to totally char it.
One other thing - if you want a decent engrave - remove the masking. That adhesive melts in there at the low power settings and makes clumps and causes skipping in the engraving. If you have to cut it too, I’d recommend cutting it first, removing the masking over the areas you want to engrave, and then engraving. The engraving doesn’t throw a lot of discoloring smoke, but the cutting does, and if you don’t want it all over the nice white leather afterwards, you need the masking for the cutting part.
What else… 340 LPI looks better on the leather, it’s a good idea to put additional paper masking on the back of the leather before cutting, and the settings listed for the default in the interface for engraving are way too high. (Might be because I have a PRU, might be designed to just get through the masking, I don’t know. You can engrave it very evenly at a much lower power if you take that mask off.)
Again, this is probably stuff the leather workers know - this is my first pass at engraving it.
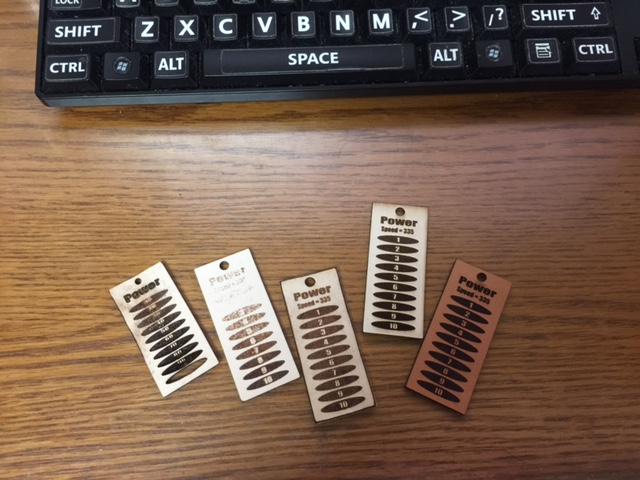
Left to Right
Settings were too high using the file posted above. Burned thru in places. The revised file below puts you more into the correct engraving range for leathers. (Also probably papers and cardboard.)
Lower setting file, with the mask. The adhesive made a complete mess on the lower power settings and made the engraves skip and turn out clumpy everywhere that it did make it through.
Single pass engrave at highest speed, no mask. Notice that 1% power looks a lot like 10% power, color-wise.
Double pass engrave at highest speed, no mask. All results are darker, but 1% power still looks just like 10% power.
Double pass engrave on a thicker piece of leather. Again, all of the engraving looks just the same, no matter the power used.
I’ll attach the Lower Power test file below. I think I’m going to run it as a single on the woods again, after I remove the masking, just to see what happens. Might get some nice ghost effects on the woods at the lower powers.
Yours is better for doing them quickly - you can do a particular speed/power set pretty fast. But you end up with a pile of swatches. Mine takes longer in one monolithic print (or you’ll have to realign it on subsequent runs if you want to do a row or two and then something else) but you end up with a single plaque that has all the power/speeds for a tested LPI (I’m doing a 270LPI one now). I’ll probably do a set of yours too.
Funny but I think there’s some indication of the way our brains work differently. The paper guy at the Makerspace I teach at came up with the same calibration style you did. He’s got a ring with a bunch of acrylic tests. Until he did it that way I never thought of an alternate to the full grid method.
Very helpful. I did some experiments with low power settings on leather right when they (re)released them, but noticed that those settings seemed entirely different on my PRU as of yesterday.
Not a huge deal for my own upcoming projects, but kind of a bummer for the write up that I started last week about tooling leather w/low power engraves. That may not be valid or make sense now, so I’ll have to start from scratch
I there any way to cut with Inkscape? So far anything I export/save from Inkscape is always an engrave, even a simple circle- trying to chose cut it says, “it can only engrave raster images”… The only way I’ve cut is to load SVG into MTC (MakeThe Cut) software and export it as a PDF vector, then the GF app will let me choose cut. Also is there anyway to darken the lines once loaded into the app?
Hey @PlGHEADED, I don’t have Inkscape but you can definitely prepare cut files using it. Until one of the experts answers you, you might take a look at the many tutorials in the Glowforge Tips and Tricks category here, I’m sure they would answer your questions.
Yes. I prefer Inkscape because my copy of Illustrator is older than dirt and it seems to do everything I would want. Use Inkscape almost exclusively. There are no limitations or workarounds needed to get cuts. Just need to understand the Fill, Stroke Paint, and Stroke Style selections. It’s probably best to go through the tutorials here or even some of the Youtube tutorials for Inkscape. Will be glad to answer specific questions but could spend days writing 10 very confusing pages on just that one question. Not very good at writing (or talking) clearly.
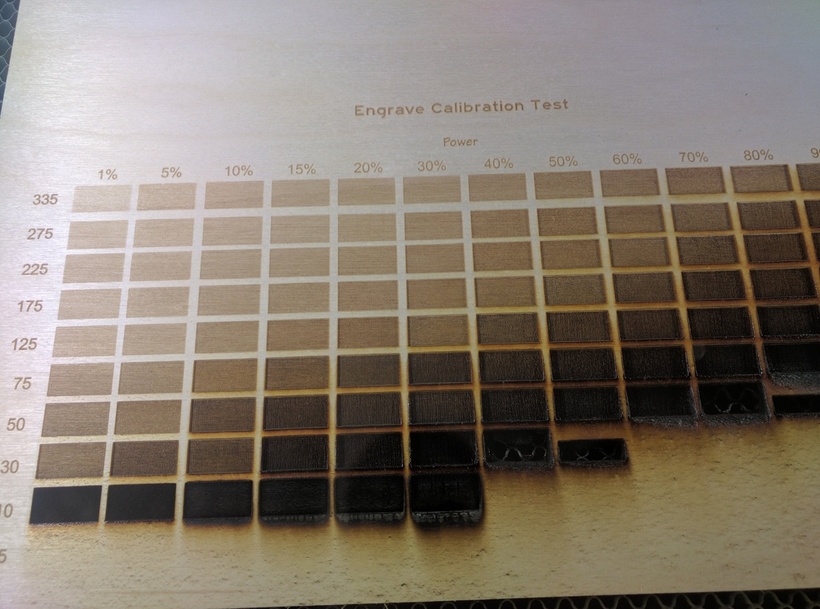
Might I suggest putting something untouched in the middle of each box. Some solid shape… a box, circle, whatever. I found it really helps me get a feel for the depth of engrave.
Might be helpful but it isn’t really necessary. Pretty easy to see how deep the engrave is. I’ll post pics tonight after I run the last row - at 5IPM and 270LPI even with just 5 power levels (the other higher ones were doing burn through at faster speeds so I dropped them) it was going to take an hour & a half. I think an entire grid sequence takes about 6 1/2 hours so it’s better to do it in sections or when you’ve got a lot of time on your hands
I haven’t run this on PG with the masking but I would expect something from 10% at 335LPI. I’ll have to run a quick test on a piece of PG with the masking intact.
Yes, the lower power settings (under 20%) aren’t making it through the masking.
(I plan to remove the mask and experiment with the Low End settings later on the woods. For now, I’ll stick with using anything under 10% on the papers and leathers.)
Looks like over 25-30% on the PG woods that are masked. (That’s at a high speed…if you slow it down to 200, you can get a light mark at 20%.)
This was the testing that I was thinking of running. But as usual @Jules is making me rethink my processes It’s good to have your ideas tested and challenged with new ways of solving issues.
So for this test, you run a row at a time? I’m assuming that you have to lift the lid as soon as you want the row to stop. Then you can cancel the rest of the “job” and move onto the next row (hopefully modifying it a bit to remove unnecessary boxes.
And while this is going on (Run the job, stop mid-way through, load next job, run, repeat) you can’t move the sample material so that it is all lining up correctly.
Sorry, I was at a U2 concert yesterday with no forum access and am just now getting back into the forum but I see @smcgathyfay jumped in with a good answer.
 I think we’re doing the same things, I just run my speeds across the top and vary the power vertically. After the initial test to see if there was any difference in the LPI results, I just fixed the LPI and started testing for color at a few speeds.


 hard maple (and mask on). Is that par for course?