what a score!
you could probably make a very nice butcher-block style insert
1 Like
I’m sorry for your loss, @marmak3261.
Those tables look terrific.
2 Likes
Sorry to hear indeed @marmak3261.
When we moved this table wasn’t as much to us in the new space. It both expands outwards , and goes up and down. Hoping this will be my new work area .
It is in the living room atm. Hopeing the air filter works as well as advertised.
http://www.modernsensibility.com/Cunningham-Convertible-Coffee-Table
Hi y’all!
First post from long time reader 
I’m putting up a shelf above the desk where my future Glowforge will live and i was wondering how tall the machine is with the lid open? From desk to top of the lid.
Thanks for any answers!
I don’t have the measurement handy but, ballpark, the glass is the length of the front so I would allow (depth) + (height). I don’t remember those numbers offhand but they’re on our techspecs page.
Hey @dan, how big is your head? We need it for guesstimates haha
I am in the same boat except that my shelf (actually a cabinet) is already in place.
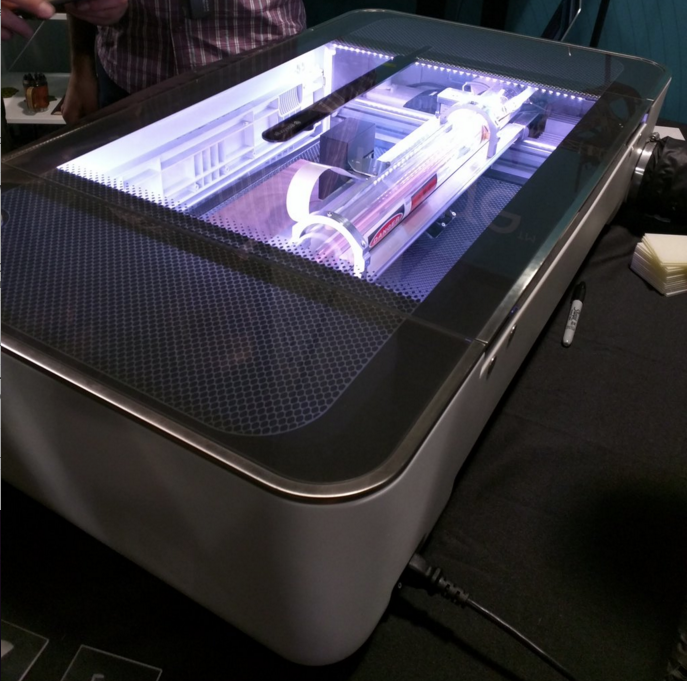
Keep in mind that there is a front loading door as well, so even if the lid can’t open ALL the way, you should still be able to get the maximum sized object in there.
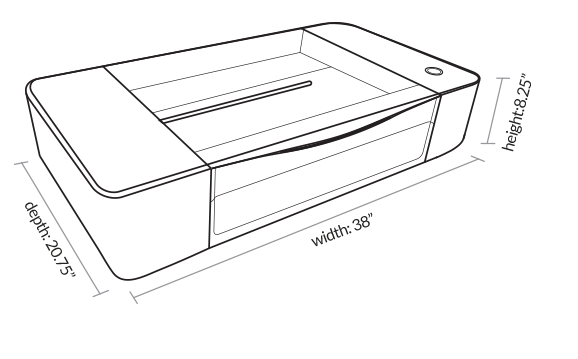
Here are the dimensions. so 29" tall with the lid open ~
36"/915mm if you have an air filter.
Wow that was fast 
so 29’’ around 74cm great info! Thank you all
In light of this new information, im going to guess Dans head is about 11" tall.
2 Likes
Speaking of that, I have two questions about dimensions. 1) does anyone know how wide the lid is? As a space saving thing, mine will be slid a bit over to the right side, where it will be under another shelf area (with enough space to ‘push the button’. Knowing how wide the lid is will tell me how far over I can move it. 2) How much leeway will I need at the back of the machine for the vent hose? There will be a wall behind mine…and as it is now, my table/workbench area is about 2" shy of the width of the Glowforge.
Maybe this image will help a little in giving you a visual size for the vent hose/port. It looks to be roughly 3.5" in diameter.
Thanks for that image, but I’m meaning if I hook up a vent hose to that, how far out will the ‘curve’ of that hose stick out from the machine before it goes straight up to the window? I’ve never installed a dryer vent hose, but I know there has to be a curve coming out of the back. I hope that all made sense. 
I a sure I have seen or heard in one of the videos that it is a standard 4" dryer hose outlet, and that a length of said hose will be included at least with the units that weren’t accompanied by a filter purchase (although those hoses are so cheap, I can’t imagine it would save them money to try to leave them out of the units that are going to people that also bought the filters). I am guessing, but haven’t tried researching it yet, that it might be possible to find a slimline elbow of sorts to make the corner in less space though.
1 Like
Elbow!..that’s the word I was looking for. I’m wondering how far the vent hose elbow will stick out.
Im again guessing here, because I am unable to actually measure it, but if you are using a standard dryer hose of 4" thickness you will probably need at least 6 inches in the back of the glowforge.
I was right, I googled “slimline dryer vent elbow” and found that a variety of designs exist. I would still want to plan for at least an extra inch or two extra if using one of these back there, just to ensure you don’t have the hose or elbow jammed against the back of the glass door, making it hard to open or keep open. If none of them seem appropriate, maybe you can temporarily support the 'Forge farther out from the wall than you really want it, and figure out a way to make a custom slim elbow as your first project on the Glowforge!
I have one of these behind my dryer, it saves a couple of inches: 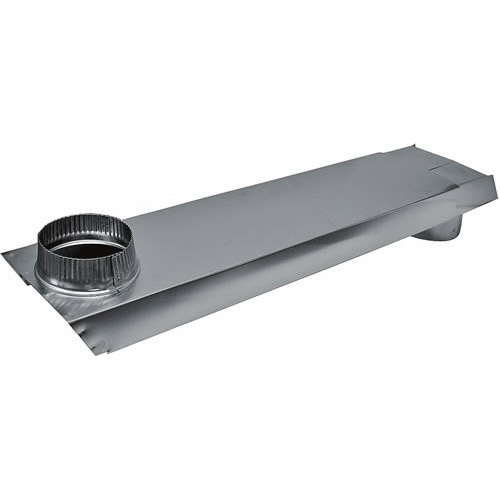
2 Likes
This is exactly what I am going to be using. But you have to seal it. I ended up using spray epoxy in the interior and aluminum tape on the exterior.
1 Like