Is the GFUI able to process fonts embedded in PDF’s?
1 Like
Yup, no need to convert to outline.
1 Like
From what I read, that will work if the image is just text. I added some white blocks in to bridge areas of the fonts (you can see it in the bigger one) and a few graphics. Converting to outline didn’t work for those parts.
I saved the .ai files as PDFs first, assuming that would work, especially if I disabled layers, or whatever those settings are, but the Glowforge interpreted the PDF the same as the .ai file.
Just a neat posterboard from Michael’s. Would be pretty cool to cut my own acrylic background though…
Definitely got the resizing concept after all was said and done, so the next project will be a bit easier.
1 Like
Awesome idea! I got excited for a second, but I’m hoping to make a ton of coin sized coins and realized pretty quickly how long that’s going to take. If I find a better way that isn’t already on the forums, I’ll post it.
1 Like
I sent you a private message to pick your brain a little bit more. I’m hoping that, if this isn’t already addressed somewhere on the forums, that I can create a decent workflow for consistent double sided engraves.
I haven’t received a PM from you…
For starters, I would not try to do all of them at once, putting all your eggs in one basket as it were. if one goes wrong they ALL go wrong. #2 you cannot use all of a slab of proofgrade particularly with engraves, and so lose half an inch all around.
If on the other hand, you have a piece of proofgrade cut into slices just bigger than your coins you can cut the first one, take it out and flip it over and engrave that, you have thus risked only one, by the time you get to 4 or six or whatever fits on a slice you will have a very good idea of what can go wrong and are ready to move to the next step. In that case, you make a batch of however many fit on a slice and do those then you just pop out the old slice an put in the new, and hit print again, As long as they are horizontal the time it takes for a slice is the same as many slices vertically, though horizontally, you can do 5 in the time it would take for three one at a time.
Now your only problem is to have all the slices the same and a way to ensure that they are in exactly the same place each time. When I was at Home Depot I was running about looking for things to cut and engrave (and also magnets} and among many other things picked up four white 4x4 bathroom tiles thinking to engrave them. I accidentally engraved one so I can see it works great but most importantly, as it turned out, it is a great way to establish a parallel line in the prime cutting area, being up against the front wall on the other side of them by putting the inch or so magnet up against the right-hand rise in the crumb tray you establish an absolute dimension on the right that is outside of the “no engrave” zone and thus available to do your coins. then you put magnets on the other two sides and you have established an absolute (and repeatable location for slices. You would have to be very precise to have the group so just flipping it over would give you the other side but the circles are precise and you could flip the coins inside each of those, with a tight control for positioning you can remove and replace the slices as much as is necessary making double sure they are tight against the tiles and the end magnet in each case as those are your measurements,
The reason the center is the most accurate is when it is directly below the camera there is the least distortion so if your whole group is positioned by the one nearest the camera it will be the most accurate. However, to make sure you are within the bounds set all the engraves on ignore and set the cut at 5% and 500 zooms which will make a barely visible line if that is correct then set the cut to proofgrade and just one of the engraves to proofgrade engrave. there are settings there as well and that is what the first time one at a time is for. To explore the settings you prefer, so when you do all of them you will know the settings.
once you get going with the individual strips ( you could do all the same side at first and after just drop in the coins in the last frame and hit Engrave only (no need to cut again) and you will move very fast and have a lot of control so any mess up will be limited in damage.
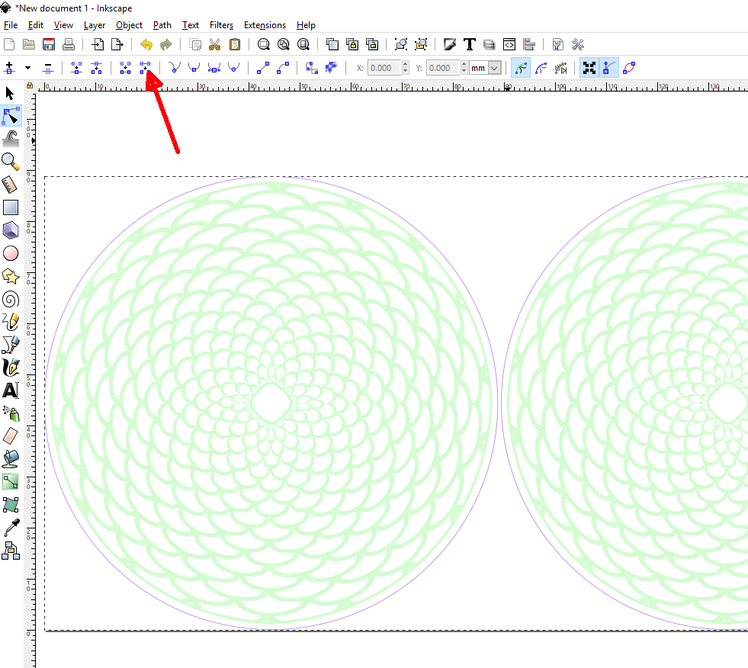
To get a line that is just one move and does not cross itself, you make a rectangle, go to paths and hit “make object path” while the rectangle is selected, then go to the node editor and select two nodes and hit the button the arrow is pointing to and the line between those two nodes will disappear. then hit the delete key and the nodes will also go away and you will have a straight line, but a special one that will not be two lines on top of each other make them 9.5 inches tall If your coins are just under an inch then copy the vertical starting at one inch and then two etc make those a group. then copy the group and make them 2
-inch tall exactly aligned with the others but make them a different color for both edge and fill (it does not matter what color but just different)
When you lay in your whole sheet of proofgrade bring in that file and line it up with the numbers at the top, you will have two groups of lines at the side the long ones and the short ones. You set the short ones on ignore and try to hang the long ones just over one edge and as far up as they will go. Do not try to adjust the size (if you do accidentally hit undo) as you can only adjust in both dimensions and you already have the correct horizontal size, the do the proofgrade cut and the cut will not go all the way. then you flip the sheet vertically so the uncut area is at the bottom but otherwise in exactly the same left to right, so now you set the long lines on ignore and the short ones on proofgrade cut and they should perfectly cut the rest of the way.
2 Likes
Well it depends on what you are trying to do. My comment was just about engraving fonts. You don’t need to do anything special there. It is possible that you can do cut paths if you change the font from fill to stroke but I haven’t tried that.
Now in context of your original post (it was early when I posted). If you are trying to cut and bridge text then you will need to convert to outlines. As somebody already posted you can do that directly in AI.
Then you will need to add your bridge pieces and merge the bridges with the letters. While you can stack objects in AI and have them print out on paper just fine the GF interprets each pieces as its own object. So if you cut a hole in a shape by placing a white circle over it the GF won’t handle it as you expect. In this case you need to punch that hole out of the object.
I hope that makes some sense. While it is no longer early it has been one of those days. ![]()
1 Like
Ha, thank you!
Seems pretty clear: convert text to outline, build bridges and then merge all layers.
I’ll give that a shot on my next go. I think I had attempted some merging, but likely didn’t do the right command. I’ve spent my whole life in Photoshop, so starting out as a noob in illustrator as well.
1 Like
Well you can definitely do it like your OP. In PS rasterize your fonts then add your bridges. Move to AI and auto trace the result.
Figuring out how to do all that in AI will likely result in cleaner files as you will be skipping the raster step.
My explanations are about Inkscape but all are similar with a few quirks each, however, I am mostly Gimp-Inkscape-Blender fan with a few others like Autocad, Artcam, 3d Max tossed in but not AI.
1 Like
Hmm, I know I’ve posted some pictures and descriptions about merging objects in AI but I sure can’t find them now.
OK, I’ve been trying to ignore our little Uranus subthread as the OP and others are going about the thread intelligently discussing real, useful laser stuff. But nope, I can’t do it. I have all the serious stuff I can deal with right now so all I gotta say is asteroids make for an angry Uranus and that aint pretty at all.
I sincerely apologize to the OP for our juvenile Uranus shenanigans. ![]()
![]()
7 Likes
At least you haven’t trotted out the ‘There are Klingons around Uranus’ line.
3 Likes
Well now that’s just a dirty situation right there 
2 Likes
I work closely to Uranus every day, so it’s easy for me to forget just how magical it can be. Thank you for the reminder to take a step back, gaze upon it and remember just how small little GFUI issues can be, when compared to the absolute enormity of things like Uranus.
3 Likes
Nice to know you have my back! ![]()