I do a lot of work with 1/16 inch thick 2-color acrylic (the IPI / inventables stuff)
Invariably I’ll have this problem where my test pieces come out perfect, but when I try and to a production run that takes up even half of a 8x12 sheet, the later operations and cuts are shifted by fractions of a mm. Enough to make a significant fraction of the run fail my QC and kill my yield.
Initially I thought this was due to stacking tolerance issue with the GF where over time enough small errors built up to cause the drift, however I have come to the conclusion that it is caused by thermal expansion of the thin acrylic during long engraves and multiple cut operations.
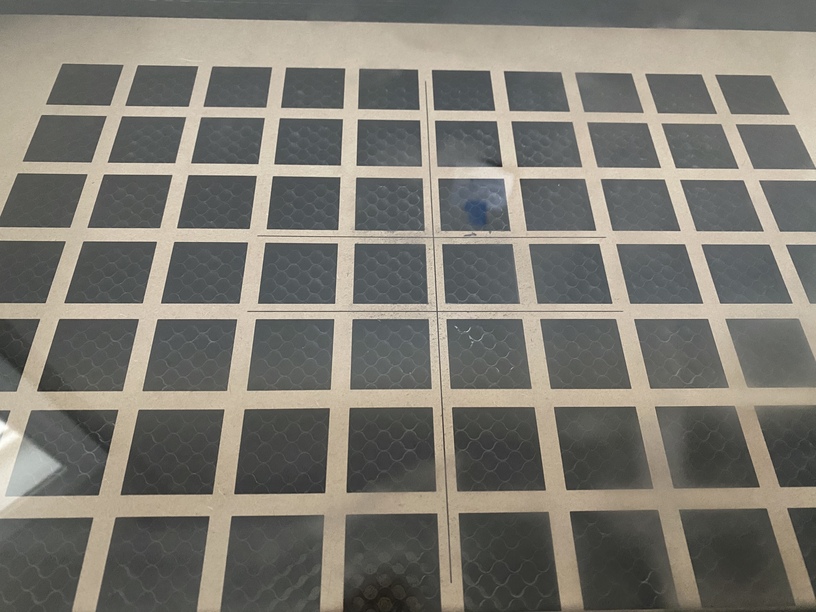
To solve this I’ve given up on just cutting the sheet as a whole. I now precut the sheet into slightly oversize squares that fit into a draftboard jig that holds each one, keeping any thermal expansion effects limited to each single piece instead of having them stack across the entire sheet.
The scored lines are registration marks allowing me to line the jig up exactly. All I have to do is import my files into the jig file and then horizontally and vertically align with a particular square to locate it in the pattern.
Seems to be about 5-9 10-5/deg C. I found a calculator that puts it at about 8 for cast, which works well enough as a guess here.
I decided to be really negative about the temperature change, and assume it covers about 160 C. This is about the melting point for PMMA, so the delta C is about as high as possible in this calculation (in reality you’d probably see much lower delta C because a: you’re not heating the piece uniformly and b: you’re just not dumping that much energy into the system quickly enough, all the heating effects would be local). With all that in mind, the expansion you could see would be about 0.2" across a 19" span.
So, given that we’re talking about really small errors I’d have to say your results check out as far as I can tell. Well sleuthed, and like eflyguy said, excellent solution.
Thermal movement can be considerable and I have favored long pieces held down as I have had a lot of warping issues that warp out unless held in place till they cool. I wonder if hold down pins could hold down that thermal expansion to keep it under control. or failing that figure how much thermal expansion pushes the result and move the design around to match?
I guess 1/16 thick material would not warp as easily as 1/8 or 1/4
I hope that will be the case in my new project currently cutting that will be a 6" dia lamp /box in seaglass acrylic, I tried to bend it to 2.5 in dia and it almost made it before breaking.
Yeah, I’m talking tiny errors here, but I work on a 1 inch square canvas and I’m adjusting my artwork engraved and cleanup scores by hundredths of a mm at times. The error is enough to throw off symmetry, make the border on side visibly wider than the other or cause the cut to leave a lip on one side. It was infuriating.
The 1/16 warps and deforms much more than the 1/8 or 1/4. It’s impossible to use hold down pins to keep it in place because it’ll just bow up in the middle, or once you start cutting it’ll deform into the kerf. Really nothing to do except isolate each individual piece. Prior to this I was limiting my self to only cutting 4-6 pieces at a time to limit the effect.
Have you tried using a heat gun? I have one made for soldering and it is digitally adjustable for temperature. You can easily bend acrylic to whatever diameter you need.
In theory, the errors would be about 1.5x as large on the x axis as on the y axis because of the 8x12" dimensions of the source material. Were you able to see that, or was it beyond your ability to measure accurately?
I have two heat guns that have not shown themselves since the last move and a toaster oven that need never see food again but getting to it and finding a place for it not as yet.
I make small 1 inch velcro backed patches. The canvas is quite small, so every little bit of detail and symmetry is important. Especially if you have a border engraved around the edge, it’s very easy for the eye to catch if its off at all.
I was seeing that problem long before we had such accuracy as there is now. The only solution? Don;t have a border! After that a mm or so off was not so striking.
If you cut each and engrave at the same time also not a problem but you have many layers.
Yeah. Unfortunately that’s kinda a big part of the design. If there was some way to easily make the forge make each piece individually instead of batching each similar operation together it wouldn’t be a issue, but say I score 20 pcs, then engrave 20 pcs, then cut 20 pcs, the expansion over the entire sheet throws it off, more so the closer the pieces are to each other. If it could just make one item at a time, 20 times over, it would be more accurate, but less efficient.
Yes it would make 60 layers or 10 layers if you did a few at a time. 70% survival is not very efficient but cut first (maybe two outlines) and engrave second would allow for some expansion so letting the machine work from the outside in, in layers separated by colors, would be faster and the needed space to expand would be created as it worked,
The cut and score together would help your border issues
Could you cut the whole sheet into squares, kind of along the middle of your jig spacers. Then engrave and score, then cut the final size for each piece?
That might prevent the dimension shift from interfering with adjacent pieces, and require less manual process. It would waste more material, but there might be a “sweet spot” as to how narrow that strip could be.
Thought about that. At the time I felts like it would waste more material. The other problem with the two color material is that if doesn’t react well to high energy. If I cut with enough power to get a definite separation and decency kerf, the bottom of material expands from the heat a bit and the top layer curls up a bit.
It’s really an annoying material to work with. I just haven’t found an alternative yet.
I’m gonna give the kerf cut thing a try though. Good thinking.
One other thought you could try…
Lower speed and power in your settings, which reduces the overall heat accumulation on the piece and might give the material enough time to cool down.
Or do more passes going super fast, but that might cause other issues.
I know this is not ideal (increases overall cycle time), but if you can go slower and improve your yields it might pay off.
Waiting for the “femto laser” Glowforge add on