Thinking out of the bottle!

Most of my life I’ve found that a series of odd coincidences have been turning points for me, and as another one has started over the last 24 hours, I’ll just go with it.

In the search for a simple, low cost, low effort, method of producing a depth map, about ten years ago I started a thread on ‘cnczone’ entitled “3D for Crazies”. If you go looking for it, you’ll spot the same avatar, so you’ll know your in the right place. There were 170 posts, so it’s quite a read, and it’s pretty light hearted, ocassionally hysterical, but there are some interesting ideas there.

Yesterday, I started thinking about the same topic once more, with a Forge in the near future, rather than the cnc in the workshop, but the requirement is exactly the same - being able to create a copy of an existing bas-relief in another material. So I contacted a company in Netherlands who make non-staining colourants, and they are now forwarding me a sample.
Last night, another contributor to that thread sent me a PM, after several years, for a life-update, so something is about to happen for me.
I’m in the process of setting up the same experiment, but only have a few days before I fly back to my ‘nest’ in Corinth, so it’s all a bit of a rush.

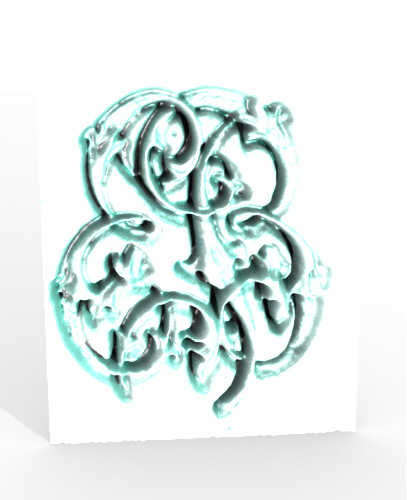
Imagine that your bas-relief is laying on the bottom of a shallow liquid-tight tray.
Spray it all with flat white paint, so that the colour is uniform, but hopefully not obscuring the details.
Fill the tray with a coloured liquid (I found elderberry wine of my own making particularly good).
Remove dust from the surface of the fluid. (I’m going to try dragging a length of adhesive tape across the surface.)

Arrange suitable lighting - you’ll need a light tent.

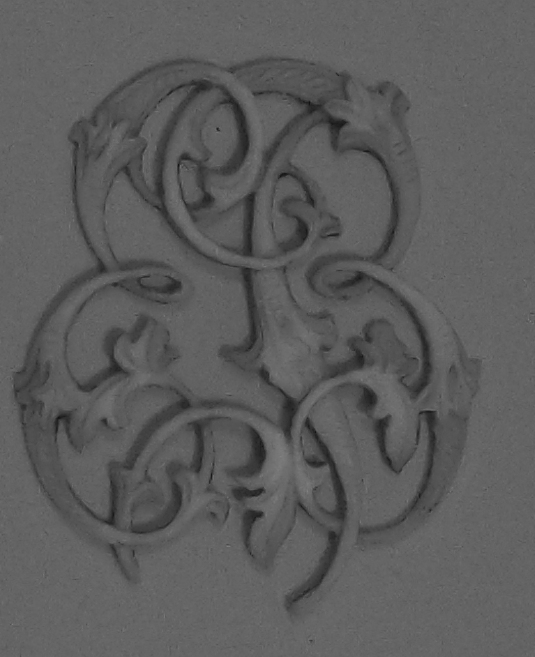
Photograph it, and convert the photo to a greyscale.

Now you have a depth map, and a quantity of wine that need tidying up.
Edit
Not sure if you have to register but this is where it’s at -
http://www.cnczone.com/forums/digitizing-and-laser-digitizing/28420-software-forum.html

38 Likes

What a fascinating idea! Let us know how the experiment turns out! :relaxed:

That is a fascinating idea and a fun experiment. Thanks for sharing.

Ok, this is interesting. I’ll be looking forward for updates!

Hmmm…I’ll have to give this a try sometime!

Just to get the ball rolling, I took a photo of the old ivory carved monogram that I’m using as a test piece. Then, without painting it white, nor with any light tent, I filled the container with blue coloured ‘brush cleaning fluid’ (smells like white spirit), and took another photo.
My little Fujipix J665 has a B&W setting, so using that, the timer, and the macro setting, this is the result.
I’ve done nothing regarding editing, apart from cropping the images.
This gives me a base line to work on.

Ten years ago, in the cnczone forum, I had access to the Carvewright software, Designer, which converted greyscales to a depth map for their machine, and a nice gui to see the result. Alas, that went with many changes of pc and OS’s.

When I get the commercial colourant, I hope to produce a much more contrasty image, and by then organise my lighting/tent setup.
But I expect by then I shall be back in Corinth, so there might be an interregnum.
Thoughts ?

14 Likes

Using a fluid bath is a pretty interesting idea.

It seems like it should be possible to extract a depth map from a stereo photo pair.

Annnnd… Yep, here’s some free stuff:

If you’re already setting up a photo rig this might be an easier way to go.

3 Likes

Thanks for the link.
I have come across that guy recently, but haven’t yet pursued the downloads.
A bit put off by my running Ubuntu, so that might need me to run it in wine, or keep switching back to xp. I dual boot the two OS’s, but it’s a bit of a pain.
I see though that he did the original work in Linux, so perhaps there’s a version I could use directly. Must investigate.

Bookmarked!

cake day? birthday? either way I see cake…happy :cake: day!

3 Likes

I tried quickly visualizing it in photoshop. So curious about how it will all translate to the Glowforge.

3 Likes

Do I need to cross my eyes to look at that ?
Doing funny things to my vision !

1 Like

How about shooting an image of it backlit as a silhouette? Then use a photoshop function to generate a gradient from the black/white boundary toward the black side (not sure what function would do that offhand). You might get a grayscale depth map that would cleanly create the shape as a 3D engrave.

3 Likes

I realise that I’ve just assumed that a greyscale image as a jpg, with the tone directly related to the depth is all that is required for the Forge to input and work with.
Is that correct ?
John

1 Like

That’s my understanding. I’d use a lossless format like png though.

1 Like

It’s easier to visualize with movement.

I have just been using (top menu bar) 3D > New Mesh From Layer > Depth Map To > Plane. It is far from perfect (although I have not looked at any instructions for how to actually use PS’s 3d functions correctly, just been mashing buttons).[quote=“johnbrooker, post:14, topic:5769”]
Is that correct ?
[/quote]

This is my assumption as well. The big hurdle for me is figuring out the proper range of tonal values to use for the gradients. I think that the Gradient Mesh tool in Illustrator will be quite useful to me for creating depth maps from scratch, once I have figured out how specific grayscale values translate to engraving depth.

5 Likes

100% correct on that! :slight_smile:

Thanks for the updated post.

Because I run Ubuntu 12.04, I sometimes have problem seeing videos, and I’m afraid this is one of those times.
John

How about an animated gif?

9 Likes

Thanks jbv, that works a treat :smiley:
EDIT
I can see now, by watching it, that a lot of depth information is there, just obscured by all the ‘noise’.
I’ve just sprayed the carving flat white, likewise the box, and tomorrow will start to build a decent light tent, and give some thought to a lighting rig.

John

5 Likes