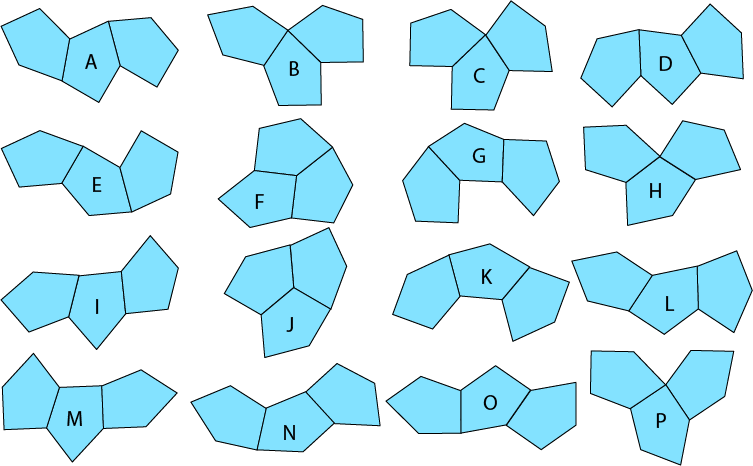
Here’s an interesting little puzzle with just sixteen pieces. The pieces are each made from three identical type 8 monohedral pentagons joined edge to edge. Type 8 monohedral pentagons are one of fifteen classes of irregular pentagons that can tile the plane. (See the Wikipedia article for details.)
There are sixteen three-pentagon pieces that will fit in with the way the underlying pentagons tile the plane:
Because the shape of type 8 monohedral pentagons is unusual and because the
way they tile the plane is odd, and because many of the pieces tend to look like others in the set
even though they’re different, finding solutions to a real physical instance of a puzzle made from them looks like it should be hard. Since I like hard puzzles, I thought I’d make one.
For a physical puzzle I chose a pleasingly shaped region in the tiling of the pentagons that is
8 x 6 pentagons (which would be the right size to hold all 16 of the three-pentagon pieces) to use
as the “board” on which to fit the pieces. The question is whether there is a way to put all 16 pieces on the board. I tried and couldn’t find one. So I wrote a program to look for them. (See the Github repository for the code and lots more nerdy details.)
There aren’t any. No solutions.
But, if I repeat one of the pieces, giving me a set of 17 from which to select 16 there are. I chose the one that uses two A pieces and no N piece:
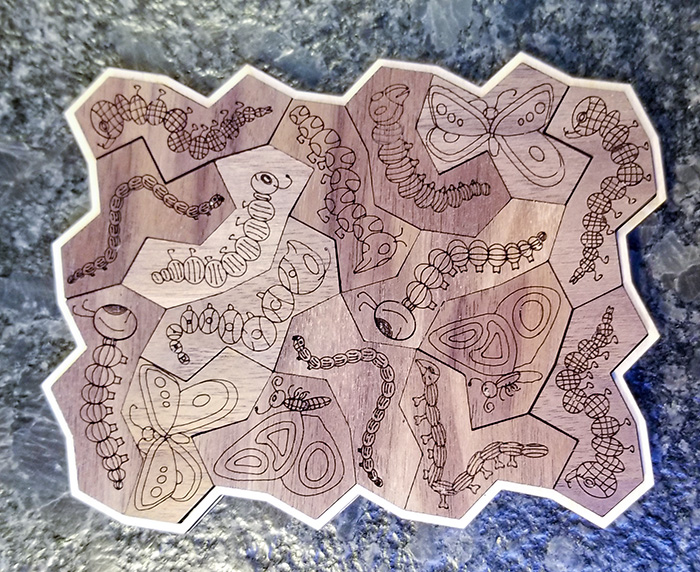
Yes, the pieces remind me of caterpillars and butterflies.
And here’s the svg to make one if you like.

Cutting Instructions
The design uses two types of material, 3mm for the board and the rim that keeps the pieces contained on the board. It uses 5mm material for the pieces themselves. You’ll be making two copies of the puzzle. (The puzzle isn’t mirror symmetrical and we need to score both sides of the pieces, so making two seemed like a good way to go.)
-
Start with the 3mm material. Load the svg into the GFUI, cut red and orange steps. Ignore the green an aqua. This will give you two boards and two rims. Glue the rims to the boards with CA glue.
-
Switch to the 5mm material for the pieces. Score the aqua (the caterpillars and butterflies) and cut the green and orange lines. Ignore the red step.
-
Without moving the stock material pinned to the bed (you do pin material to the bed, right?), carefully remove one of the sets of puzzle pieces one by one. As you remove them, flip them over and keep them together so that you end up with an assembled, flipped-over puzzle.
-
Turning to the remaining set of cut pieces, remove them one by one, flipping each one over as you remove it. Reassemble them as you go in the hole from which the first set was cut.
-
Move the first set of pieces into the hole vacated by the second set. You should end up with both holes filled with assembled pieces with their scored sides down.
-
Set the aqua lines to score. Ignore the other colors.
