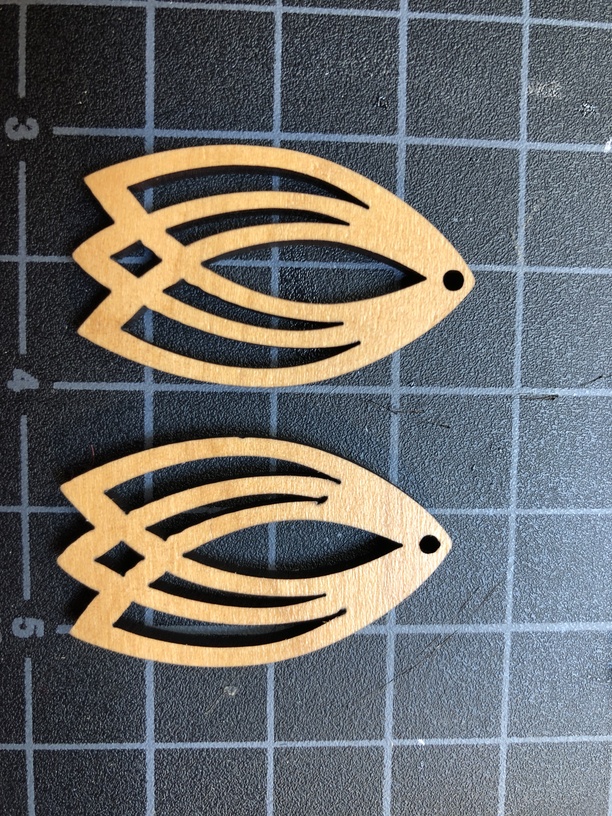
I have been cutting some “dangler” earrings with PG Medium Cherry. Apparently, the Medium Cherry PG material is still “beta” so I don’t think they have all the settings figured out.
In general I am happy with how it is turning out, but the designs have a lot of close together cuts. There seems to be some flashback that is causing minor imperfections on the back side. I tried increasing the speed by 10 but it didn’t really seem to have an impact, and I don’t think I should speed it up much more because I’m concerned it won’t cut the lines as straight. So that leaves me to going down from full power to 100 with multiple passes. I was thinking I’d start with 100 and do 2 passes. Any other suggestions? Maybe try another layer of tape instead of changing settings? I’m hoping to not have to do too much trial an error, but I have a few more pieces and it’s fairly cheap anyway.
Here is a picture to show what I’m talking about. On the bottom, you can see a few burn marks at the tip of the cuts.
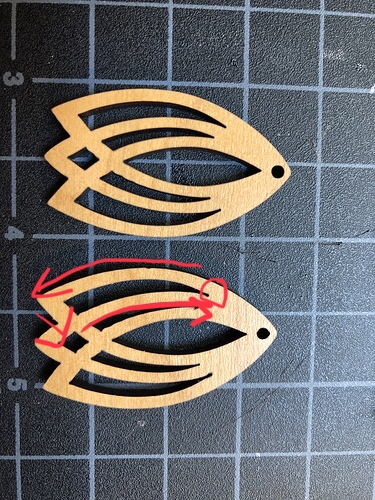
The burn marks at the tips are caused by the laser head slowing down so that it can change directions. The laser does not cut down power but the speed slows way down causing it to burn through extra well in areas like those. To reduce it you can add additional masking to the back side, or raise the piece up on a pin type bed so that it does not contact the honeycomb tray.
Thanks… I don’t have a pin bed in the budget right now, but will try the extra layer of masking tape. I definitely would like to get a pin bed at some point, I’ve seen them mentioned in the forums here. It seems like it would be ideal for this type of work.
It’s not caused by the bed, it’s not flashback. It’s overburn. The problem is laser residence time. You can start by putting a sacrificial layer behind it (wood or heavy paper) to eat up excess laser energy, but I think you’re probably going to want to experiment with path breaks and cut order, or redesign your pieces to have small radius turns instead of sharp interior corners.
You can often get away with sharp exterior corners by extending your paths past the intersection and making them a cross instead of a corner, but that won’t help you here.
@jbmanning5, you got anything to add? This seems to be puzzle-adjacent.
Thanks for the insight. I was thinking there might be some challenges with the design as well. I purchased these designs online, but I’ve tweaked a few of them where the paths seemed a bit off. I haven’t changed any of the cut order yet, but that seems like a good suggestion. Right now it is all the same cut.
Vectors have a start and end point. Usually where you start drawing and then where you stop drawing or close the shape. I would alter the start point to be in the narrow crevice where it’s burning and then go from there, so that it doesn’t have to double back on itself.
Like so:
If that failed, I would again keep the start stop at the really tight angle, but break the closed path and nudge the start or stop point, and allow the laser kerf to finish the cut.
Yes… makes sense. I just need to get in and mess around with the design a bit… I will probably just use some of the other less overburn designs to get me through the next week or so while I am trying to crank these out! Thanks for the suggestion.
First off, I think the earrings are very nice. I do not notice the burn marks you see. That said, the Glowforge pencil cup has much smaller/closer cuts and the result is without burn marks. If the cut pattern of the pencil cup can be replicated, your results will be perfect. https://catalog.glowforge.com/products/modern-mosaic-pencil-holder
Thanks! I think you are right. It’s just a matter of tweaking the vectors a little bit… My wife also inspected the earrings and said she thought it was fine. I’m just being a bit of a perfectionist, but it’s also a good learning experience for me to get them just right.
I’m with you and this would bug me to the point where I wouldn’t want to present them to anyone. I run into this with inlay designs all the time — I want interesting intricate shapes but have a hard minimum of 0.03” radius on any inside corners. I would prefer to go 0.05” to be sure but that often look too big on what I’m doing.

 Does that make sense??