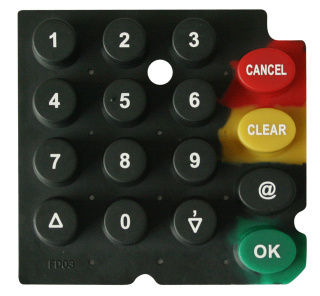
I’ve got a project in mind that requires a membrane keypad, rather than something like acrylic, because it needs to be somewhat water and dust resistant. Oh, and it has to allow for backlighting of the keys.
Sample:
I’ve read about the following technique:
Cast the keypad in transparent silicone rubber mold
use a dark grey or black oil-based opaque paint to cover the casting
laser off the opaque paint in order to reveal the keycaps in the transparent silicone rubber underneath
coat the keycaps in a matte or gloss clear polyurethane to lock in the opaque paint and prevent it from flaking off the silicone
Has anyone had experience in painting and locking in silicone that can suggest some manufacturers products? Or experience in the technique itself? Complete newb for casting silicone here…
I wouldn’t use paint, but you can use tints from Smooth On to color their Solaris or Encapso K silicones.
This way you avoid any product incompatibilities. Liquid silicone rubbers can be tricky to use when combining too many different materials into a project.
You could also get the membrane graphic printed onto plastic material (sign shops can do this with thermal printers like the Gerber Edge) then embed the membrane into a thin casting of clear silicone.
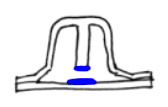
Because of the way the silicone rubber flexes, there’s no real space to do that on the underside of the keycap. Looking at a side profile, you would have a stem that goes down the center which is tipped with a conductive paint (indicated in blue).
When you press it down on a pattern that’s shaped like a zigzag (think of an ‘E’ and backward-facing ‘E’ slid together but not touching), it creates a short across the two parts of the zigzag, thus making a switch connection.
The center stem is important both for providing resistance (limited travel) and the connection itself.
In order to have backlit keys, the entire silicon cannot be colored. It has to allow the passage of light from the underside, so only a surface amount of colorant which can be removed is required.
The polyurethane coating not only locks in the surface colorant, but is longer wearing for multiple presses. Raw silicone would weaken and wear away quickly, I imagine… especially a thin layer. Getting the graphic would also be an extra expensive cost that concerns me.
So actually the reynolds team is coming over at 230 tomorrow to our simulation center to meet me and our sim team. Anyway, you can simply use the same silicone mixed with the Sim-Pig pigment. Almost all the Smooth On products are clear, and we mix dyes (ours are mostly tissue colored, so red, yellow, caucasian skin-tone, brown, and blue since we make body parts). If you use the dye, you need a VERY TINY amount of dye!! I cannot emphasize that enough, like 2 drops are enough to color several ounces! Silicone in general will bond happily to other silicone, however if at all possible stick with either tin or platinum based, so if there is any left unhardened on the surface it won’t prevent bonding.
Wouldn’t applying wet (colored) silicone on top of dry (clear) silicone cause a fair bit of lumpiness?
I’m picturing it would be thick and viscous material… I’m worried it wouldn’t exactly be a consistent surface.
No, the silicone as it comes out of the container will flow out and self level perfectly flat. There’s also an additive you can add that will thin the silicone, but for this I don’t think you would need it.
In fact that’s why my stuff all has to rotate, since it constantly will flow to the bottom so I would get oblong blood vessels, colons, etc… Also you can use the silicone solvent to smooth the surface if you need extra glossy.
Is that as funny to write, as it is to read? I suppose you’re probably used to it but when I think of a new user joining the forum and seeing these comments out of context (or not knowing what you do) I crack up.
Just a note to others what I’ll probably test out – I described to Smooth-On some of the properties (flexibility, colorability) I needed and they actually proposed:
Most of our organs are Ecoflex 50, but most of the vessels etc are DragonSkin 10 (very fast) which is squishier. Best bet is to go over to Reynolds Advanced near you and squish the discs they have. You can get silicone from hard-plastic through jello hardness
SON OF A… I better get started. Looks like construction.
Bonus: Haven’t driven through Wyoming yet. Good thing I have my diesel, I could make it on just over a single tank of fuel.
I’d probably barrel down to Butte MT, then linger in Yellowstone or Grand Teton WY for a camping trip before continuing. No sense wasting all that beautiful nature.
So awesomely we had Reynolds over at the simulation center of the hospital for 2 hours today. I think I learned more about silicones in that time than I knew in all these years combined.
I have a bunch of experiments I now need to run on silicones, and I am going to try and make it to the life casting class this thursday. We have some ideas on how to futz with inter-layer adhesion (to deliberately make layers peel apart under certain forces) and some other adulterants that I am going to try this week, which if they work will be an insane increase in surgical simulation.
Just for @dan_berry, if you are combining silicones (not just 2 of the same silicone with different sim-pig colors - which I did point out today that “flesh color” is only caucasian and dark skin is just “brown”, cringe…) either try to keep them all the same (tin vs. platinum) or you have to worry about the order as tin cure inhibits platinum cure (even if fully cured).
That’s good to know! Yeah, I must admit, I’m concerned about combining the two. I’m trying to determine how I’ll be doing the mold/setting of it all together. I figure I’ll have to have three molds plates, in two halves… one front (for the opaque color) and “back-A” for the dark layer, with a “back-B” plate for casting the transparency in cast 2.
But with rare exceptions silicone is clear, and the color is added (sil pig). When you pour blue dragon skin 10 up against red dragon skin 10 that is already cured, they completely chemically bond. Not a problem, I do it all the time. You can also use Silpoxy which glues them together (if they are different types). It’s really easy. You can also paint afterwards using their silicone paints. Also remember it is completely self leveling, so you can pour the front most layer, then each deeper layer on top (mold down facing). We do this to make multilayer “skin” with a epidermis, dermis and subdermis…
 SON OF A… I better get started. Looks like construction.