Using Inkscape with the Passthrough 🤔

There may be, but, i’m of the school whatever way works for you. I do things that works for me and others tell me i’m wrong until they realize i come up with the same results. Sometimes you have to work harder not smarter…

1 Like

Well, this one is truly a case of the blind leading the blind. :smile:

2 Likes

A lot of work on your end.

Got to thinking about it. You divided up the cuts in equal segments of 8". That’s certainly the easiest way to do it. But there is no reason why equal sized segments need to be used. And there is no reason why overlapping design placement can’t be used to minimize the connected cuts. Connections are where any errors will be noticed. For example there are 6 connected lines between the “u” an “s”. The entire “s” could be in one panel overlapping with the entire “u” on another panel. Doesn’t have to be a straight break across the material. Certainly your layout is easier.

3 Likes

Thanks! I’ll definitely need this if I ever decide to commit to Inkscape.

1 Like

Yes, this is the easiest way to do it. I’d rather not spend more than a couple of days writing up tutorials that no one reads. (I do highly encourage those who understand what is going on to put the breaks wherever they like, as long as they keep the sections under ten inches.)

1 Like

I got to work with a passthrough finally and had to come up with all these steps. It is great to have. Hard to keep all the processes straight though, but I think I can do it now.

One thing to know is that Inkscape makes it very easy to cut out blocks of text that have become paths or any path object. So make those red squares and use place them over the design you want to cut. It cuts it out as a block and leaves the insides. No messing with nodes.


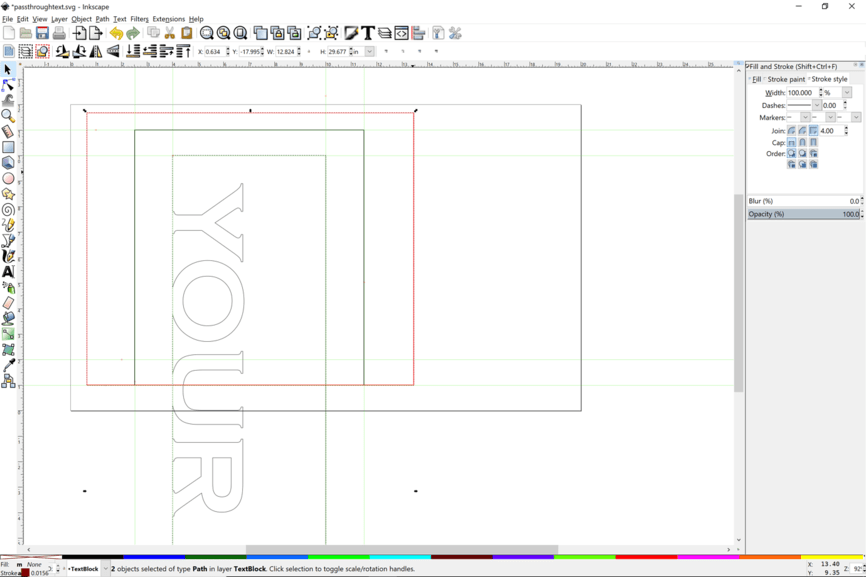
Draw a rectangle around the part of the image you want to keep in the Top layer, using the bottom edge of the rectangle to snap to your bottom margin. Make a copy of that rectangle so you have it to copy for the next layer. It disappears when you do Cut Path, so you’d have to make a new one. Select the the text/path object and the rectangle you have aligned to the bottom and then Path > Cut Path

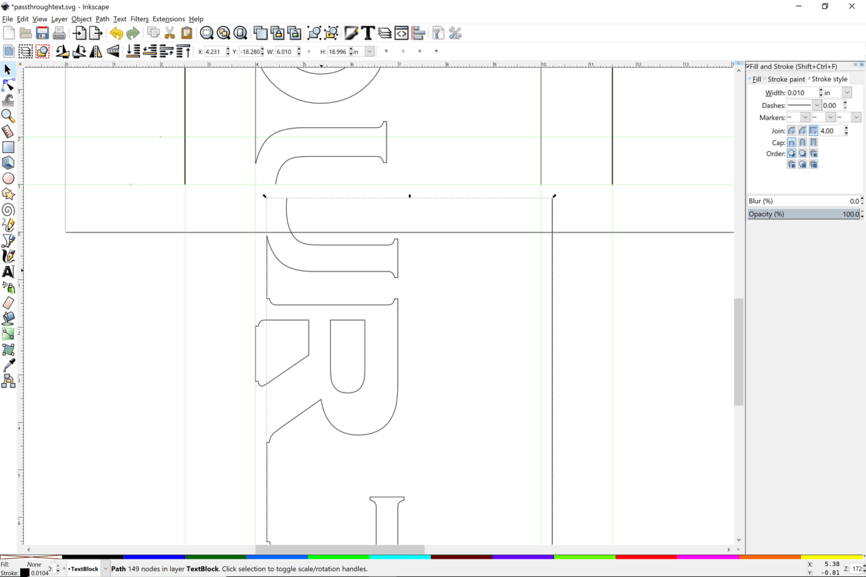
That will disconnect the bottom of your text object. Select that and the extra rectangle and cut them out, turn off the Top layer and turn on the Middle Layer, and paste the design. Align the top edge to the top guide. You halve to lines on the outer margin guides that will be the cut paths for the outside. It’s easy enough with the snapping to guides that you don’t have to worry about cutting them. Just focus on the text object.

You only need one copy of the text and the you can send whatever you cut to the next layer, and so on until they are all put in. then color code the layers.

10 Likes

You are a true resource treasurer. Thank you for all you have done to help the Glowforge community!

1 Like

Oh yeah, that is better than messing with the nodes. Thanks for the addendum!

Yeah, you should have been the one to write this up. That’s a much better way. :slightly_smiling_face:

I don’t understand why nobody else uses a jig with a stop like I do. I don’t line up little hash marks, I seat the material firmly in a cut corner. It’s simple and very accurate. Maybe I should write it up, but I very rarely use the passthrough.

Since I really don’t want to have to write all the tutorials here, and this program is not one I regularly use …if you’ve got a better method, for pity’s sake, write the damned thing up! I can take this down and it’s not going to hurt my feelings. :smile:

(I’m not sure I understand how a corner will work for something moving through the passthrough, so I’d like to see that too.)

2 Likes

Fantastic! This is so helpful for those of us who are learning Inkscape and trying to use the pass through . I know I speak for many when I say “you tha bomb.” Thank you for the time you invested and the sheer kindness to help out people like
Me!:crazy_face:

1 Like

This is handy even for those of us without a passthrough! I was just thinking about a design that I’ll need to cut in half and wondering how I’d do it.

Thanks!

2 Likes

Be sure to check out Marion’s post…much easier. (The nodes are a pain in the tush.)

2 Likes

Thanks! I read it all. You guys are great. I have been trying to figure out the best way to tackle this project and reading and reading, but I still wasn’t sure how to progress. This is going to save me hours.

2 Likes

Thanks for the detailed write-up! I have a project requiring the passthrough coming up and this will be very helpful.

3 Likes

Yes, I second what @Jules said, please do us all another favor and write this up!

I’m very new to all this. I have been working with Inkscape for a little bit and had taken one of my designs that will need to go through the pass through and just cut it and then deleted the paths where I don’t actually want it to cut because that’s where the next piece will be connected. I did this before reading this tutorial. Will that work the same as what you are describing with the boxes and deleting the paths? Do I still need to add layers? Thanks so much.

I’m working with Affinity Designer for Mac.
The process seems to apply the same way, but I haven’t figured out a proper way to break the curves exactly along a crossing line or rectangle. I can insert a node and open it (not so precise) or combine two shapes (which results in additional connecting lines). Any hints from those using affinity designer?

You can break it wherever you like, but don’t forget your indexing marks, which will need to be placed near the breaks.

If you want to use freestyle indexing marks…a good tutorial for it is this one by @johnse

1 Like