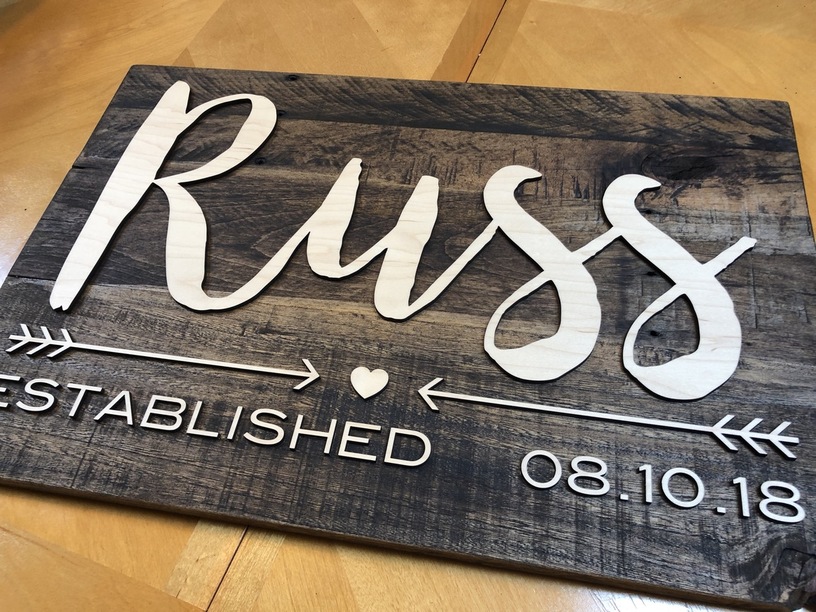
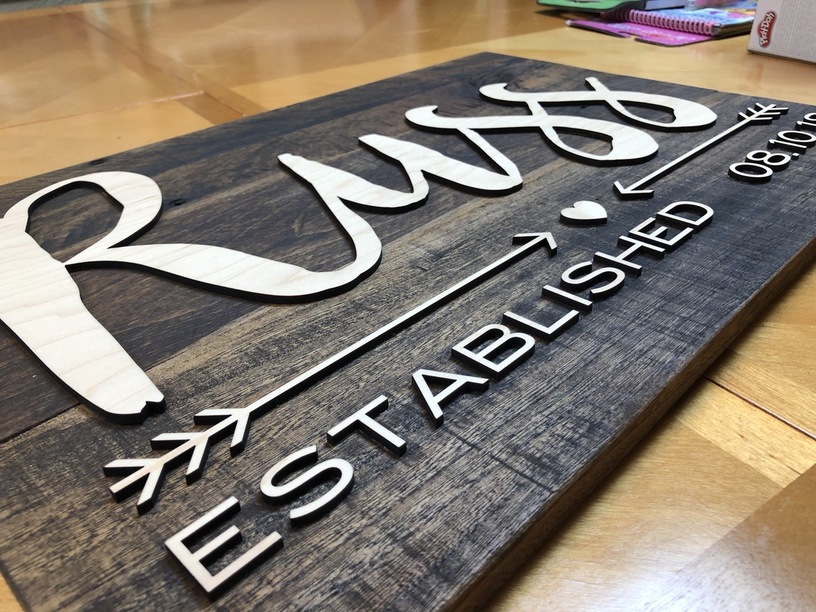
My wife’s uncle was married over the weekend and as our gift to them I was asked to make what I refer to as the “Pinterest Family Name Sign” - to the rescue!
Medium Maple Plywood on pallet wood (with Walnut stain). They were very happy with it! May have picked up a few commissions from other people that saw it as well!
The most daunting part was gluing each of the little letters and keeping them spaced/aligned properly, and we were under the gun to have it finished by a certain time as well so I needed to make sure everything was in place with enough time to dry before we gave it to them. Thankfully Gorilla wood glue sets up in as little as 30 minutes. Used a speed square and steel ruler to help align and space everything. I’d originally wanted to add a sawtooth hanger to the back but just ran out of time.
Really, the part that took the most time was cutting, assembling and staining the pallet wood backer for the letters. The cut all of this out in less than 10 minutes and I was able to get everything glued on in about 45 minutes with a little time between each section to let the glue cure a bit. In the middle of the glue-up I started wondering how feasible this would be as a purchasable product. Getting the last name aligned and glued down wasn’t too bad since it was all one piece, but when it was time to move on to the arrows, heart and letters (especially those little periods #tweezers), I wasn’t completely sure of the best strategy to take. After having finished this one though, I think I worked out a technique that should make for faster production of any of these in the future. We’ll see!
Hard to tell scale but you can always use the material that you cut out from as the template, or if the pallet fits in the GF you can lightly score the full scale sign, and use the resulting outlines to place the letters.
I did think about that - originally I was hoping to use the outlines left on the sheet of proofgrade plywood to help with alignment, but I had some issues with the laser not cutting all the way through on certain letters toward the end of the print, so the fits were a little tight and I didn’t want to accidentally glue the other proofgrade down along with the letters. Cardstock or cardboard might not be a bad idea. Will have to experiment!
I went with the Gorilla wood glue for this one but I wonder if a template was made out of cardboard to help reduce overspray and assist with alignment then perhaps a spray adhesive like Super77 might work well too.
This is one of those smack-yourself-in-the-forehead good ideas that I can’t believe I didn’t think of haha. The final dimensions of the sign are 12.5" x 18.5", so it would definitely fit in there and of course the scored area is even smaller than that. I’m hoping to make at least a few more of these and if I can speed up the process in any way and still turn out a decent product I’m ok with that!
Thanks! Was pretty happy with how it turned out - will definitely use the same formula again. Just a generous coat of Varathane 3x Dark Walnut stain with about a 5 minute wait before wiping off the excess. Let it sit and dry for almost 2 days before trying to apply the glue/letters to make sure they’d get a good bond.
I saw your lovely sign yesterday and that you’d said it was time-consuming to line up the lettering on the plank. Like was mentioned above, you can use the piece that you cut the lettering from as a template to line eveything up. In my design, I add a thin frame around the name, and that frame really comes in handy.
First, glue that frame into place. Then, you can take the piece that you cut the design from, lay it down over your sign plank on the frame, and then proceed to glue each letter into place using the template as your guide! No other work needed! Be sure to check every so often for excess glue on your sign by lifting off the template!
Lovely pallet wood that you used for your project. LastnameSign4|666x499
No paint! Just Proofgrade Medium Maple Plywood! Already prefinished and the light wood contrasts nicely with the dark stain.
If you wanted to paint, I’ve had luck getting a smooth finish with light coats of spray paint from different angles (prior to gluing), which would give you a solid color on all sides. The other option is to paint your material and re-mask prior to lasering, which would give you your painted color on the top side and the laser-burnt sides as here. I haven’t personally tried the latter but I’ve seen some really great results on other posts using this technique, especially when it comes to engraving or scoring patterns into a painted surface.
I see it now, thanks. Definitely looks lighter compared to the dark background.
Yeah, i have tried painting the whole board, re-masking, and then cutting. I have had mixed turnouts. Sometimes the paint wants to come off with the tape. Without the tape you seem to get the brown burn from the laser. I have only tried masking tape though.
I have tried applying paint with a small roller after cutting, it does okay. Small amount of overrun but doesn’t look too bad.
Thanks for your help.
There are dozens of recommendations. I’m not in a position to make one, as I rarely use it. I’m not even 1/2 way thru a small (100’) roll I bought over two years ago.


