Foil is fairly cheap, just glue it to something else after lasering. Bonding Ti is not trivial…of course thin sheet or foil may be susceptible to nonuniform color changes as it heats up if the laser job takes a while…
2 Likes
I have a sputtering chamber and some titanium targets laying around. So I may toy around with depositing a thin layer and then putting it under the laser.
Have been trying to find SOME use for the thing. Inherited it from a professor who retired, nobody else wanted it or had space to store the thing.
10 Likes
You lucky bum  let us know how it works out
2 Likes
I would be happy to take it off your hands…
4 Likes
This is actually my first post here. I am a knifemaker and anodize titanium all the time. Attached is a color scale I use to hit the correct voltage. It sounds to me like it would be fairly easy to set up a chart using varying power levels and color samples. I believe speed will also affect color as the oxide layer changes as heat rises and a slower speed will allow heat buildup.
Bob
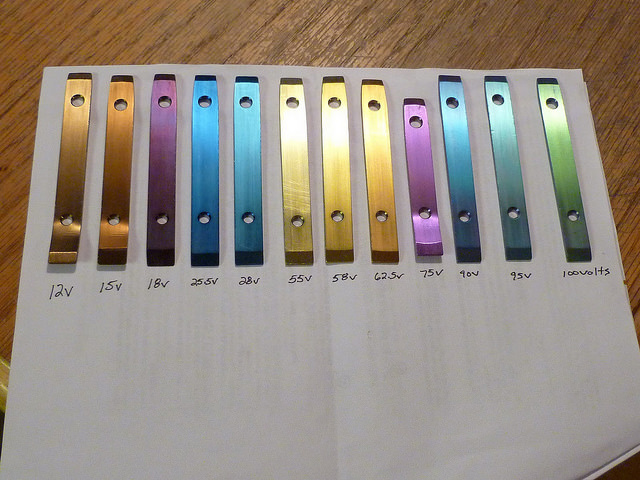 Anodizing colors and voltages 003 by Bob, on Flickr
50 Likes
Very nice!
You should post some of your completed work to the show and tell thread.
9 Likes
+1
3 Likes
Very nice!
Thanks for joining in Bob! I am struck by the similarities between 28v and 90v 
We would love to see some of your work!
2 Likes
Yeah it is weird but Titanium has two voltage bands. It is kind of like a double rainbow. The high voltage colors tend to be brighter.
4 Likes
Interesting. Thanks Josh!
I really miss Boeing Surplus. 
3 Likes
Amazing! I’d love to see some of your work.
2 Likes
This makes total sense! I’ve heat anodized Ti several times, just using a propane torch. This isn’t as controllable as using voltage, of course, but all you need is heat. Great idea, and I even have some sheet Ti laying around so I’ll definitely have to experiment!
4 Likes
I would love to work in titanium, but drilling it is such a pain. >.<
3 Likes
I’ve mixed drilling and Ti bunches of times…of course it was the drill bits that were Ti coated drilling into steel but oh well.
Drilling Ti can be tough but, I do it almost every day without issue. First, I always use good quality cobalt twist drills. Cobalt drills have a higher heat range and tolerate the additional friction of cutting Ti with less dulling. I also keep my speeds low. Most of the tapped holes I drill in Ti are with a #55 drill which is about .055". Even being that small, I only run at about 800rpm. For tasks such as countersinking or counterboring, I prefer to use carbide tooling. I actually have custom carbide tooling made for the tiny 0-80 and 2-56 screws I frequently use.
Bob
10 Likes
I did a little testing to see what colors I could make. Here’s a photo of a few test patterns…
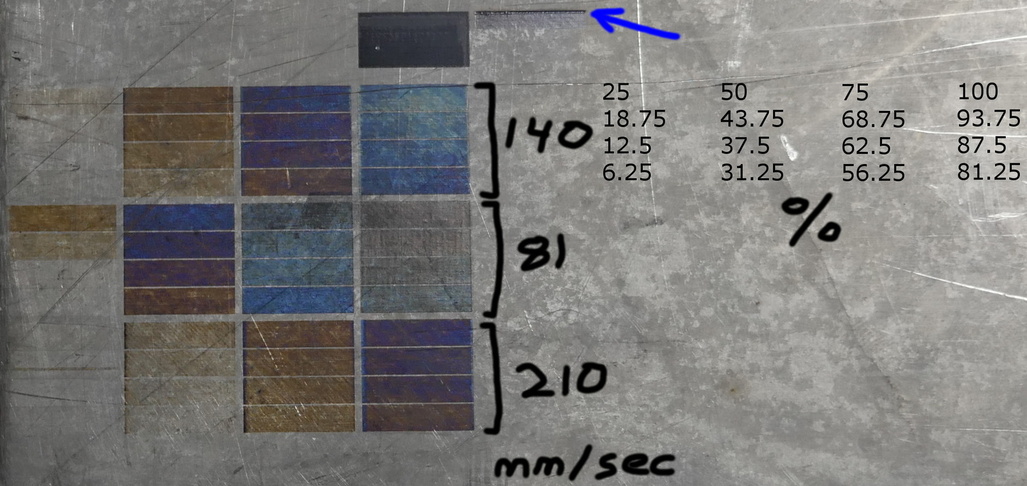
Mostly blues and yellows. I guess you could call a couple of them “red-ish”. All of these were done with the laser focused on the surface of the metal at 1000 lines per inch. I’d like to find a piece of titanium with a more uniform surface before doing any more testing.
Somewhere in the testing something interesting happened. I didn’t notice it at the time, but it seems that the laser actually removed some of the titanium. If you look at the line next to the blue arrow in the image you’ll see that there’s actually a small trough cut into the metal.
Taking those cut parameters (~2.8mm/sec at 100%) I did another test where I tried to cut a 1/8" diameter circle/hole into the piece of titanium. I knew it was a long shot, but I wanted to give it a try anyway. I made the machine take 400 passes on this same circle. 400 is WAY too many, but since I would have to remove the piece of metal from the machine in order to get a close look at it I just made it keep going and going in the hopes that it might eventually pierce through. It didn’t even get close though.
The circular slot shown in the video is the result of the 400-pass attempt. Based on the length of the bent section of that tiny piece of wire I’d say the depth of that slot is close to 1.2mm. Another circle I did (not shown) is approximately 0.25mm deep after 66 passes. I estimate the depth of the somewhat square shape that you can also see in the video to be about 0.15mm, and it was created after only half a dozen or so passes.
20 Likes
good information, I was going to try that when the forge gets here.
What was the thickness of the plate you used?
I really want to try this on thin titanium, to use as an inlay on some projects.
would like to see the video but it is listed as private.
1 Like
I think the video may be marked as private as I cant view it
thank you for the write up and the testing, I have never worked with TI, can a buffing wheel be used to clean up the surface ?
1 Like
Change the privacy settings to unlisted instead of private…no one will be able to see it without the direct link if you wish to keep it private still…
2 Likes