It seems that lining up a cut, score or engrave should be easy to do on the Glowforge. I’d like register marks that will align the material in a way that the Glowforge will precisely cut or score or engrave like the Cricut does with any laser or inkjet printer.
Aligning must be available for the Glowforge Pro but there is no way I have found to do this on the other Glowforge printers.
1 Like
There isn’t currently any alignment tool of that sort on any of the GlowForges. There may be in the future (a return of the Snapmark feature), but if you search some of the older threads, people have a lot of tips on alignment (prior to Snapmark).
6 Likes
Ignoring the camera’s display and relying on jigs and numeric positioning instead was a game-changer for me. As Christy said, there’s no “easy alignment” system, but cutting a jig or using pre-measured shims will give you precise alignment on your cuts.
3 Likes
I find the alignment tool to be quite precise, and I like that I can align to the center, left, right, etc.
The Glowforge Pro does not offer any advantage with alignment over the other models.
1 Like
Those answers are all seem to presume you’ve run the camera calibration - with that my camera alignment is practically perfect, and when it’s off it’s by sub-millimeters
1 Like
The camera is inherently inaccurate, IMO. It needs to be super wide angle “fish eye” lens to see the entire printbed from only a few inches above the surface. A complicated mathematical transformation is required to “square up” the image and that causes even the smallest errors to increase exponentially further from the center of the bed. Then, the camera is mounted to the lid, which does not have any features (like a pin/socket) to guarantee alignment each time the lid is open/closed, which means each time you open and close the lid you’re changing the alignment of the camera a little bit. And because of these things, I don’t think the accuracy of the camera can be relied on. Even if you go through the process of calibrating/aligning, it’s unlikely to stay that way over time. You can use the camera if you include some “Kentucky Windage”, extra space between things to account for potential errors. But if you really need to guarantee precise alignment, a jig is the best way to go. I find it to be generally faster than trying to align things visually, anyway, and it’s guaranteed that the alignment is correct on the first try, so you’re less likely to waste material.
I throw a simple box around my print, lay a sheet of corrugated cardboard on the tray, set everything except the box to “IGNORE” and cut out the box. Then I remove the piece I cut out, lay in the material I intend to actually cut, and switch everything around so the box is IGNORE and the artwork isn’t.
4 Likes
Without snapmarks, getting fine rotations correct has been a problem as plus or minus a quarter degree can make getting a 3" design to fit on a 3.1" wide material very difficult. Short of that, however, calibration and set focus can be very accurate as I can flip the piece over and engrave both sides to the point that cuts that go through align without a visible step as would be the case were the design off in the slightest.
2 Likes
Not exactly the point but I got curious: Rotating a 3” square by a quarter degree works out to be about 3.013” wide and tall. You’d still be ok.
1.9 degrees rotation bumps right up on 3.1” wide and tall.
I mean your point is valid, rotation is hard to correct for, but I think even with snapmarks 0.25 degrees of rotational accuracy is probably not attainable. Jigs all day when you need maximum accuracy.
2 Likes
Perhaps I was less than clear in that a very high percentage of available wood is 3"x12". When you see a box of many pieces offered it will claim to be many widths by many thicknesses by twelve inches. When it arrives it will be many thicknesses but rarely different from three inches wide. I have no trouble with 3/8" thick wood as I can deeply engrave that, but usually need to push the wood to the maximum to get all three inches , and that is when rotation is critical as some width is lost on each side.
1 Like
Nah I understood what you meant.
We’re basically illustrating good reasons not to design to the absolute limit of your materials. The time and effort to do so coupled with the relatively high chance your job will fail and thus cost you even more make chasing pennies worth of material a losing bet.
If you have 3” wide material, design to 2.75. If you have a 3” wide design, use 3.5”+ material. You’ll be happier either way.
But, if you’re really stuck with 3” design on 3.1” material and need super tight accuracy, I’d recommend that you use a jig.
2 Likes
Frequently the case. Many times I just cut off the ends and don’t bother with the width, but then the accuracy is even more critical, and I spend the effort to get it right, but snapmarks make that oh so much easier.
So I don’t know how many of you are familiar with the way the Cricut synchs up with any printer.
The Cricut sends a specific print file with alpha numerically labeled vertical and horizontal lines to the printer to print. Then you feed the “special” print into the Cricut and the Cricut cuts various line patterns on the special print. You then tell the Cricuit which lines horizontally and vertically are closet to or match the lines on the special print.
that’s it. Every print on the printer will be razor cut-out exactly by the Cricut.
So if I have a inkjet drawing on a vinyl sheet, the Cricut will cut out the design perfectly.
Here with the Glowforge I have a laser instead or a razor. My cuts (not on vinyl) should be more controllable and more exact than the razor cuts. But we have no control as to where the laser will cut unless the program allows it, I cannot laser cut a printed say color drawing that is a vectorized not pixel/raster drawing.
Sometimes I forget to add a hole in a piece or need to enlarge it; and instead of being able to recut in a precise way I must redo the whole piece.
Yes a lot of us graduated from cricuts.
There are several challenges to making it work with Glowforge that Cricut simply doesn’t need to address.
Snapmarks was their solution but they abandoned it for reasons only Glowforge knows. Take it up with them, and they almost certainly aren’t reading this thread. (Thet don’t monitor this category)
1 Like
Someone mentioned it above, but use a jig. Can be as simple as a piece of cardboard and you just add a box cutout or score for your material. It may seem complex the first time, but after you understand it by doing it, it’ll save you redoing projects. Here are a couple pictures that help illustrate the jig. Doing a search I’m sure will turn up lots of posts, even step by step instructions I bet!
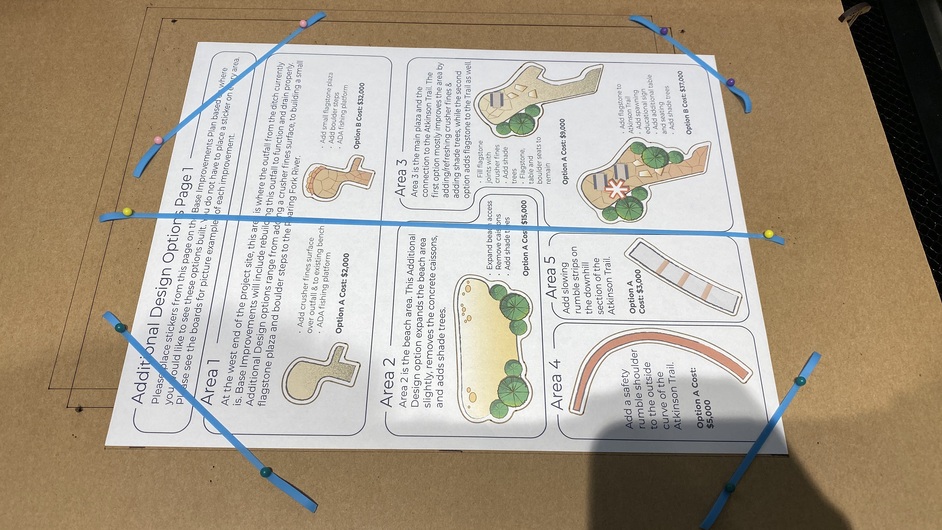
Scoring on cardboard to align cut outs (actually kiss cuts) on an inkjet printed sheet:
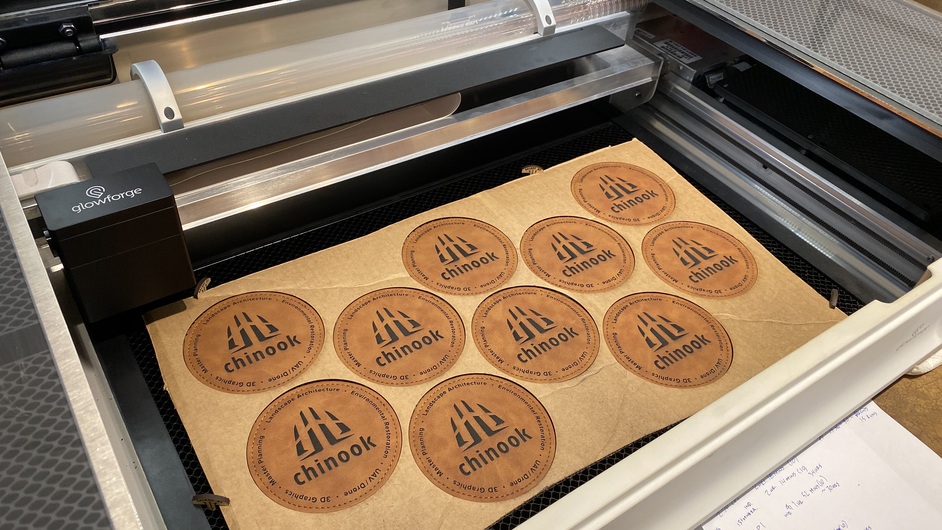
cardboard jig for coaster engraving (laser cuts out holes for coasters, then I put the coasters in and artwork is perfectly aligned):
2 Likes
This topic was automatically closed 32 days after the last reply. New replies are no longer allowed.