It would be interesting to see what the true statistics are. When my material is flat and the optics are clean:
- On my GF PG cuts always cut right through.
- On my GF PG cuts do not always cut through.
0 voters
It would be interesting to see what the true statistics are. When my material is flat and the optics are clean:
0 voters
I don’t cut a ton of proofgrade, but when I do I just use the auto settings with no adjustments. I’ve had a problem once or twice, where one area failed to cut through, but it was because the material was warped and I was too lazy to tape it down.
But I have only had my glowforge since December. If youre suspecting some sort of overall loss of power (which I definitely don’t have - settings for nonproofgrade I figured out months ago still work perfectly), someone who got theirs summer 2017 would prob be a better judge.
Edit: forgot to mention I live in Georgia. Less humid that some places, but a lot more humid than others.
You should consider posting your poll somewhere else. Posting it in a thread about material not cutting through is probably a bit of a biased audience - a lot of people might not read threads that dont pertain to them.
I’m in NY so I don’t think dry air would be the issue. I’ve had a couple warped pieces and try slightly bending them back. I keep reading that people with this issue use magnets to hold the board in place. Can anyone elaborate on this a little more or provide a picture of their print setup with the magnets in place?
I’m nervous to lower the speed on the cut because during the print, I noticed the flame was rather larger than usual. I felt a little uneasy about the flame size while watching the cut. Has this happened to anyone else?
this, for the most part. i occasionally have a smaller issue, but it’s almost always the flatness. and it’s always on wood, not on acrylic, which helps reinforce that for me.
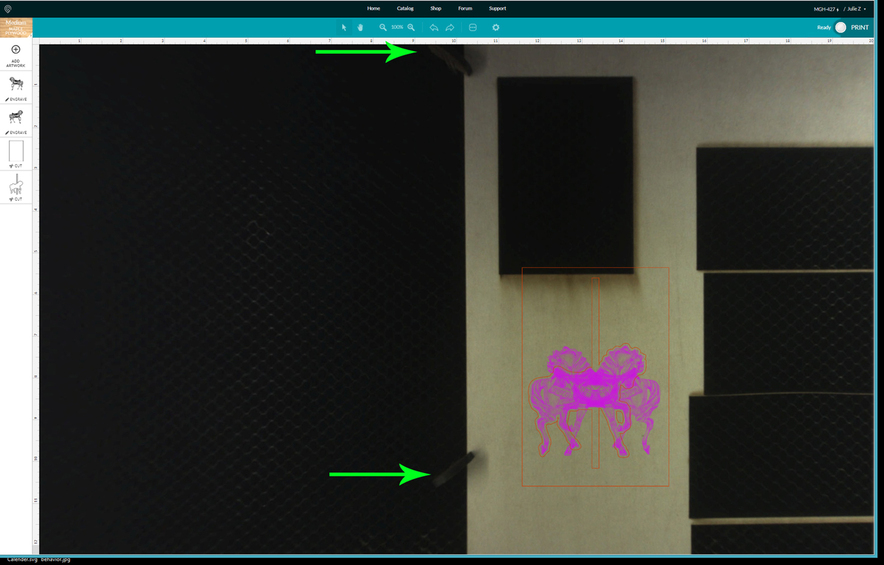
I prefer the honeycomb pins - they work better than magnets for flattening out the material. (Tried both. Like the pins.)
I haven’t had a single sheet of PG fail to cut through since I started using them, so yeah, it’s probably the warp.
The little hold-downs the @eljefe4 designed and shared work great for me and really flatten the piece and ensure it does not move. This was the post Honeycomb bed holdown pins
Thanks for the link! I’ll definitely try these out
They are great… one of my first steps in making a puzzle is to just cut out the whimsical pieces from the board. After I cut those, I put the hold downs in the holes left by those pieces, so I have a sheet of goods that is basically held down on the exterior and interior by them.
I like to peg the interior too. Most folks might not realize yet that once you cut something out of the middle of a sheet, you’ve got increased warping and twisting forces going on in the leftovers. Those pegs are da !
I recall you saying that you reduce the speed by 10% on Proofgrade cuts. Is that still true?
Would these help with warp towards the middle of the board? I have medium sized pieces with smaller cuts and engraves within it. All the cuts and engraves are on a single file
Haven’t needed to lately since I started using the pins. (UNLESS I’m cutting something with extremely tight small curvy cuts. That’s just a bit of extra insurance from habit after years of doing it with digital cutters. So put that one down to outside experience.)
Come to think of it, I had no trouble at all with the little 3 mm circles I cut yesterday, and they weren’t slowed down - I just used the defaults. (Board was pinned.)
Ok thanks for the info. I have had to reduce the speed on all my proofgrade cuts since we got the machine. However last night I was testing some thick proofgrade draftboard for the first time and I used the default settings. It cut through without any trouble. First time ever. Up until now all my cuts have been in meduim proofgrade materials.
Yes.
Even just doing the perimeter of the board helps quite a bit… but, with the cuts I’m doing, they have the potential to release tension within the board causing it to “warp” during the middle of a cut.
My typical cut process looks like this (discourse hates vertical images, apparently, must click to see rest):
I cut out pieces on the interior in one file operation and then pin down on the interior. Then, I run the rest of the file in the order that I want.
(These are manual settings because it’s non-PG material.)
Try pinning the sheets down using those honeycomb pins…I swear I could just kiss the guy who designed 'em!
(Sorry @eljefe4 …don’t get panicky, I don’t know where you are.)
Thank you for this! Hoping its my solution
I need to look at this project of yours as I would rather have a server setup that is able to handle my use when the main ones are down …
I’ve had a chunk of sticky tack next to my unit for this! Saves on the tape!
I thought it was me…since I’m a total laser virgin. I have only had successful cuts doing the first tutorial/try-these-out types of things (had the unit for just a month now - I delayed shipment hoping that some kinks would be worked out…).
I have been trying to cut on a proofgrade maple plywood - nope, I got a nice, deep engrave , though. I slowed the speed down…nada. I used those little honeycomb tabs (freaking love those), didn’t help.
I’m in Seattle, so maybe humidity is a factor, but it looks SO DANG FLAT and ANNNDD I used the magic honeycomb tabby things.
Kinda leaves you feeling deflated, doesn’t it?