I do believe our own @palmercr would qualify for this title. He’s been quite the key contributor to the project.
1 Like
I love my M2. Solid and reliable.
1 Like
I’ve written two different guides to 3d printing for a major national organization (American Library Association) and have worked with makerspaces all over the US. For my $$, I recommend Lulzbot printers…As @chris1 says above, they Just Work, and are solid and reliable workhorses. Bonus for my purposes is that the company that makes them (Aleph Industries) is committed to Open Hardware and software, which means they are never going to lock them down in a way that would prevent me from modifying or fixing mine.
They are on the $$ side…these days, there are a lot of budget printers. But either the Mini or the Taz will print nearly any filament you can throw at them, and will last many, many years. I have had 3 Lulzbot printers, 2 of which are currently whirring away in my workshop right now, and a Taz 2 from years ago that is my backup. I’ve printed hundreds and hundreds of hours on my machines, and they still print perfectly.
5 Likes
I haven’t pulled out PLA since I started printing ABS.
I’ve found ABS to be way easier to sand and finish. Vapor polishing with Acetone is amazing!
Getting the bed temp right is a little tricky. I print on ordinary plate glass, clamped to the print bed, and washed with a lightly doped Acetone/ABS slurry.
I also sometimes bag the printer with a heavy garbage bag when printing large parts to help control temps and prevent warping.
3 Likes
I have to agree with Ben, I have a Kickstarter Robox and have found it to be very reliable and capable. For larger prints, I also have a Robo 3D R1, which is much more fiddly, but still a nice printer.
1 Like
I tried to tag everyone but was limited to 10 so I hope everyone gets the message - Thank you all so much for taking the time and making the effort to respond! I really appreciate all the insights you have to offer! I should have known that this community wouldn’t let this go without giving tons of insight into the topic.
I have read each post at least 5 times and have checked all the brands mentioned and made notes etc. There certainly are a lot of options (which in itself is amazing and overwhelming - almost crazy the number on the market). The printers that seem to fit are the Robox, The Lulzbot, the Prusa MK3 and, Makergear. I have to say though that the Prusa is standing out for one reason and that is that the upgrade coming out in January will allow printing with 4 materials - I take that as potential for 4 color prints which could be great fun for a seven year old (although perhaps much more complicated from a software perspective). I am sensitive to the safety piece, too. The closed system like robox might be good, although, I don’t intend to allow the printer to be used without supervision - 130 degree open bed does give me pause. Each of them get very good reviews for reliability and all of them have pretty large build volumes, too (the TAZ6 has a nice volume). The other piece about the Prusa is that I want a crack at the kit. That might be risky. If this is to be for Xmas morning, I think I better be very confidant or just buy the already built version.
I suppose part of the discussion also needs to be software. I am sure there will be plenty of model files out there that we can print once it is up and running, but my intent is to get started on making our own designs. All of them seem to come with "simple"software but I am wondering if there is a particular design/modelling software that is 7 year old friendly - perhaps something like tinkercad. Since the start of my Glowforge adventure, still an adventure of waiting, I have begun teaching myself Fusion360 with some success (we will see when they get printed!). This is fairly advanced to say the least and I will look into something more kid friendly. We will need to start with designing and printing small shapes and going from there.
Deep down I wish I could buy all of them, but that won’t fly with the boss - if you know what I mean!
Again, I greatly appreciate all your insight. I will drop a note here as to the decision. I can’t wait to get started. With this and a Glowforge we should be set for a bunch of learning and fun!
Matthew
1 Like
It can be a bit overwhelming for sure! I recently decided to investigate getting a second machine to complement my Lulzbot Mini, and after looking for a while the decision was so complicated I just put it on hold.
As for software, I apologize if I’m explaining something you already know, but you mentioned the software they come with, so I wanted to clarify this. The gist is that there are 2-3 steps, which often involve separate programs. The workflow is vaguely similar to laser cutting.
First is creating or obtaining a 3D model, which you can do in pretty much any 3D modeling or CAD program. You mentioned some of them. I sunk time into learning Fusion 360 so that’s what I generally stick to. Maybe someone can suggest a more kid-friendly 3D modeling program. In any case, at the end of the day all you need is to be able to export a model in one of a number of common formats (typically STL).
The printers you’re looking at don’t know what to do with a 3D model, though. There are always exceptions but let’s just say they speak G-code, which is very low level (move to this position, extrude this amount, etc.) The intermediate software that looks at the 3D model, comes up with the strategy for building it by squirting out plastic, and translates that into G-code is referred to as a slicer. Broadly speaking, there are different slicers you can choose from, although the G-code has to be tuned to a particular machine and material, so sticking with the manufacturer’s recommended slicer is easier. Lulzbot, for example, provides a lightly customized version of the open-source Cura (ironically created by competitor Ultimaker) and I’ve found it works just fine for me.
The third part is actually sending that G-code to the machine. Most of them have a card slot on the front, and a very popular option is to save your file onto an SD card and pop it in the machine. So maybe there’s no software involved here. Other machines have network connections so you can upload the file over WiFi. The Lulzbot Mini stands out as it has no card slot, so you need to plug a computer into via a USB cable for the duration of the print so the computer can feed it G-code. Many Mini owners, myself included, work around this by leaving a Raspberry Pi attached to it running software like OctoPrint that provides a web interface for uploading files and controlling the machine from a browser. This is also a popular option even for machines that have a card slot.
One thing I should mention that’s a significant exception to what I just said: there are some machines that work only with the manufacturer’s own proprietary software. I don’t know which ones they are, or whether they’ve all failed in the market. But I would consider that a bit of a red flag.
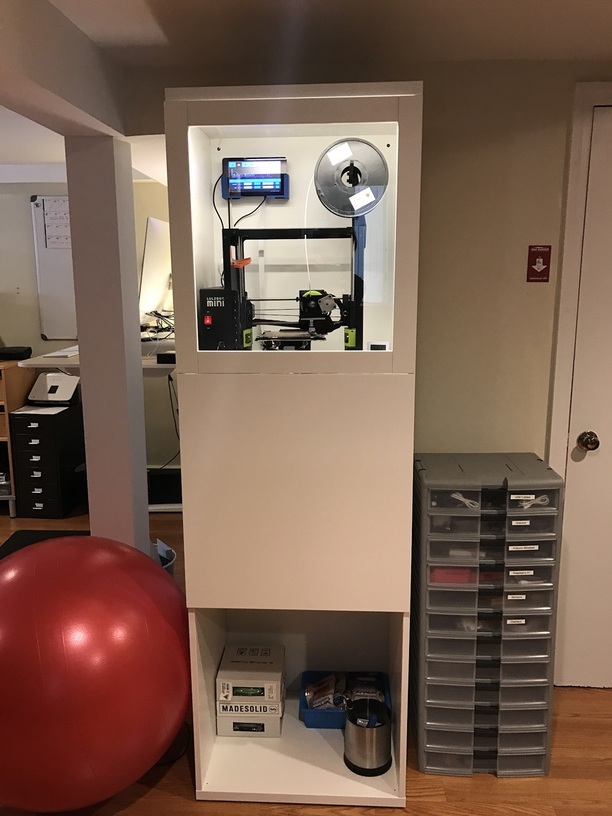
Anyway, that all probably sounds a more complicated than it really is, especially since a lot of this software now has integration with the others. For example, you can send from Fusion 360 directly to Cura, and upload from Cura directly to OctoPrint, so my workflow is pretty streamlined. I also added a touch screen to the Raspberry Pi and OctoPrint provides a nice control panel. And then I put it in an IKEA cabinet because all my projects eventually involve a trip there.
12 Likes
Hi @chris1! Thanks for the note. I appreciate the explanation of the whole work flow. It does a nice job of confirming some of the the things I think I know! Since I am a fusion360 person, I will likely try tinkered as they are from the same folks and it gets good reviews. Plus, it has a piece about wiring small electronics which is a future interest. I also appreciate your use of the ikea cabinet. I am certainly going to need a place for this thing. Thankfully, I am near 3 Ikeas! A small Jackpot!
You mentioned the Raspberry Pi. How difficult is this to set up.I think this sounds like a nice option, but I am no that familiar. Perhaps I am making too much of it as I understand that the Raspberry Pi is really just a very small computer. Is there a great deal of programming that needs to be done or is is simply connected to the printer with the USB port with slicer software installed? I assume the touch screen just displays the slicer software? I know where to buy the raspberry pi, but which screen? Your insight would be appreciated.
1 Like
If you’re reasonably, technical, it’s not difficult at all. Someone has already gone to the trouble to make a canned boot image for OctoPrint: https://octopi.octoprint.org/. It’s pretty much download the file, write it onto an SD card, pop that into the Pi, and you’re ready to go. Assuming you don’t run into trouble writing the image or configuring the WiFi (if desired).
One clarification: while you technically can do your slicing on the Pi, I wouldn’t recommend it. Think of it as primarily a way to remote-control your printer over the network. You can do things like upload (pre-sliced) G-code files, start and stop jobs, monitor progress (including a live webcam feed), etc. My preference is to run Cura on my computer to do the actual slicing, since you may want to tweak parameters and manipulate some things (like the position of the objects on the print bed). Cura will spit out a .gcode file, which OctoPrint running on the Raspberry Pi is responsible for feeding, line by line, to the 3D printer, while you do other things. I don’t want to throw too much information at you all at once, because this whole part is completely optional. Like I said, most machines have a card slot and a little control panel on the front, so you can just drop the file on an SD card and walk it over. Some of them even have their own built-in network interface, but it’s surprisingly uncommon in these days when even light bulbs have web servers.
If you do go this route, you’ll find that OctoPrint has a Cura-based slicer built in, which means you can upload a .stl file and it will do the rest. But you need to ensure the right profile for your machine is installed on it, and you don’t have the interactive GUI to confirm and adjust things. It’s also a much slower processor than a PC. I don’t really see the value of this approach. The latest version of Cura actually knows how to talk directly to OctoPrint from its UI, so you can run it on your computer and send jobs directly without having to save out the .gcode file and upload it. It’s pretty seamless.
As for the touch screen, now you’re into optional-optional territory. It’s not used to run the slicer, it’s just an alternative view of the OctoPrint web UI. So it’s primarily for starting and stopping jobs and monitoring progress. This is accomplished by running a browser on the Pi and using a plugin that re-skins the interface to be touch-friendly (also works for smartphones and tablets): TouchUI. I bought the “official” one (Buy a Raspberry Pi Touch Display – Raspberry Pi) which works ok but had some flawed adhesive, causing it to gradually slide down out of alignment with the bezel. One of my first Fusion 360 projects was to design a bracket to hold it to the wall: Raspberry Pi Touch Display Wall Bracket by masto - Thingiverse. Most people seem to use a different model of screen, though, and I guess any of them would work.
4 Likes
Dremel 3D printer (idea builder) + tinkercad (free tutorials how to make 3D design from scratch)
Dremel is geared towards educators and kids
Tinkercad has a step by step guide
2 Likes
Yes, the software side of the equation from modeling to print control is just as important as the printer itself and might even be more difficult to decide. @chris1 has you covered. [And I totally am going to switch my model of enclosure build now to a full cabinet like his. I don’t recall seeing a 3D printer setup like this. Looks like a trip to Habitat Restore is in order).
Design software: I am biased to what I am familiar with, but in choosing software for a young person, there is something to consider. I think students are way more capable than we realize. Folks would often want to choose easy software for students. When I questioned them about it, they often admitted that they would rather the students had kid-friendly software because they didn’t have the time, desire nor skills to walk them through those first big steps on the learning curve. So kids software means programs we can give to kids and they can do stuff without adults guiding them along. I know kids software can be surprisingly robust, and can do amazing things, but who of us would hire a graduate who only knew TuxPaint? So go for the gold. Start them out on professional software, especially some of the newly redesigned things like Fusion 360 or OnShape. You’d be surprised at what they can pick up.
For slicing I just use Slic3r, part of that is because Prusa’s version of the open source software has the presets I need right there. I don’t have any experience in other slicers.
For getting the gcode print instructions into the 3D printer: Octoprint on a Raspberry Pi is one of the best ways to understand the concept of application servers and web servers. You do not need the touch screen or monitor at all. There are great howtos and videos on setting up the Pi to run headless (no monitor needed) then you connect to it and control it from any computer or device on your network. It can really be as simple as loading the OS on the SD card. Modifying the login and network configuration files on the SD. Hook everything up and it just works. I volunteer for troubleshooting if you go this route. I do use a wired connection though to the RPi to cut down on wifi congestion and it seems it’s just so much easier, Octoprint is just an amazing project that just keeps getting better. I’m not sure about the ability of Octoprint to control all the wide array of printers, but it seems to have some great versatility.
2 Likes
I’ve got a couple of printrbots and have mixed feelings about them. Mostly reliable, but more trouble than I’ve really enjoyed. Had a makerbot, and mostly the less said about that the better.
I would very much second @marmak3261 about the software, especially if you’re going to be involving a 7-year-old. You want something like tinkercad or Doodle3d that’s simple and intuitive if limited. Blender and company are not really suitable for the under-10 crowd in my experience. (One other possible option is the export possibilities from minecraft – not good for real work, but if a kid already knows how to build things there they can get to some kind of object fairly quickly.)
1 Like
One word of caution about 3D modeling software. I see a lot of models created in Tinkercad and Sketchup that aren’t manifold. This causes 3D printing to have lots of strange defects or will flag errors in your slicing software. I check every model using 3D Builder before printing.
You will also need to check that bodies placed next to each other are actually merging and not staying separate as the printer will try to recreate any gaps between them, which will make a weaker print. Horizontal gaps can cause the print to fall apart during printing, leading to spaghetti.
I would also make sure that any printer you buy has the ability to monitor filament and pause itself if the filament runs out.
2 Likes
I think you make a great point about the software! Very thoughtful! I may as well just show my son Fusion360 and we can play with it together. There will be no harm done and will likely turn out better than expected. We can always try something else if needed.
I appreciate the troubleshooting offer with the RPi. I think this is worthwhile and I am going to check it out.
A trip to Ikea is in the making, too!
Thanks for the insight!
1 Like
Thanks of the tip! I will have a look at 3D builder and make sure to check filament monitoring!
Good suggestion. It was a feature that I didn’t pay attention to in planning for a 3D printer. Now I know how inconvenient not having one is. One of the features I’d like to integrate into my setup when I get the cabinet together. I have several things I’ve been thinking of, but I have lots of sensors and things from old photocopiers that I’d like to repurpose for filament monitoriing on the Prusa. I didn’t think it was a big deal but then when I have to babysit the last section of a roll, it’s a pain.
The enclosures mentioned are a good idea. And 130f is warm but not an instant burn; you would need about 30 seconds of direct contact on the skin for a 1st degree burn (time of contact decreases exponentially with temperature increase).
1 Like
Most motors are rated to run 180f without any real problems.
An old school check is to lightly tap the motor with a finger. If you would tap it again, then it is less than 180f and probably ok.
If you would NOT tap it again (or finger tip sizzles a bit - ouch), it is over 180f and probably degrading.
Normal hot water or hot coffee is about 120-130, so not dangerously hot.
2 Likes
I run my glass beds at 130C for the first layer. I have never burnt myself on them as a brief light touch doesn’t conduct heat well enough. It isn’t like touching metal or water.
1 Like
as far as software I backed these guys on kickstarter but haven’t had a chance with an over full work schedule so far this year to check it out. Seems like might be easy on a youngster.
2 Likes