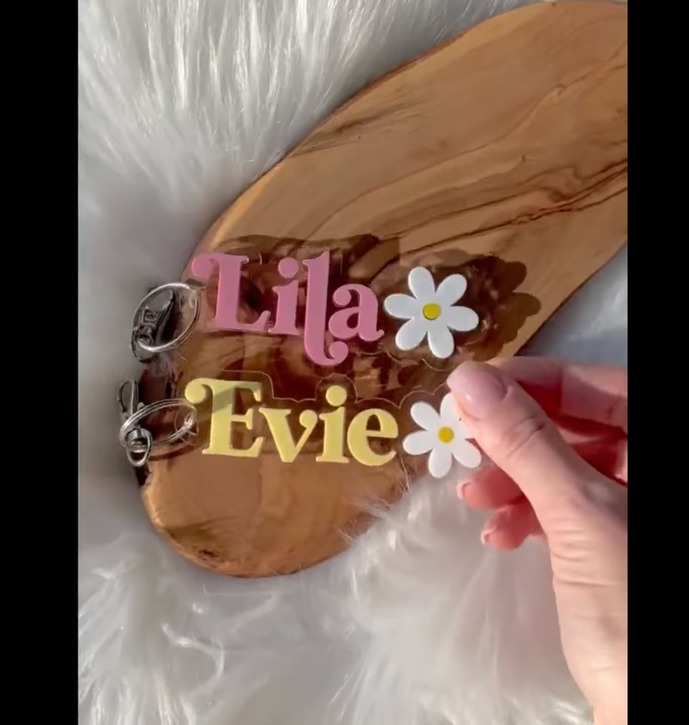
I am wondering how this was done . It loos like the clear acrylic was done some how to where the pastal acrylic name pieces set down inside? Is this engraved or something first ? My Friend asked me to make one for her daughter and I am clueless ![]()
10 Likes
Those look awesome! Thank you for sharing the process.
They do look awesome but I did not make them . I am wondering the process myself lol
Looks like they just scored the letters on the base, then they only removed the masking for the letters so they could line up the cut letters, and then stuck them into those spots. I’ve done something similar with keychains for my husband’s work. I use 3M on the backside of the letter materials, so when it cuts, I have the adhesive already on and don’t have to worry about glue.
I hated the way the letters felt on the base though, so I ended up engraving a pit for them to be it, which is fine with wood because you can’t see it on the other side, but it would stand out on acrylic. I think if you do the pit, you should use Weld-On 4 or something similar to permanently keep those letters in place.
11 Likes
There’s always an alarm siren going off in my head when I see a visually perfect object…with only one view. You just don’t know how good or awful the backside is. I’ll second what @CMadok wrote.
Also, if doesn’t have to be clear, use translucent background. Besides giving good cover for the inevitable less-than-perfect glue-up, it will be so much easier to find it in the future!
8 Likes
Looks to me like they cut the outline and scored the text/daisies, then peeled the protective film off the text/daisies where they were going to be applying glue (that’ll help keep the glue from getting all over the clear areas surrounding the letters…) Then they cut the text/daisies again from colored acrylic and glued them to the clear.
1 Like
Cute as this design may be to some, if your acrylic gluing skills aren’t excellent those little pieces are going to pop off in use as a keychain (and two layers of acrylic are pretty chunky IMO)
Might I suggest you engrave a single layer and fill the engraving with paint/paint pens instead?
5 Likes
I believe she used the 3m double sided adhesive on the back instead of glue
If I were to do this I’d use 1/8 acrylic in clear, and either 1/16 coloured acrylic - or craft foam. Obviously the foam won’t last as long, but I think it’d make for a nice feel to the keychain.
and as others have said - score the names onto the clear acrylic, pull the masking, from inside the scores, place the letters, then pull the masking off everything.
Now if you wanted to be even more sturdy - but also harder to make you could cut everything out of 1/4" acrylic and instead of scoring cut the names out, leaving the masking on, slide the coloured pieces in - then add acrylic cement to all the joints - then the next day pull off the masking.
1 Like
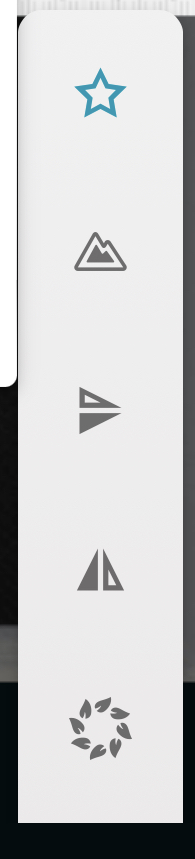
I am trying to make a keychain from the proof grade acrylic that came with my GF. I used a pencil file and typed a saying in the center. It came out really cut BUT aren’t the words etc. supposed to be viewed from the flat side? Not the engraved side? And if so how do I mirror my image? I have not found that option any where. TIA
When you have your text object selected, do you see this little tool palette? Usually pops up on the right side of the screen. (I can’t remember if it’s a Premium only feature or not.) the two icons made of triangles are for flipping up down or left right.
3 Likes
That’s 100% a matter of choice. Both ways are done ![]()
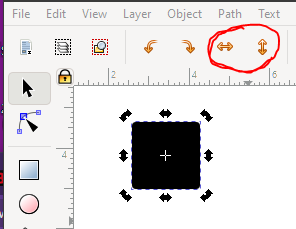
Or you can go into your graphics program and use the flip command.
In Inkscape it’s one of these two:
1 Like
This topic was automatically closed 30 days after the last reply. New replies are no longer allowed.