Adafruit word clock

While waiting for my Glowforge to arrive I bought the parts to make the Adafruit word clock…

I finally got around to putting it together recently. It’s been a great project! Three things to keep in mind…

  1. The hardest part, for me, was finding the nuts and bolts needed to put the enclosure together.
  2. The Trinket doesn’t have a standard USB port and requires it be in a certain mode at start-up to upload the sketch (read the instructions!).
  3. When you solder the wires to the Neopixel matrix be sure you solder them to the “in” pins an not the “out” pins. :slight_smile:

54 Likes

Now that looks like fun! :grinning:

3 Likes

How did you find the overall project to do? I was thinking about doing some Christmas light stuff with some pi’s. I’ve read the warning about in / out lol - apparently you have to look really closely?

2 Likes

I need to just stop reading the forum. My head is so swimming with projects, I can’t focus. You all are killing me here. Nice! Another Adafruit win.

14 Likes

I did spend some time learning about the Arduino before starting this project. I think if you know the basics of programming and uploading a simple sketch then this project is a good next step. Here is a photo of the parts I forgot to include before…

PG Cherry and Walnut, Black Acrylic, and standard white copy paper.

12 Likes

I’ve been thinking for a long time now that I need to jump in and learn Adafruit. Thanks for pushing me over the edge! :slight_smile:

1 Like

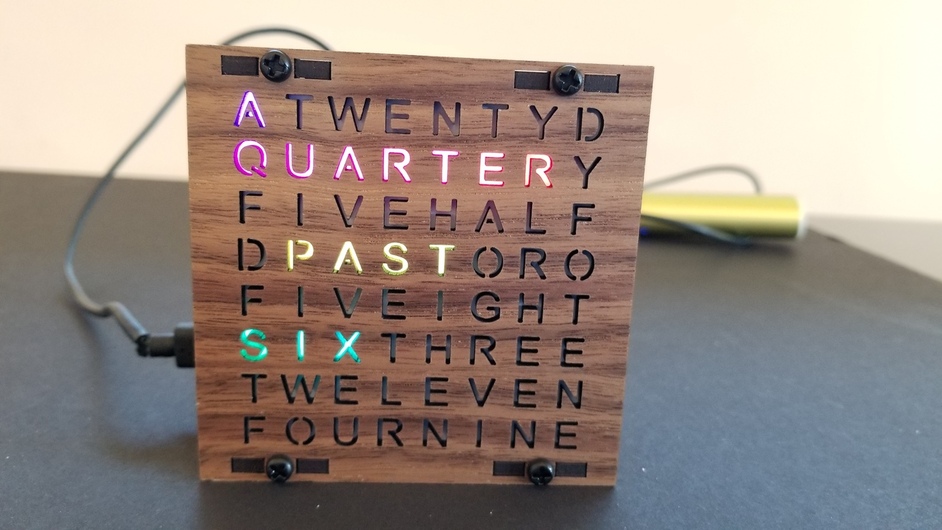
Adafruit is great but stupidly expensive, like 3x to 4x as expensive.

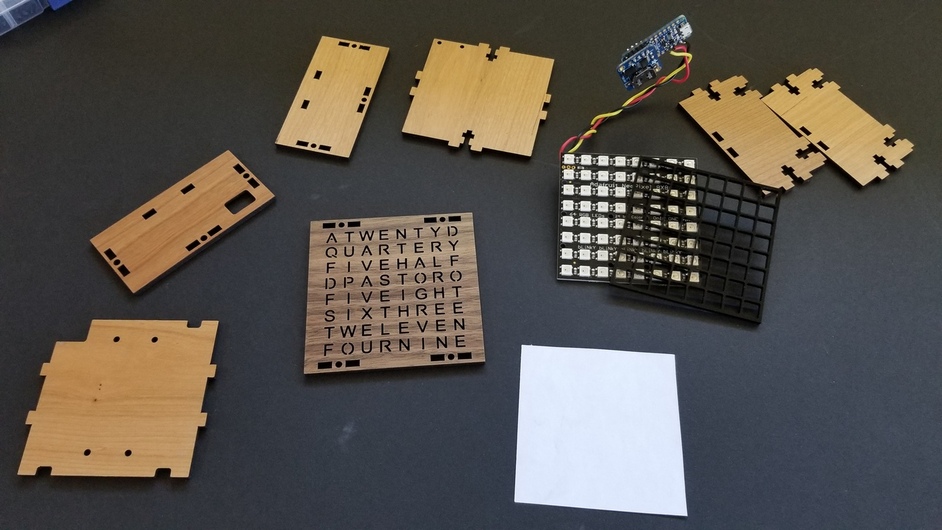
https://www.ebay.com/itm/Sale-WS2812B-8x8-64-5050-RGB-LED-Module-Matrix-Bright-Colors-for-Arduino-P/153043657229?hash=item23a21ce20d:g:9lIAAOSwZZ5auFkQ

lights for $9.38, adafruit costs 35.
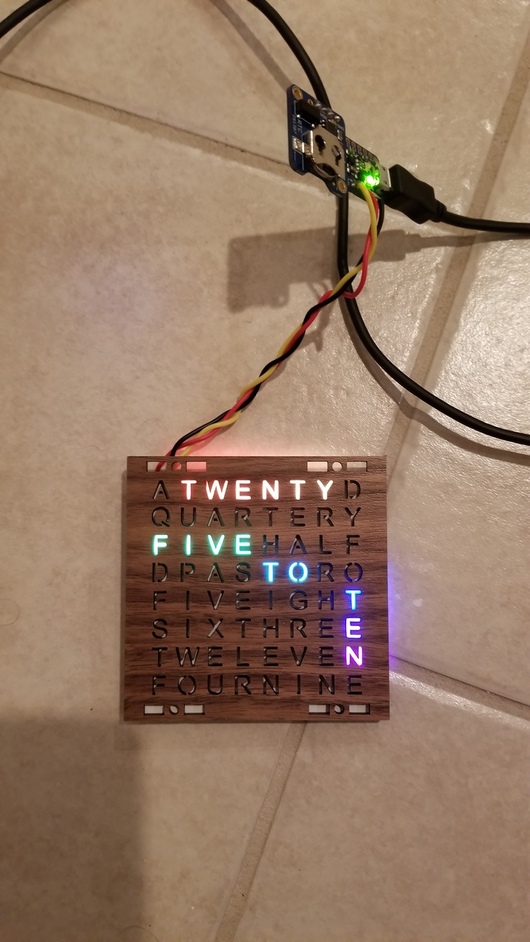
Clock unit:

Clock for $0.99, Adafruit wants $8. Do youself a favor, though and get the better DS3231 based clock unit here:

https://www.ebay.com/itm/IIC-Precision-RTC-Real-Time-Clock-Memory-Module-For-Arduino-DS3231-AT24C32/251401815796?epid=2098275579&hash=item3a88b746f4:g:IOoAAOxyXDhSorpn

Still only about $1.50.

Arduino, pick your poison, but I like the nano model:

https://www.ebay.com/itm/2PCS-Nano-CH340G-V3-0-ATmega168-16M-5V-USB-Mini-controller-For-Arduino/322565163189?hash=item4b1a61c8b5:g:BiUAAOSwQFNa9BcY

2 for $5, Adafruit wants $10 for a single trinket.

If you stay with the DS1307 based RTC unit, their code will probably be 100% compatible. If you use the superior clock unit (far more accurate and also can be used to store 32kb of rom and also give temperature [sort of irrelevant here but interesting]) you might have to use a slightly different clock library but it’s pretty easy to adapt.

You might even get cheaper prices if you look at dx.com.

So, Adafruit parts cost (rounding down) roughly 35+8+9 = 52 bucks. My parts list (rounding UP): 8 + 2 + 5 = 15 bucks. And you have a spare arduino when you’re done, and a far more accurate clock.

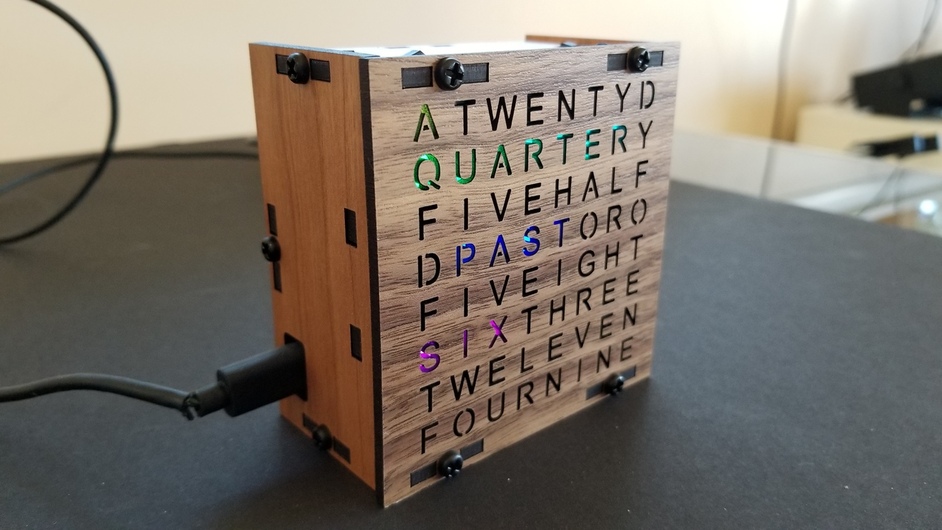
Hidden costs: you need a soldering iron, some solder, a PC or mac to flash the code, some thin wires (22 gauge solid core are ideal) and a 5v power source*, but these are all fixed costs, so their tutorial will steer you correctly. They also didn’t design this with buttons for setting the time, so there’s that. It’s not a super standalone clock as it is designed.

*(usb is fine, but count on 60ma from each light at peak white brightness, so max power draw is 3.84a @ 5v. In reality you will never see even remotely close to this when you use it as a clock, so I’d be comfortable with a 1A usb power supply)

12 Likes

I saw one of these in a shop window the other day and thought, “i could make one of those.” Thanks for providing the recipe!

5 Likes

That’s great info!
My only problem is, I don’t know anything. Adafruit seems to lay it all out for me. Otherwise, I wouldn’t even know what to look for on ebay or elsewhere. Ya know?

4 Likes

(This comment falls maybe in “everything else” but the thread is and should stay made on a glowforge. That @yawstring clock project is great.)

It’s a deep rabbit hole, but adafruit is a great source of tutorials to get started. The arduino forums have a tremendous amount of tutorials as well, the arduino IDE software has a great series of built in tutorial programps (called “sketches” in arduino-land) that will guide you through a tremendous number of basics.

There are a lot of starter kits out there, they typically come with a bunch of little components to help you understand the basics of LEDs, transisitors, dimmers, capacitors, motors, buzzers, clocks, buttons, LED displays and even some LCD stuff. Here’s an inexpensive one:

You can spend double that and get kits that aren’t as fully featured, I would recommend a kit like this to get started. When kit shopping, beware of anything that is too cheap, sometimes they don’t include an actual arduino! The nerve. This one includes an arduino uno clone, it’s a good starter board, a little larger than something like the nano and perhaps a bit more approachable as a result. The nano is just as powerful as the uno, the uno’s main advantage is an onboard standard power barrel adapter.

There’s almost no physical danger to playing with arduinos, it runs at very low voltage, but if you don’t know what you’re doing you can fry your arduino (and even a usb port if you’re really careless). Reading this thread can really help you stay out of trouble for rookie moves that might cause an unexpected end to your experimenting:

It’s the one thing I wish someone had told me before I got started. Ask me how I know about the USB port. :roll_eyes:

8 Likes

@yawstring, it may be time to replace that usb cable! :wink:

Hey, thanks for that! Really!

Sorry, @YawString for sort of hijacking your thread. It was just so cool it really inspired me! :slight_smile:

Agreed! :wink:

Not a problem, I’m learning from the exchange as well!

1 Like

Fiance’ made a few of these several years ago (I didn’t get one – I think he got burned out making them) and was using shadow boxes, the Silhouette (using vinyl stencils for the words), shelving between the rows to prevent light going through wrong words ---- it was a big ordeal. The result was awesome! Hoping I can get him to make me one now using the Glowforge!

Going to send him a link to this thread in hopes that a fresh wind blows into his sails and I, er I mean we, will have a new clock!! Thanks for posting!

3 Likes

Did you use the laser files as is and everything fit together ok or did you need to adjust the files for kerf? After digging through my electronic stash, I found all the parts - just need to cut it out, program the nano and put it together. Thanks for sharing!

The only thing I did was bring the svg files into InkScape, set the art board to 20in by 12in, and saved as a Plain SVG before uploading to the GFUI. Didn’t make any other adjustments. Everything fit together fine. Good luck, would love to see the results when you are done!

I really love adafruit and occasionally purchase from there to support them. I also buy a lot of stuff in bulk on ebay or banggood when I need stuff to experiment on. The one thing that kills me about adafruit isn’t the price per item, it’s their shipping. I can get a pack of 10 nanos for 10 bucks with free shipping or, 1 from adafruit with 10 bucks in shipping costs.

1 Like

Finally got mine together. A few things I learned:

  1. the rgb led matrix you can buy on Ebay is not the same size as the one from Adafruit, so the Adafruit template will not work. I didn’t feel like re-sizing everything, so I got one from Adafruit. I’ll use the chinese knockoff in a different project.
  2. Used a cheapie arduino nano - worked great
  3. Used a ds3231 RTC - worked great
  4. I went the easy way and just put a few small breadboards in the box instead of soldering them all together
  5. Used PG Walnut for the front, PG maple for box and PG black acrylic for the divider - all with the default PG cut values
  6. Don’t have the screws yet - ordered some from Amazon, right now blue painters tape is holding it together
  7. Some of the screw holes were missing from the files I downloaded from github. I didn’t realize until I had already cut then out - will have to hand drill those

This is something I’ve wanted to make for a long time, glad to finally have it up and running.

9 Likes

Nice! Glad you were able to get it together! It’s a fun project with a lot a little things that you need to get right. Ironically, I received a couple LED Matrices from ebay just today. I suspected it might not fit right, now I know! Like you, I’ll use them for other things. :slight_smile: Strange about the screw holes, I did a quick check of the SVG file on GitHub for the faceplate and I did see the holes. Something to check before cutting for sure. Fun to see another one built!