This video was provided by a supplier I favor (https://gs2awards.com/) that recently began selling Trotec lasers. The video is 2 years old, so some of you may have already seen it. There is no reason the technique can’t be accomplished on any laser. I look forward to seeing someone with a steadier hand and better eye hand coordination use this to embellish boxes and plaques.
That’s amazing. I may have to give it a go!
Wonderful video! Unsteady hands put me in the interested observer category though.
Another rabbit hole!
Very clever! I definitely have to try this.
Ok this is irritatingly effective.
1/8" maple, and … some sort of curly mahogany maybe? Raw veneer from a variety pack with no labels.
How dare they do something clever before I do? Infuriating.
Those rings and letters are 0.0113" thick, or about 2 laser beam thicknesses.
Now to think of something I want to engrave at very fine pitch.
I don’t like engraved pocket inlays – it’s too slow – but this may be worth it because of what it enables.
I went off script once: I put a layer of blue tape on my veneer before putting it on the foil tape, my thinking was that the foil tape might be too tacky and lead to tear-out.
I’m not sure I’d do that again; I had to sand the blue tape off, which was probably more labor than was needed. Next time I’ll go foil-to-veneer and see how it goes.
@dan this should be on your radar. Proofgrade 6" wide aluminum foil tape
I had the same reaction.
Thanks for the sample.
How precise does your pocket depth need to be? I was hoping that since it is glued in, you might have some wiggle room.
I went a bit too deep on purpose to give the glue some room. then I pressed it down flush with a flat reference surface. In the end the blue tape was exactly level with the surround surface, which made it extra painful to remove the blue tape.
Thanks for posting this sample! Do you have any thoughts on the video’s suggestion to do two engrave passes on the veneer to clean off the aluminum? A second pass would take so much time for a truly intricate design.
Of course, on the other hand, without the aluminum tape you would spend so much time individually matching and gluing pieces that the laser time would be negligible in comparison…
I tried a couple different settings and the second pass really did help clean it up.
Wow - the detail of the projects in the video are amazing! Will have to give this a try at some point. Thanks for sharing @dklgood!
I posted this ages ago, about the limits of inlay in the glowforge. this was right around when clean corners was new, so some possibilities were opened up to us at that point. This is all through-hole inlay, as I’ve said I tend to prefer through-hole because engraving takes so long.
This will change the game on inlay.
So I finally got around to a solid inlay test.
I’ve always shied away from harsh corners and too-fine inlay designs because of overburn. The clean corners did indeed change the game and I got excellent results with 1/8” through-cut inlay. These sorts of results were possible before only with pocket engraving for veneer and then it was dicey.
Anyway, here are the pics:
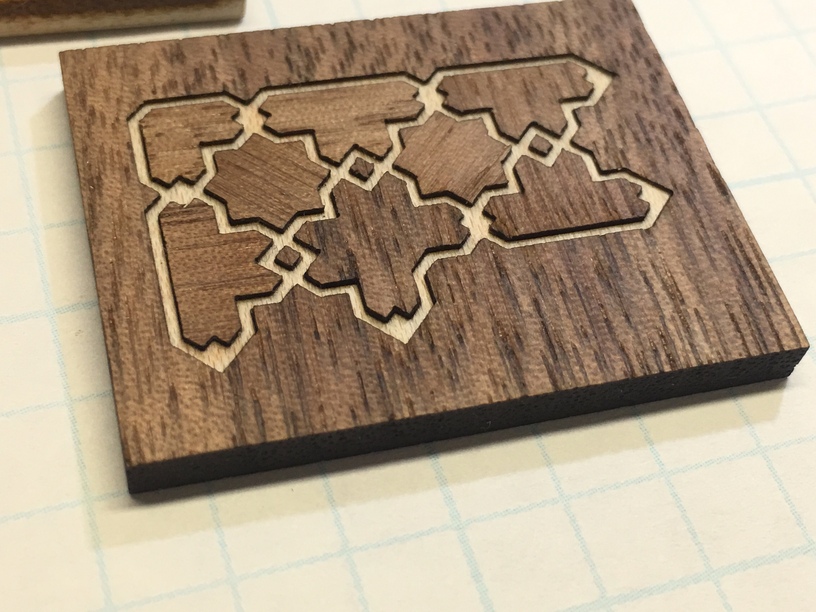
These are small tests of two quick and dirty designs. The bottom two are all 90 degree corners, designed as a border that can tile to make a rectangular outline to anything.
(Various materials)
You can see the sharpness of the corners is very well preserved with almost no pitting. There are some defects, but that’s because the material has an open grain. (Padauk). The maple surround is far more representative of a tight-grained material and has almost no pitting.
(Maple, Mahogany, Padauk)
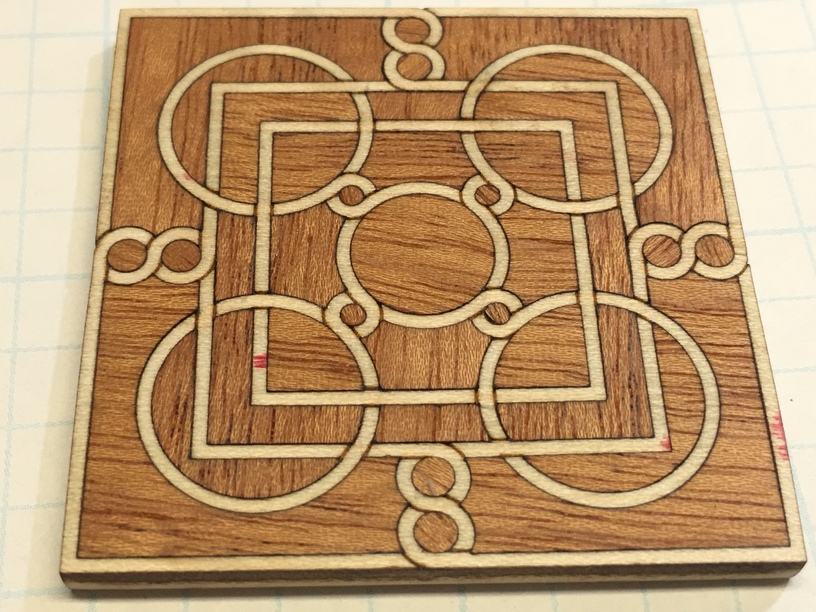
When you have two wood samples with different thicknesses, you can make this cool effect where the maple is “sunken”. It’s really interesting in person.
(Maple, walnut)
The red bits are where magic marker bled through my masking. I wish someone made colored masking so that it’s easy to tell the difference between front and back on pieces like this. I should have sanded it more aggressively to get the smoke residue fully off the maple, but this is just a test so I didn’t go too far in the finishing process. The maple itself has a fairly strong grain (same stuff as I used in my grateful dead box), so the lines were never going to be featureless white anyway.
(Mahogany, maple)
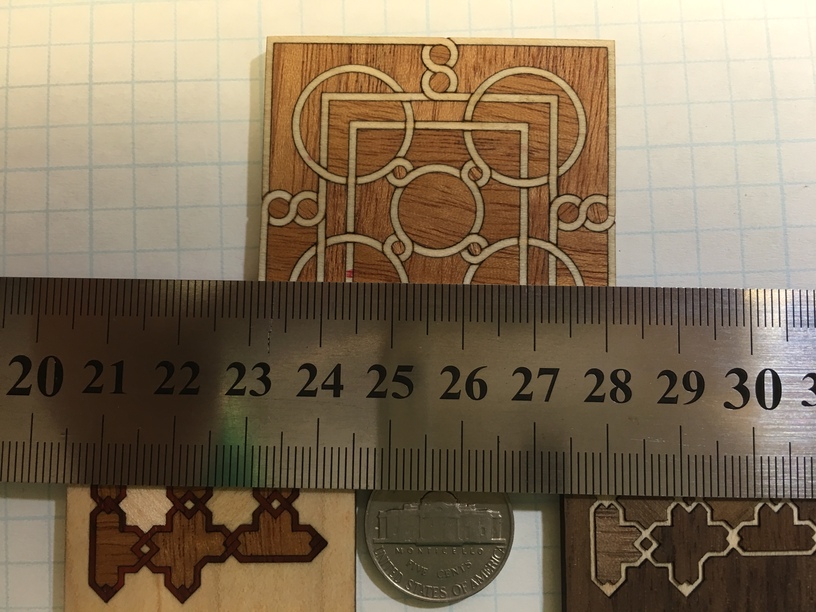
You can really see the context of the scale I’m working at here. The traces are about a mm in the deco-inspired top piece, and a bit less in the islamic-inspired border.
(Various materials)
So, yes, with inlay and clean corners, things that were off limits before are now feasible.
What a game changer! Here’s my first try. The engraved material was coaster-size (~4” by ~4”): ¼” maple-veneered MDF and walnut veneer. I used some 2”-wide Scotch brand, Core Series 541, foil tape leftover from some HVAC work. It doesn’t have a protective layer of paper like the foil tape Laser Dave used. And the adhesive is thick (quite messy later on in the application). I’m ordering some of the BOMEI PACK Aluminum Foil Tape referenced in the video. I didn’t run two passes because after the first pass the tape had expanded (probably from the heat) and rose about 3/16” above the piece of sacrificial cardboard to which it was taped. Next project I’ll tape the underside of the two pieces of tape together — pretending it’s 4” wide — and tape the middle, underside of the pair to the piece of cardboard, so (perhaps) it won’t lift. It took a bit of work (Windex and a rag) to get everything clean, then a light sanding with 220 and a couple coats of Polycrylic. I’m definitely heading down this rabbit hole…
Incredible. I don’t have unsteady hands, but maybe a lack of patience is what puts me in the “interested observer” category.
I have an idea for something I’d like to try with this. Thank you for sharing. I can’t remember if I’ve already seen this Even if I did see this before, sometimes I need to see something more than once for it to be in my long term memory
Way cool!!! Will definitely have to try that.
… but it’s also way too easy. I’ll never be impressed by detailed inlay again.
… if I can find the time, I’ll try it on an engraved dome puzzle. Bet it would look great.
The intricacy of the design should have no impact on the time to do an engrave. If you are creating a design using cut lines, yes, but not engrave. The laser is just going to go back and forth like an inkjet printer regardless of how complicated each of those passes is.
It WILL double the time over doing a single pass engrave, but that’s simple math. 1 pass = x time, 2 passes = 2x time, etc.
I have been thinking along those lines for a while now. I proved I could do it with some test stuff, and analize designs as I am doing them. For many there is a distinct two part system and others that woukd have “floaters” no matter what. The ones that are just two part can also be made hollow (though I had to do some redesign to get it so). However, others like this one could definitely benefit from that technique with the foil.
If you double the LPI It will take longer but probably not take as long as 2 passes, and make a much smoother result.