I wonder if it is to do with the limited horizontal bandwith. As you increase speed you get less DPI, so perhaps that interacts with the dither pattern somehow.
Definitely looks like a bug that should go to support.
I wonder if it is to do with the limited horizontal bandwith. As you increase speed you get less DPI, so perhaps that interacts with the dither pattern somehow.
Definitely looks like a bug that should go to support.
Hmmm… what’s your power setting? I’m trying to replicate your results and clearly using the PG default 100% with the 200 speed is way too much. I mean, it turned into a 3D engrave despite being set for dither and it sort of resembles the image, but I don’t think that a charred “thing” that crumbles into dust when you touch it is the desired end result. The sappy soot is the only thing holding it together. 
If you use the image as a background and the sculpt mode in Blender or one of the other 3d programs you can get the real offset you want with white at the top and black at the bottom. In Blender, it is a blend texture in X,Z,Y that will color your model in just that way. The result, of course, will be all black and I am not sure how you could clean that up enough to come back and paint the original image. Getting the fog, of course, would also be a problem.
This is something I did that was much more simplistic.
Since it’s all manual work either way to create a depth map for engraving, and you’d end up with pretty much the same result either way you do it, it comes down to comfort level with the tools that are available.
If someone understood depth maps, and they were a whiz with (photoshop, gimp, illustrator, inkscape, coreldraw, etc) they can make depth maps without ever touching a 3D app.
If someone was more comfortable with 3D they can do it that way and of course directly export a depth map.
If someone knows both 2D and 3D design programs, they could take this photo of the kayaker, use 2D programs to quickly rough out a few key levels of gray, import that rough depth map into a 3D program and let the software build the model, then manually refine it with sculpting tools and re-export a more finished depth map.
OK I’ve ran the tests on my side and did not have the same issue with parts being missed completely.
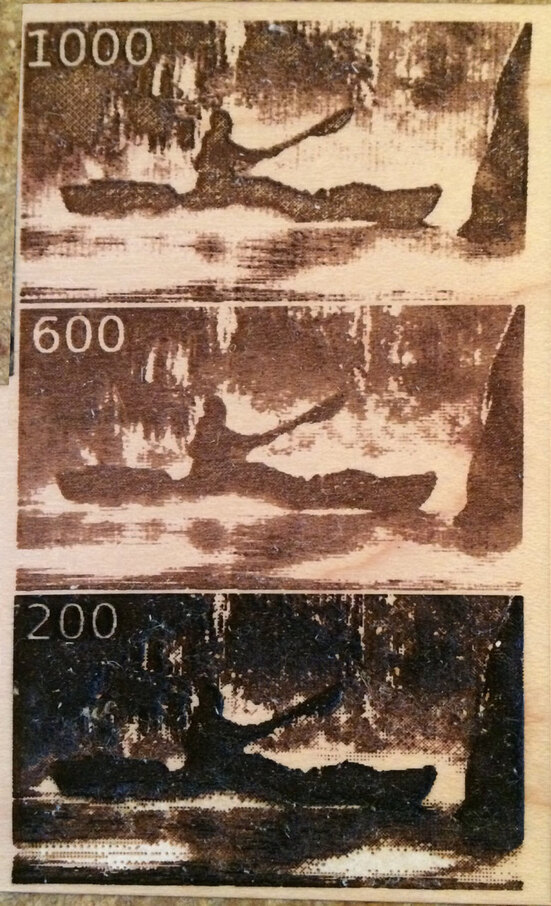
I used the Ordered Dither option for bitmap engraving with Min gray at 10% and Max gray at 100%.
Speeds at 200,600,1000 and power level somewhat adjusted for each to avoid making more charcoal. ![]()
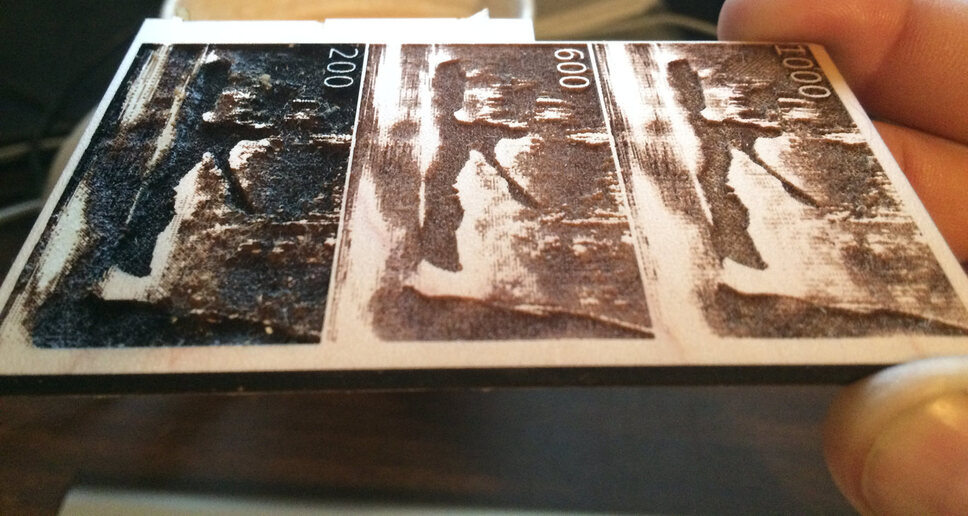
The speed of each engrave is actually engraved into the top left corner of each for reference.
Each of these is only about 1" tall x 2" long.
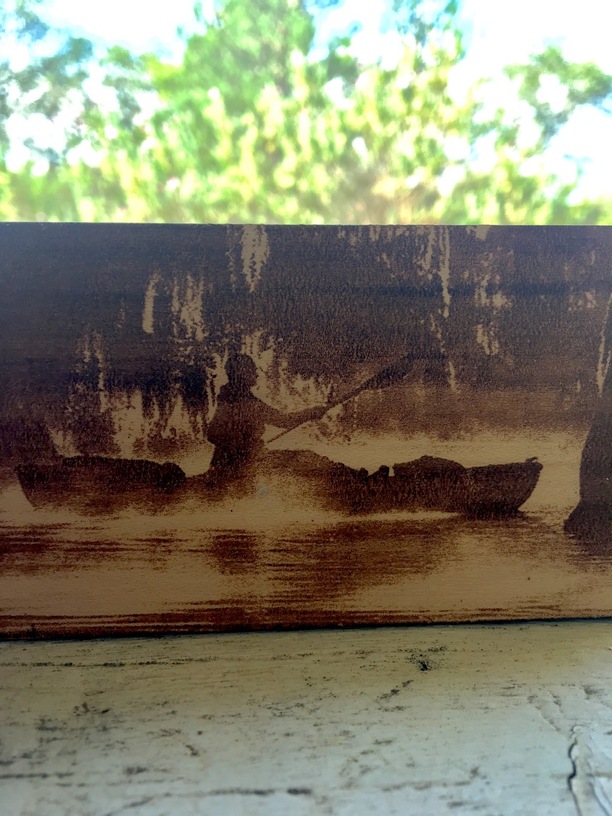
I made one too. Processed in Photoshop, mapped to grays (don’t remember settings) on PG plywood (meant to grab hardwood - oops). And a bad picture - my bad. I included the chromatic aberration for free.
I have no idea what the wood I am using is. I had bought it last year for similar plaques, and cut them on my other laser then. Had some wood left over, so used the same this year.
The wood is 0.2" thick, and needed three passes at full power and 230 speed to cut clean through (well, mostly clean, still had to work a few puzzle pieces free). Doing a 1,000 speed 0->100 dither on this stuff barely makes a visible change in the surface (with PRO tube).
I am running a new cut on some 1/8" baltic birch ply. I have a feeling that the particular wood I am using just doesn’t do engrave very well. Your 600 results are precisely what I wish I had been able to get.
Few quick notes:
Well that is very disappointing. It is clearly a bug but you won’t address it unless it can be re-created on Proofgrade. What if it doesn’t happen on PG? It is still a major bug that the laser doesn’t fire at all on dark areas at certain speeds with certain settings. You should be able to log enough information in the cloud to reproduce the job as you have all the information. You don’t need to have the actual piece of wood. The only unique thing about it is the depth measurement and you can log that.
Okay, I ran the cut last night on 1/8" Baltic Birch:
Ran at 1,000 again, and again had empty Kayak and rider.
So, at this point I am willing to try running it on some of my Proofgrade sheets and send in a proper bug report, because something fishy is indeed happening. As others have had success, it would appear potentially to be specific to my unit. So I will be super careful to detail precisely every step I take along the way to the final failure I continue to obtain.
I suggest asking for a replacement of your PG sheets as part of the bug report.
With respect to wood, the poplar sheets Lowe’s has seem to work decently. Oak plywood does not engrave well (tried 2 pics so far, the grain gets eroded very unevenly, so you see contrast from the grain vs the actual engrave). Got the oak as it was just a few pennies more than the birch they had…it does cut nicely though. Picked up a bit more of the poplar planks and a piece of pine…hopefully will have some time this weekend (their acrylic smells way worse than proofgrade…but needed some quarter inch in a hurry…)
I am wondering if it is a combination of size and speed along with the dithering? With some of the other tests people have varied the size, too.
I hope you are able to reproduce with  !
!
Agreed. @dan, clearly it’s not a material issue. The laser doesn’t know or care what the material is. It was told to fire and it didn’t. Or it wasn’t told to fire and it should have been. It’s also possible there’s some flaw in the image itself. Nobody’s asking to make it look good on some random material… This is an issue that should be addressed regardless of what material was fed. If you didn’t make ![]() materials would you simply not support the laser at all?
materials would you simply not support the laser at all?
I agree that the lack of support regarding non-Proofgrade is VERY annoying.
However… from the side of myself that often helps troubleshoot for other people, and from my efforts to fix this engrave on my own… There are a LOAD of potential variables to deal with. Anything at all which can be done to reduce the variables helps the Troubleshooting effort.
So, Proofgrade is a material with largely known properties. And more importantly, there are pre-assigned settings. I am not sure if there are specific Proofgrade settings in place for photoengraving, as I never tried it yet. But if there are, then it brings things considerably closer to a known-good.
It would be nice if the Glowforge help team would try provided designs on Proofgrade themselves, rather than dismissing people who don’t use some of their own supply. But, again, I can see a reason to not practice this way as a default.
I haven’t had time to run this on Proofgrade woods yet, but intend to do so by the end of next week at least (honestly takes little to set it up and run again, but having the machine whir in my ear for an hour and a half is a nuisance that I have dealt with quite enough this last week).
I get that. But common sense has to play a part as well. If I stick anodized aluminum in and the laser never fires at all, it’s painfully obvious that the laser didn’t think to itself “Oh. This isn’t ![]() material. I’m going to do something bizarre.” In fact, it didn’t think anything at all and would have behaved exactly the same if it was aluminium or
material. I’m going to do something bizarre.” In fact, it didn’t think anything at all and would have behaved exactly the same if it was aluminium or ![]() maple hardwood. And if Support comes back and says “Well try it on
maple hardwood. And if Support comes back and says “Well try it on ![]() and see what happens” and it works, that tells us nothing at all. I’m just saying to address an issue as a human being and think about what’s happening.
and see what happens” and it works, that tells us nothing at all. I’m just saying to address an issue as a human being and think about what’s happening.
On the other hand, there are certainly paths within the S/W that are different depending on whether you are using Proofgrade or not. The laser doesn’t care, but the hundreds of thousands of lines of code may. And I can think of different results that you would see on anodized aluminum vs. wood that a novice might mistake as S/W failure.
Yes so this problem might not happen if you use PG settings. It is still a major bug though, which needs to be debugged with the OP’s settings. It doesn’t matter what is under the laser when recreating it. GF was never sold to only work on PG materials.
Nobody, including support, ever suggested that the GF is designed to only work on PG. But using PG with the same manual settings is the best way for them to debug the problem. I can think of a reason unrelated to any problem with the GF or material as to why the person is missing in the image. But it’s not always useful for each of us to speculate. I don’t have the time to test right now. So let him follow the requested steps.
Working support is always a nightmare and the Support staff must handle each problem step by step. Never ever trust a smart person to do logical things. The more experience a user has the more likely they are to make assumptions in the debugging process. So reducing the variables is the most effective use of time.
If I were tasked with creating a system like the GF cloud I would put in place a good logging system that stores all the settings, artwork placements, height measurements, etc, for every job. Then if a user reports a bug all you need is for them to supply the time and the artwork and then you should be able to recreate the motion plan sent to the GF and run it on a simulator to see if is wrong. No need to laser anything to debug a problem like this.
Does the red preview that appears before the button press have enough detail to show errors like this? I.e. would you be able to see the boat was missing without lasering anything?